CATEGORIES:
BiologyChemistryConstructionCultureEcologyEconomyElectronicsFinanceGeographyHistoryInformaticsLawMathematicsMechanicsMedicineOtherPedagogyPhilosophyPhysicsPolicyPsychologySociologySportTourism
Animating the Results
In this section, you view the analysis you just ran. ADAMS/Car has already loaded the analysis results files for you.
1) From the Reviewmenu, select Animation Controls.
2) Select the Playtool  .
.
3) If you want the vehicle to always be in the center of the screen, do the following:
Ÿ Toggle Fixed Baseto Base Part.
Ÿ Right-click the text box under Base Part, point to Body, and then select Browse.
The Database Navigator appears.
Ÿ From the list under MDI_Demo_Vehicle, double-click TR_Body, and then double-click ges_chassis.
4) If you want to see the path the vehicle takes, do the following:
Ÿ Toggle No Traceto Trace Marker.
Ÿ Right-click the text box under Trace Marker, point to Marker, and then select Browse.
The Database Navigator appears.
Ÿ Double-click TR_BODY.
Ÿ Double-click ges_chassis.
Ÿ Double-click cm.
5) To run another animation with either of the options presented in Steps 3 or 4, select the Playtool.
ADAMS/Car animates the vehicle.
6) To return the assembly to its initial configuration, select the Resettool  .
.
Plotting the Results
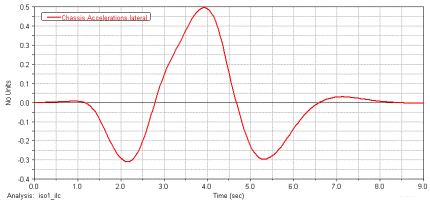
In this section, you create two plots that represent the following:
n Vehicle lateral acceleration as a function of time
n Roll angle of the vehicle as a function of the lateral acceleration
To create a plot of the lateral acceleration with respect to time:
1) From the Reviewmenu, select Postprocessing Window.
2) Verify that Sourceis set to Requests.
3) From the Simulationlist, select fveh_test_sin.
4) From the Filterlist, select user defined.
5) From the Requestlist, select chassis_accelerations. You might have to scroll to see this option.
6) From the Componentlist, select lateral.
7) Set the Independent Axisto Time.
8) Select Add Curves.
ADAMS/PostProcessor displays the plot you requested, as shown next:
Date: 2015-12-18; view: 1272
| <== previous page | | | next page ==> |
| Defining Hub Attachments | | | Modifying the Full-Vehicle Assembly |