CATEGORIES:
BiologyChemistryConstructionCultureEcologyEconomyElectronicsFinanceGeographyHistoryInformaticsLawMathematicsMechanicsMedicineOtherPedagogyPhilosophyPhysicsPolicyPsychologySociologySportTourism
Introduction to Polymer Science and Technology
Mechanical properties
 1500 -
3 6 9 12
deflection, mm
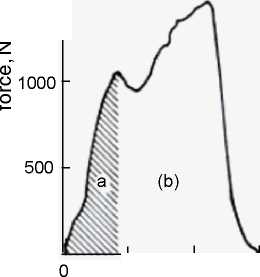
Figure 6.20Force-deflection trace for a 4 mm thick sort glass-fibre reinforced PP plaque: (a) crack initiation (the hatched area is the energy expended up to the crack initiation), (b) crack propagation (source: Akay and Barkley 1985)

4 6 8 10
Deflection, mm
Figure 6.21Photograph of an impact event for an injection-moulded fibre-reinforced PP plaque (the red arrow on the force-deflection trace
indicates the instant of photography) (source: Barkley and Akay (1992)
The associated ISO test standard for instrumented impact testing is ISO 6603-2: 2000, but for thinner materials less than 1 mm thick ISO 7765-2: 1994 should be used. The tests produce force-deflection traces, from which various results that are indicated by the standard methods can be extracted: the maximum force, the deflection at maximum force, the energy to maximum force, the puncture force, deflection and energy to puncture, and total energy and deflection, where the force, deflection and energy are expressed in N, mm and J, respectively. The type of failure, i.e., brittle or tough/ductile, is also recommended to be recorded.
6.7.4 Fracture mechanics approach
Fracture mechanics enables a separation of the material response from specimen geometry; however there is a reluctance/ scepticism in industry, particularly polymer-related industry, to use this concept. The standard notch impact tests are qualitative and produce at best a guide for ranking materials. Design against crack propagation in materials requires
Introduction to Polymer Science and Technology Mechanical properties
determination of fracture toughness, a material property that indicates the likelihood of a particular crack to cause catastrophic failure. Fracture toughness parameters Kc, indicates the minimum level of stress intensity to cause a specimen of the material containing a crack of certain sharpness to suffer fracture, and the corresponding release of the stored energy, Gc, are interrelated in the fracture mechanics equation for isotropic materials:
Kc = (EGc)1/2= Ycrfa1/2
where, Kc is the fracture toughness (MPa m1/2), E is the Youngs modulus (GPa), Gc is the critical energy release rate (kj / m2), of is the nominal applied stress at fracture (MPa), a is the crack length (or one-half of an internal crack length) and Y is the dimensionless calibration (correction) factor that accounts for the geometry of the specimen containing the flaw. Y is a function of (a/W), where W is the width or depth of the specimen. The values for the Y calibration factor are available for different specimen geometries and loading modes (Rook & Cartwright 1976). For an ideal case, where an infinitely large plate containing an internal crack length of 2a is under tensile load, Y2 = n.
ASTM D5045-99 standard test method, for 'Plane-strain fracture toughness and strain energy release rate of plastic materials', is designed to characterize the toughness of plastics in terms of the critical-stress-intensity factor, K., and the energy per unit area of crack surface (the specific surface energy) or critical strain energy release rate, Gc, at fracture initiation. Two testing geometries are covered by these test methods, single-edge-notch bending (SENB) and compact tension (CT). Linear elastic behaviour is assumed for the cracked specimen, so certain restrictions on linearity of the load-displacement diagram are imposed. A state-of-plane strain at the crack tip is required. Specimen thickness, therefore, must be sufficient to ensure this stress condition holds. Furthermore, the crack must be sufficiently sharp to ensure that a minimum value of toughness is obtained.
Date: 2015-12-11; view: 1416
| <== previous page | | | next page ==> |
| Introduction to Polymer Science and Technology | | | Mechanical properties |