
CATEGORIES:
BiologyChemistryConstructionCultureEcologyEconomyElectronicsFinanceGeographyHistoryInformaticsLawMathematicsMechanicsMedicineOtherPedagogyPhilosophyPhysicsPolicyPsychologySociologySportTourism
Mechanical properties
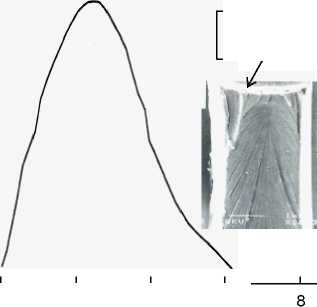
Further information on testing and the determination of fracture mechanic parameters, and on various fracture toughness data for polymer types and polymer-matrix composites are presented elsewhere (Akay 1999, pp. 533-588). One of the important factors in material behaviour under mechanical loading is the presence of any frozen-in residual stresses in materials. Some polymers, such as polycarbonate, are very sensitive to the presence of residual stresses in their fracture behaviour as demonstrated in Figure 6.22, causing a variation in impact strength values: a Charpy notched impact value of 42 kjnr2 was obtained with specimens taken from as-moulded injection moulded plaques, which deteriorated to 6 kjrrr2 with specimens taken from plaques that were annealed at temperatures both below and above the material's glass transition temperature (140 °C) (see Akay & Ozden 1996).

|
| 400 ■ |
| deformed notch line |
| 300 - p 200 - 100 - 0 - |
 0.5 1
0.5 1
deflection, mm
4 6
deflection, mm
(b)
Figure 6.22Instrumented impact force-deflection traces for notched specimens, and photograph of fracture surfaces for: (a) annealed PC and
(b) as-moulded PC (source: Akay & Ozden 1996)
The presence of compressive stresses at the surface of notched specimens enhances the impact strength by promotion of the plane-stress failure, the material yields during the impact failure as can be seen from the deformed notch line in Figure 6.22 (b). Heat-treated specimens fail in a brittle manner as indicated by the straight notch line and the smoother fracture surface in Figure 6.22 (a).
However, a similar study on ABS copolymer has shown no significant variation between the impact properties of the as-moulded and annealed specimens (Akay & Ozden 1995).
6.8 Bearing strength
Bearing strength is particularly relevant in bolted joints. Successful adoption of bolted joints depends on a clear understanding of pin bearing strength, which is of critical importance since such joints are employed in critical engineering applications such as aerospace structures. The serious accident that an Airbus 300 jet aircraft suffered in 2001 during its flight from New York to Santo Domingo, Dominican Republic, claimed the death of 260 people onboard and five people on the ground. The accident was attributed to the tail of the plane breaking off from the fuselage under the force of swirling wakes generated by another jetliner flying at a path, approximately 1.2 km away. The tail assembly of the aircraft was constructed from carbon-fibre (CF) polymer composite and bolted on to the fuselage and the failure had occurred in the vicinity of the bolted joints as shown in Figure 6.23.
Introduction to Polymer Science and Technology
Mechanical properties
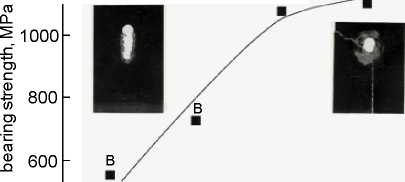
The bolted joints are vulnerable to bearing failures, where the mode of failure is complex and depends on the factors such as the structure and properties of the materials joined together, the size and the geometry of the joint, e.g., the pin-hole diameter, thickness and width of the lug, and the level of clamping force applied to the joint (see Akay 1992 and Akay & Mun 1995). Various failure modes are possible: end-section bearing (i.e., crushing failure ahead of the bolt), net-section tension (tensile failure across the reduced section), edge-section shear (double shear out parallel to the direction of load), end-section cleavage (tear out or split forward of the bolt) and a tension-cleavage combination. Any mixture of these failure modes may also be experienced, see Figure 6.24. The figure also shows the influence of the clamping force (or constraint pressure) applied to the bolted assembly on the bearing strength and the modes of failure.

|
| TIME Dunm tvJKUTteU .НИ Ian |
Figure 6.23Illustration of the aircraft tail section failure at the November 2001 crash (source: TIME, November 26, 2001)
 1200
1200
B+T+C
B+T+C B+T+C
10 20 30 40
constraint pressure, MPa
Figure 6.24Bearing strength vs. constraint pressure for a CF/epoxy resin composite system with associated failure modes indicated as В -
bearing, T- tension and С - cleavage (source: Akay 1992)
Figure 6.23 shows that the tail assembly has snapped off at the bolted joints, however without a closer inspection, it is difficult to conclude whether the failure is caused by an inherent weakness in the composite material or by an actual aspect of the joint.
Introduction to Polymer Science and Technology
Mechanical properties
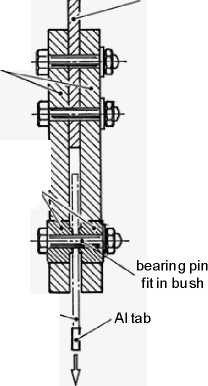
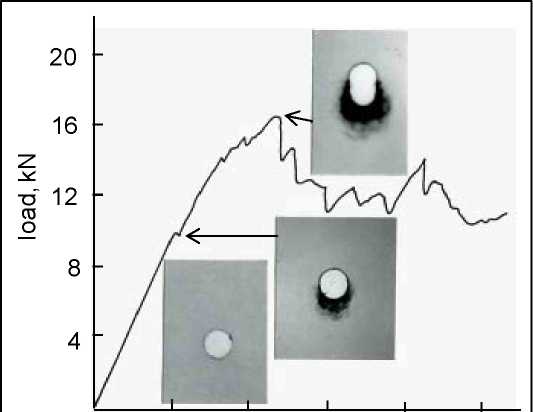
A standard test method for bearing strength of plastics is given in ASTM D953-10 and for polymer-matrix composites in CRAG test methods (Curtis 1985). The tests are normally conducted in tensile mode, employing a test fixture shown in Figure 6.25. The test produces a load-displacement graph (see Figure 6.26.), from which the bearing strength properties; expressed in terms of the maximum stress sustained by the specimen, the stress at initial failure, and the stress at which the bearing hole is deformed by 4% of its diameter; may be determined.
| hardened-steel side plates hardened-steel bushes sliding fit in side plates' specimen . |
 load
load
spacer plate
Figure 6.25An illustration of specimen test fixture for bearing strength
Introduction to Polymer Science and Technology
Mechanical properties
|
2 3 4
hole deformation, mm
Figure 6.26A typical load-displacement curve with associated X-ray micrographs of specimens at various levels of load on CF/epoxy composites (loading at 1 mm/min via 4.8 mm diameter pin) (source: Akay 1992)
6.9 Environmental stress cracking
Environmental stress cracking (ESC), also known as solvent cracking or stress corrosion cracking, is produced in a solid when placed in an aggressive liquid environment. The level of stress required to produce cracking/fracture is less than that required in the absence of liquid. Residual frozen-in stresses may be sufficient even in the absence of any additional applied stress to produce cracking (Alger 1989). The resistance of polymeric materials to ESC is known as environmental stress crack resistance (ESCR).
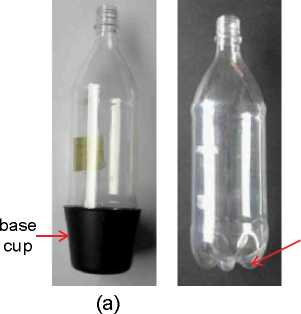
The phenomenon is responsible for many failures in plastic products/components in service (It is claimed that about 25 % of plastic part failures are relate to ESC, see Jansen 2004). A classic example of the phenomenon can be seen when one examines the history of the development of the current soft drinks PET bottle. These bottles were originally made from glass, a 2-litre bottle weighing almost 600 g, in 1980s PET bottles were introduced, using the same shape design as the glass bottles, which had a small radius between the body of the bottle and its flat bottom. This design made plastic vulnerable to ESC in the presence of the drink, creating a mess and shock in customers as the bottom fell out of them when the customers lifted the products from supermarket shelves. To alleviate the problem, the design of the bottle was changed such that the bottles had rounded hemispherical bases, but they had to be seated and glued into a separate base cup (Figure 6.27 (a)) with a flat bottom to make it self-standing. Such two piece constructions do not lend themselves to recycling and were relatively expensive in terms of material and production costs. In 1990s, the current design of bottles was introduced; having petaloid bases (multiple bulges), Figure 6.27(b), to provide a self-standing ability with a one piece construction without introducing any stress-rising sharp edges. The base cup was no longer necessary.
Introduction to Polymer Science and Technology
Mechanical properties
|
| petaloid base |
| (b) |
Figure 6.27PET bottles: (a) fitted into a base cup, and (b) one-piece bottle with a petaloid base
The progression made in the design of PET bottles for carbonated beverages had many desirable outcomes: as well as exhibiting much greater ESCR, the bottles weighed less. The weight of 2-litre PET bottles was reduced from approximately 66 g in 1980s to 40 g in 2000s. This light-weighting meant material resource conservation, waste reduction and more efficient transportation of the product.
There are a variety of tests that are available for assessing the resistance of thermoplastics to ESC. These are based on the application of either constant strain or constant load (stress) to specimens and monitoring crack initiation and propagation. The equipment for constant-strain based tests tends to be simpler and less costly.
Determination of environmental stress cracking resistance of plastics by a constant pre-strain test include a bent strip method BS EN ISO 4599:1997, where the test pieces are clamped to a former of known radius before being brought into contact with the liquid at the specified temperature. Different magnitudes of strain are generated by employing formers with different radii, and the test aims to determine the minimum strain that causes a specific type of failure. An alternative method for ESC determination by means of a constant-strain test is the ball or pin impression method BS EN ISO4600:1998. The test uses a pin or ball of known oversize, which is pressed into a reamed hole in the test piece to produce the strain. Different sized pins or balls produce a range of strains. The test is applicable to finished products and to test specimens.
Another constant strain method was developed by Bell Laboratories in the USA for testing the ESCR performance of polyethylene cable insulation and, therefore, known as the Bell Telephone Test and is detailed in ASTM D1693 - 10, entitled 'Standard Test Method for Environmental Stress-Cracking of Ethylene Plastics', the test involves introducing a slit/notch of a certain depth into a small rectangular strip of material and placing it in bent form into a holding clamp (a square-bracket holder with holes along its back to enable uniform exposure of the specimens to the test fluid). The assembly of the specimens are then immersed in a specified chemical solution in a test tube (Figure 6.28). The test tube is sealed and placed in a constant-temperature water bath. Specimens are inspected periodically for the development of any cracks from the notch. Cracks generally develop perpendicular to the notch, and run to the edge of the specimen. Initially crazes (tiny cracks) initiate and grow perpendicular to the notch direction in the form of a web; the crazes then coalesce and extend the notch tip. This failure repeats itself and crack propagation continues (see Jansen 2004).
Introduction to Polymer Science and Technology
Mechanical properties

Figure 6.28Bell telephone test: (a) notched specimen, (b) specimens assembled in the holder, (c) specimens placed in the test fluid, and (d) a
battery of tubes with specimens in a hot-water bath (source: IDES)
BS EN ISO 6252:1998 is a constant tensile-stress method for the determination of ESC for plastics. A dumbbell-shaped specimen, immersed in a chemical reagent, is placed under a given tensile load until it breaks, and the time to failure is recorded.
Introduction to Polymer Science and Technology
Mechanical properties
6.10 Fatigue and wear
These properties indicate the response of the material to dynamic loading. The subject area is covered in general by Brown (1999, p245), for plastics by Hawley (1999, p334), for elastomers by Lewis (1999, p291) and with respect to fracture mechanics by Akay (1999, p541). Fatigue covers progressive weakening and ultimately breakdown of material in a component from repeated vibrations, and wear is generally taken to mean loss of material caused by repeatedly rubbing together of two surfaces, i.e., abrasion. Almost all moving parts, engineered or otherwise, could suffer from these forms of failure, for example, tyres, bearings, gears, helicopter propellers, turbine blades, engines, conveyor belts, moving shafts, limbs/equipment of sportspersons (e.g., tennis elbow), wrists/fingers of typists (an example of'Repetitive Stress Syndrome', and hip and knee prostheses.
6.10.1 Fatigue
Fatigue testing, as distinct from dynamic mechanical thermal testing, takes the material/product to failure in order to estimate its expected life, and concentrates mainly on material strength, although loss of stiffness is also an important criterion in applications such as aerospace, therefore, materials would be tested for loss of stiffness under, for instance, torsion oscillations.
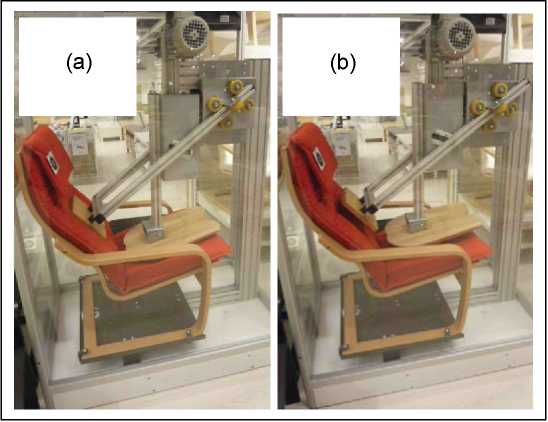
| Figure 6.29Testing home chairs for repeated (a) sitting down and (b) getting up (visit an IKEA store to see the test in action) |
Fatigue testing can be conducted under any mode of loading (e.g., bending, torsion, compression, tension) and it is conducted at a given frequency between either set stress (load controlled) or set strain (strain controlled) values. The tests are normally conducted by superimposing the dynamic cycles onto a static preload or strain - this is more akin to the conditions of real applications/usage and also avoids zero strain in the cycle, which can be difficult to control. The mode of loading, therefore, may become tension-tension or compression-compression. The other obvious test variable is the wave shape selection, e.g., sinusoidal, square, saw-tooth (zigzag). Tests can also be conducted in special environments as well as under standard laboratory conditions. Of course, in certain industrial sectors, particularly where there are serious safety concerns, finished parts and the complete products are fatigue tested. Even ordinary household products such as furniture are tested for long-term strength and durability: Figure 6.29 shows the fatigue testing of an armchair, simulating sitting down, moving and getting up.
Introduction to Polymer Science and Technology
Mechanical properties
Compared with metals, plastics exhibit viscoelastic damping and they have lower heat conductivities and, therefore, are prone to hysteretic heating of the specimen during testing. Accordingly the tests for plastics tend to be conducted at low frequencies. Heat built up in the specimen lowers fatigue resistance, particularly if the temperature reaches the vicinity
of the T of the material.
G
There is a scarcity of standard test methods on fatigue testing: ASTTM El 823-10a, entitled, 'Standard terminology relating to fatigue and fracture testing'; BS 3518-1:1993 'Methods of fatigue testing. Guide to general principles'; BS 7270:2006 'Metallic materials. Constant amplitude strain controlled axial fatigue. Method of test' are designed for metallic materials. The only method for polymeric materials, ASTM D671-93 'Standard test tethod for fiexural fatigue of plastics by constant-amplitude -of-force' was found to be unsatisfactory and was withdrawn in 2002, and so far has not been replaced. One of the problems encountered was that the associated test machine, for cantilever bending fatigue, operated at a fixed frequency of 30 Hz!
Fatigue testing equipment are normally a servo-hydraulic system and modern machines provide flexibility for the selection of various parameters. In an actual test, conducted, for instance, in load-amplitude controlled mode, a maximum stress, S , and a minimum stress, S . , is selected, giving a stress ratio R = S . / S . The specimen is cycled at a given ferquency
max mm ° ° mm max L ' tj i *
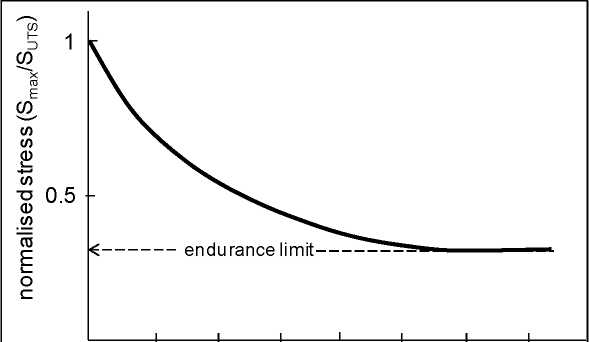
until it fails and the number of cycles to failure, N, is noted. The tests are continued at progressively reduced values of Smax, maintaining the same R value and frequency, until sufficient data is collected to establish a smooth "S-N curve", which is normally a plot of maximum stress against log (cycles to failure). The S-N curve may be constructed until a specific number of cycles are reached, or until an asymptotic limit (i.e..until there is a levelling off in the Smax values) is established, yielding the "endurance limit" value for Smax, see Figure 6.30. Note that the first data point on the S-N curve should be the static failure stress (i.e., the strength of the material under the same mode of loading). The maximum stress in the S-N curve can also be presented as normalised stress, i.e., as a fraction of the static strength of the material (UTS) (an example of this can be seen in BASF-2 (2003) for short glass-fiber reinforced PET).
|
| 2 3 4 5 6 7 cycles to failure (Log N) |
| Figure 6.30S-N curve |
Other possible outcomes for fatigue testing include "modulus decay curve", which is determined by appropriately attaching an extensometer to the specimen, periodically stopping cycling temporarily to take data for determination of E and then resuming cycling. The test is terminated near the end of the fatigue life (i.e., prior to fracture), as estimated from S-N data.
Introduction to Polymer Science and Technology Mechanical properties
6.10.2 Wear
Wear is not a fundamental material property, it involves friction, localised adhesion, fatigue and tearing to various degrees depending on the material type and, therefore, at best suitable for comparing materials. Wear/abrasion tests mostly give a measure of the weight loss in the test piece, which can be converted to loss in volume if required, and sometimes loss of thickness and gloss/transparency as in coatings and laminates.
The main standard method for measurement of wear resistance of polymeric materials is the Taber Abrasion Test as specified in ISO 9352: 1995 or ASTM D1044-08. In ISO 9352: 1995 test, two rollers covered with abrasive paper abrade the surface of a rotating test specimen; see Figure 6.31, for a specified number of cycles under a specified load. The magnitude of the abrasion depends on the grade of the abrasive medium and the down force of the wheels on the test specimen, and the result is expressed as material loss given in milligrams per cycle of rotation. The ASTM D1044-08 test method specifies that the change in haze of the test specimen to be determined as a measure of abrasion resistance.
Introduction to Polymer Science and Technology
Mechanical properties
| abrasive ^ wheels"""^/ | N | |
Figure 6.31Taber abrasion setup (source: Taber Industries)
An associated property is friction, which can be defined as resistance to motion when substances slide over each other. It is proportional to the compressive normal force between the surfaces, and the property of the coefficient of frictionis defined as the ratio of the frictional force to normal force. One of the associated standard test methods is BS EN ISO 8295:2004, "Plastics, film and sheeting. Determination of the coefficients of friction". There are other test methods that are specific to certain applications, for example, for flooring where anti-slip characteristics are important, a swinging pendulum test is used. This was designed by the Road Research Laboratory (now the Transport Research Laboratory) of the U.K. in the late 1950s, which is standardised in BS 7976:2002 in three parts: BS 7976-1 specifies the features, dimensions and characteristics of the pendulum tester. BS 7976-2 describes a method of operation for this pendulum tester, and a method of calibration is specified in BS 7976-3. Its equivalent in ASTM is ASTM E303 - 93(2008), "Standard test method for measuring surface frictional properties using the British Pendulum Tester".
The pendulum slider, Figure 6.32, can be fitted with a pad of either 4-S rubber or TRL rubber with different hardness and resilience values. During the test, similar to impact testing, the pendulum is released from a given height, and at the bottom of its swing it slides over a given area of the specimen surface. The energy absorbed by the sliding process is determined on the basis of the climbing height of the pendulum and results in a measure of the grip offered by the surface tested. The pendulum tester is fitted with an appropriate scale depending on the sliding length traversed on the specimen surface, and enables a direct reading of a test result in terms of a pendulum test value (PTV), which is proportional to the energy absorption and indicates the level of grip or skid resistance of the surface tested. The test is often conducted under dry or wet conditions. PTV value provides a guidance, above which the risk of slip is extremely low for able-bodied people (under standard laboratory conditions, the guidance PTV values of 65 and 75 are indicated for TRL and 4S sliders, respectively).
Introduction to Polymer Science and Technology
Mechanical properties
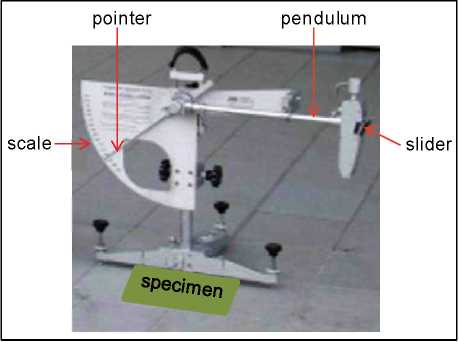
Figure 6.32Pendulum slip resistance test
6.11 Self-assessment questions
1. Compare the elongation to failure value obtained from a plot of stress-strain curve for a brittle plastic with the
one obtained by measuring the length of the broken halves of the specimen. What difference would be expected
and why?
2. The mechanism of plastic deformation in ductile polymers is different than that in metals because:
a) it occurs by the movement of dislocation
b) it is reversible by heating
c) it takes place by stretching of cross-links
d) it takes place by slippage of chains
3. Sketch on the same graph paper (on the same plot) the stress-strain curves for: (a) atactic PS, (b) HDPE, and
(c) a copolymer of styrene and butadiene.
4. Draw stress-strain graphs for two polymers: one is stiffer than the other and exhibits a yield point and the other
shows no clear yield point but is much tougher.
5. A metal ball is dropped from a height of 2 m onto a specimen cut from a plastic sheet. The specimen punctures
and the damage consists of a hole about the size of the ball. The same test is conducted by dropping the ball
from a height of 5 m, and this time the specimen shatters to pieces. Explain why this is so.
6. From the stress-strain plots shown in Figure 6.7, determine the tensile strength, yield strength and % elongation
to failure for HIPS at room temperature.
7. A pillar of length L, made from a polymer-matrix composite of density, p, is erected upright. Show that the
compressive strain under its own weight at a height of h from the ground is
б = p(L-h)g / E.
Express the level of compression (the reduction in length) in terms of L and h by using the data for a composite
material of density of 2000 kg/m3 and E of 20 GPa. Show that the length of the pillar should not be greater than
5.4 m in order to avoid an average compression of 15 (im.
Answer: AL = L(L-h)xl(r6.
8. Often a range of values rather than a single value are quoted for the mechanical properties of semicrystalline
TPs and thermosetting plastics, why?
Introduction to Polymer Science and Technology Mechanical properties
9. Why are some polymers hygroscopic? How are the mechanical properties affected by moisture, explain by giving
specific examples of polymers and mechanical properties.
10. By using the data on Figure 6.12, draw an approximate creep curve for a Nylon 66 bar of 100 mm2 cross-sectional
area under a load of 2 kN for over a year.
11. Bulging and emaciation, depending on the mode of deformation, enables the volume of a rubber specimen
remain constant, show that its Poissons ratio is 0.5. Assume that the specimen is a square prism of length L and
cross-section A = w2.
Hint: AV = A(AL) = LA A + AAL = 0.
12. With the aid of Table 6.1, select a polymer that floats on water, has a minimum Youngs modulus Of 1 GPa and
remains ductile/tough below 230 K.
13. With the aid of Table 6.1, select a polymer that is transparent, remains rigid in boiling water and has a specific
gravity not greater than 1.2.
14. Determine the compression modulus of a block of rubber of a square face of 200 mm side and 50 mm thickness
with a Youngs modulus of 3 MPa. The rubber block is to be used as a bearing material sandwiched between two
steel plates attached to its faces, what deflection would it undergo if loaded with a mass of 5 tonnes?
Answer: If с is the thickness of the block, then its deflection under load, Ac = 6.8 mm.
15. A bridge of 300 tonnes mass is to be supported by four rubber bearings of square surface areas. Each has to
withstand a compression stress of 5 MPa. Calculate the dimensions of the bearing needed to ensure that under a
horizontal force of 60 kN, the shear deflection does not exceed 25 mm. Assume the shear modulus of the rubber
to be 1 MPa. How many steel plates should be used in each bearing in order to restrict the vertical deflection
to 3 mm under the static deck load?
Answer: the surface side of the block, a = 380 mm, and the thickness, с = 61.25 mm.
By using the shape factor parameter, S, it can be shown that the total thickness of 61.25 mm should be split into three layers so that each layer would have a thickness less than 24 mm and therefore will not compress more than 3 mm. Therefore, together with the outer plates, a total of four steel plates will be needed for the bearing.
16. Name and sketch a simple mechanical model that will describe the stress relaxation in polymers. A sample of
PVC flexible cable is tested at 27 °C to determine its stress relaxation properties. The stress decreases from 6 MPa
to 1 MPa in 50 h, calculate the relaxation time.
It is intended to manufacture coiled cords for telecommunication equipment using the PVC flex, and therefore the relaxation time should not be greater than 3 h for efficiency in production. Determine what should be the minimum temperature of the processing oven to achieve this. The activation energy for this process is 20 kj / mol and the molar gas constant = 8.314 J / (mol.K). Answer: r = 28 h; oven temperature: 142 °C
17. Distinguish between the pendulum impact tests of Charpy and Izod.
18. "One of the important factors in material behaviour under mechanical loading is the presence of any frozen-in
residual stresses in materials", verify this statement in terms of impact behaviour of some specific plastics.
19. A brittle polymer component that has an internal crack length of 0.58 mm must not fail when a tensile load is
applied. Determine the maximum stress (in MPa) that maybe applied if the specific surface energy of this polymer
is Gc = 0.50 J/m2. Assume an elastic modulus of 2.9 GPa, and that the calibration factor, Y, is given as Y1/2 = n.
Answer: af = 1.26 MPa
20. Draw a typical impact force-deflection curve for a semicrystalline polymer and describe the sort of information
about the impact properties of the material that can be extracted from such a curve.
Introduction to Polymer Science and Technology Mechanical properties
21. In a bolted mechanical joint, which property of the material is relevant for the integrity of the joint under load?
What modes of failure can be expected during the failure of such a joint under tension?
22. Define ESC in polymeric products and describe how it led to the development of present-day PET bottles for
soft drinks. What other desirable outcomes besides improved ESCR has resulted from the changes to the PET
bottles over time?
23. Describe different ways of plotting fatigue-life expectancy curve for polymeric materials; define what is meant
by the fatigue endurance limit.
24. What properties indicate the response of a material to dynamic loading? Give actual engineering examples where
these properties are relevant.
Introduction to Polymer Science and Technology Thermal properties
7 Thermal properties
"In science there is only physics; all the rest is stamp collecting." Lord Kelvin (William Thomson)(1824-1907) - Britain's first scientific peer.
Only a Belfast-born Irish man can make such a daring statement, a challenge to the dye in the wool chemists amongst us! Lord Kelvins statue welcomes you to the beautiful Botanic Gardens in Belfast, next to Queens University Belfast, what a privilege for the people of QUB and Belfast to have such a well-kept garden in the heart of the city.
Lord Kelvins contribution to physics includes the fundamental concept of the Kelvin thermodynamic temperature scale, where the "infinite cold" (absolute zero) was the scales null point, -273 °C, and which used the degree Celsius for its unit increment. The kelvin symbol is always a capital K. In the SI naming convention, all symbols named after a person are capitalized; in the case of the kelvin, capitalizing also distinguishes the symbol from the SI prefix "kilo", which has lowercase к as its symbol.
Thermal properties of materials indicate mainly the physical response of the materials to the input of heat and the resulting change in their temperature. In the short-term the physical effects of temperature variation on the material are reversible, whereas the long-term effects are generally dominated by chemical changes and are not reversible. The long-term effects at elevated temperature are usually that of degradation/aging, causing deterioration in mechanical, physical and chemical properties.
Thermal properties include coefficient of thermal expansion (CTE), specific heat capacity, thermal conductivity, glass transition temperature (also secondary glass-transition temperatures), heat-distortion temperature, softening temperature and melting point. These properties are all interrelated, e.g., the CTE values can be significantly different on either side of T .
The references that cover the topic of thermal properties for polymers include a comprehensive two volume coverage by Turi (1997), general introduction of the basic principles by Brown (1999, p263), a wide range of standard test methods by Hawley (1999, p341), dynamic mechanical thermal analysis by Gearing (1999, p501), thermal conductivity, thermal diffusivity and specific heat by Hands (1999, p597) and a book that covers all the principles and the applications of the thermal analysis test methods by Ehrenstein et al. (2004).
There are a variety of standard test methods for determining thermal properties, some of which are material specific, employing equipment and techniques of different degrees of sophistication. The equipment for performing thermal analysis, i.e., monitoring of the property change with temperature, used to be basic and the tests time consuming. However, the advent of a range of instrumented and soft-ware based commercial thermal analysis equipment/techniques in the last few decades have made these tests less tedious, very accurate and very efficient with many alternative ways of presentation of the measured data. These techniques include differential scanning calorimetry (DSC), thermomechanical analysis (TMA), thermogravimetric analysis (TGA), dynamic mechanical thermal analysis (DMTA)/dynamic mechanical analysis (DMA) and dielectric analysis (DEA). These techniques and the properties and the variation of the properties with temperature that can be determined with these techniques are covered in the succeeding sections.
Introduction to Polymer Science and Technology Thermal properties
7.1 Differential scanning calorimetry
The differential scanning calorimeter measures change in enthalpy, i.e., the amount of heat that is either absorbed (an endothermic reaction) or released (an exothermic reaction) by a substance undergoing a physical or a chemical change. During a DSC test, the sample is subjected to a controlled temperature/time programme (e.g., 10 °C/min heating rate) and the heat flow to and from the sample is measured.
Two very identical equipment/techniques are available, viz. differential thermal analyser (DTA) and DSC:
DTA, also known as heat-flux DSC, consists of one block furnace for both specimen and reference material cells. The cells are harnessed with thermocouples, and heated or cooled simultaneously to a controlled temperature programme. The temperature difference (AT), between the sample and the reference material is measured while both are subjected to identical heat input, and the heat flux (i.e., heat required to bring about material transitions) is calculated from calibration data using AT.
DSC, power-compensated DSC, consists of two small separate furnaces/blocks housing the cells for the sample and the reference. Thermal power is supplied to the individual heaters in the blocks to maintain the sample and reference at the same temperature, even during a thermal reaction in the sample. Therefore, any variation between the furnace temperatures, due to any exothermic/endothermic reactions in the specimen, is compensated by varying the power input. Because of the direct measurement of heat flow, it is often also called heat flow DSC. Direct measurement of heat capacity and enthalpy makes this technique generally preferable for quantitative analysis. Furthermore, large single DTA furnaces heat and cool at a slower rate than the smaller DSC furnaces. For the vast majority of basic applications, the data from both types of instruments are comparable and both instruments can give good data, and in the succeeding coverage, unless required, only the term DSC will be used.
Using a differential scanning calorimeter any transition in a material that involves a change in heat content of the material
can be detected and measured, accordingly, the following properties are generally determined:
T (glass transition temperature), the temperature at which an amorphous polymer or an amorphous part of a crystalline
polymer goes from a hard brittle (glass like) state to a soft rubbery state with rising temperature.
Tm (melting point), the temperature at which a crystalline polymer melts.
Tc (crystallisation point), the temperature at which a polymer crystallises upon heating or cooling. AHm (heat of fusion),
the amount of energy (J/g) which a crystalline polymer sample absorbs while melting, and is used in determining %
crystallinity,
AHc (heat of crystallisation), the amount of energy (J/g) a sample releases while crystallising.
С (specific heat capacity at constant pressure), the amount of heat required to raise the temperature of a substance by
1°C, in other words, С indicates the amount of energy a unit of matter can hold.
P
DSC is also used to measure curing, cross linking, phase changes (e.g., solid-state (s-s) transitions), oxidative degradation or decomposition by vaporization or sublimation. The processes/reactions of crystallisation, curing, cross linking, oxidative degradation are exothermic, whereas melting, some phase changes and decomposition by vaporisation/sublimation are endothermic. One should, however, avoid substance decomposition in the DSC in order to prevent a subsequent cleaning problem. Substances suspected of decomposition should be tested on a TGA first.
Introduction to Polymer Science and Technology Thermal properties
The standard methods associated with DSC include:
ISO 11357-1:2009 Plastics - Differential scanning calorimetry (DSC) - Part 1: General principles
ISO 11357-2: 1999 Plastics - Differential scanning calorimetry (DSC) - Part 2: Determination of glass transition temperature
ISO 11357-3:2011 Plastics - Differential scanning calorimetry (DSC) - Part 3: Determination of temperature and enthalpy of melting and crystallization
ISO 11357-4:2005 Plastics - Differential scanning calorimetry (DSC) - Part 4: Determination of specific heat capacity
ISO 11357-5: 1999 Plastics - Differential scanning calorimetry (DSC) - Part 5: Determination of characteristic reaction-curve temperatures and times, enthalpy of reaction and degree of conversion
ISO 11357-6:2008 Plastics - Differential scanning calorimetry (DSC) - Part 6: Determination of oxidation induction time (isothermal OIT) and oxidation induction temperature (dynamic OIT)
ISO 11357-7: 2002 Plastics - Differential scanning calorimetry (DSC) - Part 7: Determination of crystallization kinetics DIN 51007, Thermal analysis; differential thermal analysis; principles
Introduction to Polymer Science and Technology Thermal properties
DIN 53765 Testing of plastics and elastomers; thermal analysis; DSC-method
ASTM D3417-99 Standard test method for enthalpies of fusion and crystallization of polymers by differential scanning calorimetry (DSC)
ASTM D3418 - 08 Standard test method for transition temperatures and enthalpies of fusion and crystallization of polymers by differential scanning calorimetry
ASTM E793 - 06 Standard test method for enthalpies of fusion and crystallization by differential scanning calorimetry ASTM E794 - 06 Standard test method for melting and crystallization temperatures by thermal analysis
ASTM E967 - 08 Standard practice for temperature calibration of differential scanning calorimeters and differential thermal analyzers
ASTM E1269 - 11 Standard test method for determining specific heat capacity by differential scanning calorimetry
ASTM E1356 - 08 Standard test method for assignment of the glass transition temperatures by differential scanning calorimetry
The outcome of a DSC test is usually presented in the form of a plot of heat flow against temperature and/or time. The standards use different notation of indicating exothermic (exo) and endothermic (endo) effects on a DSC trace; i.e., whether they are indicated as an upward or downward deflection on the ordinate axis. In a heat-flow DSC, the endothermic peaks (those events which require energy) point up, since the instrument must supply more power to the sample to keep the sample and reference furnaces at the same temperature. In a heat-flux DSC, these same events cause the sample to absorb heat and become cooler than the furnace, so they point down. The reverse logic applies to exothermic events where energy is released. The International Conference on Thermal Analysis and Calorimetry (ICTAC) (PerkinElmer 2010, p5) has set the convention that curves should follow this pattern. Most modern software systems enable the curves to be presented either way. Notwithstanding, it is important to clearly indicate the sense/direction of 'exo.' and 'endo.' on the graph.
The plots, as well as the usual DSC curves, may also include their derivative (DDSC curves) as a function of temperature. Figure7.1 shows the DSC and DDSC for a semicrystalline PET specimen scanned at 20 °C/min. The derivative can be expressed with respect to temperature or time. The DDSC plots are useful in detecting/highlighting the temperature of poorly defined transitions and also the start and end points of the measured effects. It is particularly useful in converting a step in the base line of a DSC trace that occurs at glass transitions into a peak and therefore makes it easier to read off temperature. The derivative traces serve as an aid and they are not normally included in the plots that are presented.
Date: 2015-12-11; view: 3789
| <== previous page | | | next page ==> |
| Introduction to Polymer Science and Technology | | | Introduction to Polymer Science and Technology |