CATEGORIES:
BiologyChemistryConstructionCultureEcologyEconomyElectronicsFinanceGeographyHistoryInformaticsLawMathematicsMechanicsMedicineOtherPedagogyPhilosophyPhysicsPolicyPsychologySociologySportTourism
Withdraw the shaft and remove the gear
|
4Unscrew the bolts securing the left-hand engine cover and wiring clamp and remove the cover and clamp, being prepared to catch any residual oil (see illustration).If the cover will not lift away easily, break the gasket seal by tapping gently around the sides with a rubber hammer or block of wood and levering carefully on the leverage points around the edge of the cover. Protect the frame with a piece of wood or rag while doing this. Discard the gasket as a new one must be used. Remove the dowel from either the cover or the crankcase if it is loose.
5 The operation of the starter clutch can be checked while it is in place. Remove the starter motor (see Chapter 9). Check that the idle gear is able to rotate freely anti-clockwise as you look at it from the left-hand side of the bike, but locks when rotated clockwise (see illustration). If not, the starter clutch is faulty and should be removed for inspection.
6 Withdraw the idle gear shaft from the crankcase and remove the gear (see illustration).
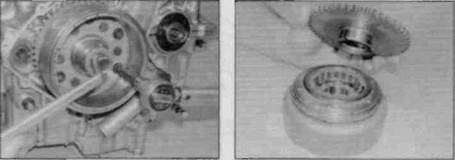
7 Remove the alternator rotor - the starter clutch is mounted on the back of it (see Chapter 9). Note:Before removing the alternator rotor, slacken the six starter clutch bolts while holding the rotor centre bolt (see illustration).II the rotor has already been removed from the bike, hold the rotor with a strap wrench to slacken the bolts.
8 Withdraw the starter driven gear from the starter clutch (see illustration). Ifthe gear appears stuck, rotate it anti-clockwise as you
withdraw it to free it from the starter clutch. If the starter driven gear does not come away with the alternator rotor, slide it off the crankshaft.
Inspection
9Inspect the starter idle gear and driven gear
teeth and renew them as a pair if any teeth are
chipped or missing. Check the idler shaft and
gear bearing surfaces for signs of wear or
damage, and renew if necessary.
| 13.7 Slacken the starter clutch boltsbefore removing the alternator rotor |
10With the alternator rotor face-down, check that the starter driven gear rotates freely in an anti-clockwise direction and locks against the rotor in a clockwise direction (see illustration).If it doesn't, the starter clutch should be dismantled.
11Unscrew the six bolts and remove
the clutch housing and the clutch from the back of the alternator rotor (see illustration).
12Inspect the condition of the rollers and the roller cage inside the clutch assembly (see illustration).If they are damaged or worn at any point, the starter clutch should be renewed - individual components are not available.
13Inspect the driven gear contact surfaces for signs of wear and scoring.
Installation
| 13.8 Withdraw the gear and inspect for wear or damage |
14Clean the starter clutch bolts and apply a drop of locking compound to their threads.
15 Fit the clutch assembly and the clutch housing to the rear of the rotor and tighten the

|

|

Date: 2016-01-14; view: 1668
| <== previous page | | | next page ==> |
| Apply grinding compound very | | | B ... on the leverage points around the cover (arrowed) |