CATEGORIES:
BiologyChemistryConstructionCultureEcologyEconomyElectronicsFinanceGeographyHistoryInformaticsLawMathematicsMechanicsMedicineOtherPedagogyPhilosophyPhysicsPolicyPsychologySociologySportTourism
BUTTON-HOLE STITCH FOR BEGINNERS
Materials— No. 8 needle, No. 40 colored thread, and a folded and basted strip of cotton cloth.
Button-hole stitch—
1. Make a small knot in the thread.
2. Place the folded edge of the cloth across the cushion of the forefinger of the left hand, allowing the tip of the finger to show.
3. Hold the cloth firmly, keeping the end of the thumb near the folded edge.
4. Work from you, instead of towards you.
5. Draw the needle through from underneath, close to the folded edge of the cloth, which will bring the thread into position for the stitch.
6. Again insert the needle one-eighth of an inch from the edge, and exactly back of its first position.
7. Let the needle remain half-way through the cloth, and pointing towards you.
8. Take the two threads at the eye of the needle, bring them towards you at the right of the needle, then under the point of the needle and from you (Fig. 44).
 9. Pull the needle out, drawing the thread so that the twist or purl comes at the top of the folded edge of the cloth (Fig. 41).
10. One-eighth of an inch beyond take another stitch in the same manner.
11. So continue, making the stitches even.
12. When the thread becomes too short to use, turn to the other side of the cloth, and fasten lightly at the side of the last stitch, and away from the purl. After threading the needle, insert it beside of the last stitch, drawing it towards the purl. Turn to the right side, and draw the needle up through the last purl, and proceed with the button-hole stitch.
· What is the first thing to be done?
· Where should the folded edge of the cloth be placed?
· What part of the forefinger shows?
· How should the cloth be held?
· In which direction do you work?
· Where is the first stitch taken? Why?
· How far from the edge is the needle next inserted?
· How far through the cloth should the needle be brought?
· How should it point?
· What is done with the two threads?
· When the thread is drawn out, where should the twist or purl come?
· How much should be left between the stitches?
BUTTON-HOLES
Materials— No. 8 needle, No. 40 colored thread, buttonhole scissors, a medium-sized button, and a folded and basted strip of cotton cloth.
The instructions are given in the following order:—
1. Cutting.
2. Barring.
3. Overcasting.
4. Button-hole stitch.
5. Finishing.
6. Joining the thread.
Cutting— Cut the slit by a thread of the cloth, one-fourth of an inch from the folded edge, and a little longer than the diameter of the button.
Barring—
1. Make a small knot in the thread.
 2. With the folded edge from you, place the slit across the cushion of the left forefinger (Fig. 42).
3. Hold the slit firmly between the thumb and forefinger, and slanting as in Fig. 42.
4. Work from you, beginning at the end farthest from the folded edge of the cloth.
 5. Draw the needle through from underneath, at the left of the slit, and three or four threads from the raw edge, a (Fig. 43, A],
6. Turn the cloth, so that the folded edge is towards. you.
7. Insert the needle at b (Fig. 43, A), and bring it out at c, taking up three or four threads of the cloth at each side of the slit.
8. Again insert the needle at b, and bring it out at c. This makes a side and end barring.
9. Turn the cloth, and bar the other side and end in the same manner, i.e., inserting the needle at d, bring it out at a, and repeat. This brings the needle to the starting point.
Overcasting—
1. Hold the barring tightly near the edge of the slit.
2. Taking up three or four threads of the cloth, overcast one side, making the stitches over the barring and one-eighth of an inch apart. Bring the needle at the last stitch into the corner, where the side and end barring meet, b (Fig. 43,B).
3. Turn the cloth, and take one overcasting stitch in the opposite corner, c(Fig. 43, B).
4. Overcast the remaining side and end in the same manner, which will again bring the needle to the starting point.
Button-hole stitch or purl—
1. Draw the needle halfway through at the left side, and one thread beyond, taking up about four threads of the cloth.
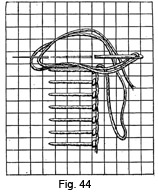 2. With the needle pointing towards you, take the two threads at the eye of the needle, and bring them towards you at the right of the needle, then under the point of the needle and from you (Fig. 44).
3. Draw the needle and thread out, at right angles to the slit, and so that the twist or purl comes at the top edge of the slit (Fig. 44). In making the purl, the thread will form the figure eight (8).
4. Continue in this manner, leaving a thread of the cloth between each stitch, and make the stitches even.
5. Take seven or eight stitches across the outer end (Fig. 45), drawing the purl towards the folded edge, and making either a square or round end. The greatest wear from the button comes here.
6. Holding the folded edge of the cloth towards you, work the second side until close to the end barring.
If, in taking the button-hole stitch, you fail to put the thread around the needle, the stitch can be picked up, by leaving a small loop, and, with the thread beyond it, passing the needle from underneath through the loop.
Finishing—
1. Without turning the cloth, draw the needle down through the first button-hole stitch taken, bringing it up on the opposite side, where the side and end barring meet.
2. Draw this stitch so tightly as to bring the sides close together.
3. Make a barring exactly over the one already there, which will leave the thread at the left side.
4. Holding the thread under the left thumb, draw the needle under the two end barrings and over the thread, which will form the loop stitch.
5. Take another loop stitch in the middle of the barring and one in the right hand corner.
6. Draw the needle down through the cloth close to the part of the last loop stitch, and fasten on the wrong side.
Joining the thread—
1. If the thread should prove too short, put the needle through the slit, and turn to the other side of the cloth.
2. Fasten lightly beside the last stitch.
3. After threading the needle, insert it beside the last stitch, drawing it towards the purl.
4. Turning the right side towards you, draw the needle up through the last purl, and proceed with the buttonhole stitch.
Suggestions— On materials that ravel, make two parallel rows of stitching, and cut between the rows; or the place may be dampened with glue and cut when dry. It is important to remember when making a button-hole, to work from you and begin at the end farthest from the edge. Try to keep the slit straight and not to press it out of shape. Some hold the slit horizontally on the forefinger. The distance that the button-hole is cut from the edge, depends upon the garment. The side of the garment in which the button-hole is made, is a matter of choice, but it is wise to decide upon one side and adhere to it. In woolen goods a triangle of a few threads of the cloth can be cut out of the end nearest the edge, or the end can be rounded.
The barring strengthens the button-hole and keeps it in place. If a great strain comes on the button-hole, put a double barring around.
Some prefer to overcast before barring, but the overcasting stitches are helpful in keeping the barring in place. When the overcasting is clone first, take the overcasting stitches on the under or wrong side, thus securing the under edge, which is very apt to pull away in working. A material, that does not ravel, need not be overcast.
A button-hole can be finished by taking button-hole stitches in the loop, or on heavy goods by sewing closely over and over the barring. In a button-hole, where a strain comes on the sides, as in the front of a shirt, work both ends as in finishing an ordinary button-hole.
Always try to have the thread long enough to finish working the button-hole. For a very large button-hole, take a new piece of thread, when beginning on the buttonhole stitch. On woolen cloth, button-hole twist should be used. On heavy goods, a cord is used instead of barring.
· What is a button-hole? What is its use?
· Give the order in which the instructions for button-hole making are given.
CUTTING—
· How should the slit be cut?
BARRING—
· Where should the slit be placed and how held?
· In which direction do you work?
· At which end do you begin?
· Where is the needle inserted?
· What should be done next?
· What stitch is taken by following the directions for the end barring?
· How is the other side and end barred?
· Where will this bring the needle?
OVERCASTING—
· How should the barring be held?
· How is the first side overcast?
· How is the end overcast?
· How is the needle brought to the starting point?
BUTTON-HOLE STITCH—
· Where and how should the needle be inserted?
· How many threads of the cloth are taken up?
· In what direction should the needle point?
· What is now done with the two threads?
· How are the needle and thread drawn out?
· Where should the twist or purl come?
· What figure is formed by the thread, in making the purl?
· How many threads of the cloth should be left between the stitches?
· How should the outer end be worked?
· Where does the greatest wear come?
· How should the cloth be held in working the second side?
· How can a button-hole stitch be picked up?
FINISHING—
· What is done with the needle?
· How should this stitch be drawn?
· Where is the second barring made?
· How is the loop stitch formed?
· Where are the other loop stitches taken?
· Where should the needle be drawn, to fasten the thread?
JOINING THE THREAD—
· What is done if the thread proves too short?
· After threading the needle, where should it be inserted? Where is it next brought?
· Why is barring used?
· Is a material that does not ravel overcast?
· How long a thread should be taken?
BUTTONS
A button is a catch of metal or other substance, by which a garment is fastened.
Materials— No. 7 and No. 8 needles, No. 36 and No. 50 thread, a pin, a four-holed button, and a folded and basted piece of cotton cloth.
Buttons—
1. Make a pin-hole, where the button is to be placed.
2. Stitch with the fine needle and thread a very small circle around the pin-hole, or a cross at the pin-hole, to keep both sides of the cloth in place.
3. Having the coarse thread double, make a knot.
4. Draw the needle through the pin-hole from the upper side, to conceal the knot under the button.
5. Bring the needle partly through, close to the knot.
6. Place the button on the needle, and draw the needle and thread through.
 7. Place the pin across the top of the button (Fig. 46, b), to lengthen the stitches; and take the first stitch across the button, at right angles with the edge of the cloth.
8. Sew securely through and through the holes, making a cross on the button, and two parallel lines on the wrong side of the cloth.
9. Remove the pin, which will loosen the stitches.
10. Inserting the needle from underneath, bring it out between the button and cloth, close to the centre of the button.
11. Wind the thread tightly around the stitches three or four times, to form a neck for the button; thus allowing room for the thickness of the button-hole.
12. Fasten the thread on the under side of the cloth.
Suggestions— In sewing on a two-holed button, the stitches should be taken at right angles with the edge of the cloth (Fig. 46, a), to avoid stretching the end of the button-hole. A button with a loop, as a boot-button, should be sewed with the stitches taken parallel with the edge (Fig. 46, c); this will bring the wear on the loop of the button.
The button-holes should be made first. To mark the places for the buttons, lay the right sides of the garment together, and put pins through the outer ends of the button-holes; taking great care to have the pins exactly opposite the button-holes.
· What is a button? What is its use?
· How should the place for a button be prepared?
· What kind of thread should be used?
· How should the needle be inserted? Why?
· What is placed across the top of the button?
· How is the button sewed on?
· How is the neck of the button formed? Why?
· How should the stitches be taken in sewing on a two-holed button?
· How on a button with a loop?
· How are the places for the buttons marked on a garment?
EYELET-HOLES
An eyelet is a hole made and worked in a garment, to receive a small cord or the loop of a button.
Materials— No. 8 needle, No. 40 thread, a stiletto, and a piece of cloth folded and basted.
Eyelet-holes—
1. Pierce the cloth with the stiletto, breaking as few threads as possible.
 2. Holding the hole tightly over the cushion of the left forefinger, work it over and over with very close, even stitches (Fig. 47, a).
3. When working on a line with the threads of the cloth, use great care to take the stitches close and deep enough.
4. Use the stiletto occasionally to keep the hole round.
Suggestions— To make a large eyelet-hole, mark the circle by twice running a thread around the desired size (Fig. 47, b); then carefully cut out the centre, turn the edge of the material under, and work the edge over and over or with button-hole stitches (Fig. 47, c). On woolen materials, use silk or twist. An eyelet-hole can be worked with the button-hole stitch.
· What is an eyelet-hole? What is its use?
· With what do we make an eyelet-hole?
· How should the eyelet-hole be held and worked?
· Where should care be taken?
HOOKS AND EYES
A hook is a hard material, bent for holding or fastening. An eye is a small round catch to receive the hook.
Materials— No. 8 needle, No. 40 thread, a medium-sized hook and eye, and two folded and basted pieces
of cotton cloth.
Eyes—
1. Make a knot in the thread.
2. Place the loop of the eye a little beyond the folded edge of one of the pieces of cloth.
3. Hold the loop firmly between the left thumb and forefinger.
 4. Beginning at the further side, overhand closely the two circles of the eye (Fig. 48), being careful not to let the stitches show on the right side.
5. Take three stitches over each other at each side of the eye, near the edge of the cloth (Fig. 48, a).
6. Fasten very securely.
Hooks—
1. Taking the other piece of cloth, lap the two pieces as desired.
2. Put the hook into the eye already sewed on, and place it in position.
3. Holding the hook firmly between the left thumb and forefinger, unfasten it.
4. Begin at the further side, and overhand closely the two circles (Fig. 48), being careful not to let the stitches show on the right side.
5. Overhand the under part of the hook, as far as the bend.
6. Fasten, by taking three or four stitches in the same place, at one side of the hook; then run the needle to the opposite side, and again fasten. A great strain comes here, and it is necessary to fasten securely.
Suggestions— If the eye is on a garment, where it is liable to show, cover it with button-hole or loop stitches. When sewing on hooks and eyes, use a strong thread or twist, and as fine a needle as possible.
· What is a hook?
· What is an eye?
· Where is the eye placed?
· How is it sewed on?
· How should the thread be fastened?
· What is done to the two pieces of cloth before sewing on the hook?
· Where is the hook placed before it is put in position? How is it sewed on?
· How is the thread fastened?
LOOPS
A loop is a catch made in a garment, to take the place of an eye.
Materials. — No. 8 needle, No. 40 thread, and a folded and basted piece of cotton cloth.
Loops—
1. Make a knot in the thread.
2. Holding the folded edge of the cloth towards you, work from left to right.
 3. Half-an-inch from the folded edge take three or four stitches one-fourth of an inch in length, and over each other (Fig. 49, a).
4. Holding the thread down with the left thumb, insert the needle under the backstitches, and over the thread (Fig. 49, a); being careful not to take up any threads of the cloth.
5. Draw the needle and thread towards you, so that the purl may come at the side of the loop towards you.
6. Fill the loop full of stitches drawn closely together.
7. At the right-hand end, draw the needle down through the cloth, close to the purl of the last stitch.
8. With a few stitches, overhand the underneath stitching, and fasten securely.
Suggestions— In making a loop on a garment, the backstitches should be taken one-sixteenth of an inch beyond where the loop comes, when the garment is fastened. Button-hole stitches can be used instead of loop-stitches.
· What is a loop? What is its use?
· In which direction do you work in making a loop?
· Where and how are the first stitches taken?
· How is the needle inserted?
· How is the needle drawn through?
· How many stitches should be taken in the loop?
· What is done to the underneath stitches?
GUSSETS
A gusset is an angular piece of cloth, inserted in a garment, to strengthen and enlarge an opening.
Materials— No. 8 needle, No. 60 thread, pins, scissors, and a piece of cotton cloth five inches square, hemmed on three sides; for the gusset a quarter of a four-inch circle of cloth.
Gussets—
1. Find the middle of the side of the cloth not hemmed, and cut two inches and a half, by a thread.
2. Make a hem on each side, having it one-eighth of an inch wide at the top, and turned to a point at the bottom.
3. Find the middle of the rounded side of the gusset, and crease to the opposite corner.
4. Baste with even stitches along the crease.
5. On all the sides, fold and crease one-fourth of an inch.
6. Cut off all unnecessary thicknesses of cloth in the folds, and baste the folds down.
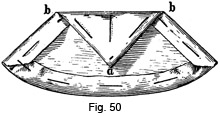 7. On each side, five-eighths of an inch from point a (Fig. 50), make a pin-hole; then fold and crease from pin-hole to pin-hole (Fig. 50, b to b).
Setting-in the gusset—
1. With a small knot in the thread, draw the needle through from the wrong side of the gusset, at point a (Fig. 50).
2. Holding the wrong side of the cloth towards you, insert the needle from the right side, two or three threads from the end of the opening.
3. Holding the right sides together, overhand the gusset to the cloth, as far as the crease or point b (Fig. 50); fasten securely.
4. Overhand  the other side in the same manner, beginning at point a.
5. Fold the gusset over on the crease.
6. Pin the end of the middle line of basting to the cloth, a little below the opening (Fig. 51).
7. Baste and hem the gusset to the cloth.
 8. Make a row of stitching at the fold of the gusset, to strengthen it (Fig. 52).
 Suggestions— The gusset can be made as large or small as desired; it can also be cut in different shapes (Fig. 53). An easy method of inserting a gusset is to cut a small square of cloth; fold and crease the edges; placing a corner at the end of the opening, overhand two sides; fold on the bias and hem the remaining sides over the over-handing stitches.
Gusset and facing—
 1. Make a paper pattern the desired size, having the gusset in the proportions of Fig. 54.
2. Fold the pattern at the dotted lines (Fig. 54), and place this edge on an exact bias fold of the cloth, which will bring the edge of the gusset on a line with a thread of the cloth.
3. Cut the cloth by the pattern, and then cut in one-fourth of an inch to a (Fig. 54).
4. Make a narrow fold on the inner edges of the facing, and on the sides of the gusset make a fold turned to a point at a.
5. Fold the edges of the opening in the garment.
6. With the wrong sides together, overhand the gusset, and then the inner edges of the facing, to the opening in the garment.
7. Hem the opposite edges.
· What is a gusset? What is its use?
· How should the hem in the opening be made?
· In setting-in a gusset, how is the point brought to the opening?
· What kind of stitches are then taken?
· What kind of stitches are used after folding the gusset?
PLACKET
A placket is an opening made in a garment.
Materials— No. 8 needle, No. 60 thread, and a piece of cotton cloth five inches square, hemmed on three sides.
Placket—
1. At the middle of the side not hemmed, cut three inches by a thread.
2. Hold the wrong side of the cloth towards you.
3. At the left of the opening, make a hem turned to a point at the bottom, and one-eighth of an inch wide at the top.
4. At the right, make a hem three-fourths of an inch wide the entire length.
5. Turn to the right side of the cloth.
6. At the bottom of the wide hem make a horizontal crease by a thread.
7. On the right side of the opening, make a vertical crease by a thread, three-fourths of an inch from the edge.
8. Place the edge of the wide hem on this crease.
9. Holding the hem carefully, baste with small stitches, on the horizontal crease.
10. Make two rows of stitching, one a little below, and one a little above the basting.
· What is a placket?
· When the wrong side is towards you, how wide a hem is made at the left?
· How wide at the right?
· How many rows of stitching are taken in tacking the hem?
TUCKING
A tuck is a fold made and sewed in a garment for ornament, or that the garment may be lengthened when necessary.
Materials— No. 8 and No. 9 needles, No. 50 and No. 90 thread, a sharp-pointed lead-pencil, and a piece of cotton cloth six inches square, having at one side an inch hem sewed exactly on a thread; for a measure, a stiff, smooth piece of paper or cardboard three inches long and half-an-inch wide.
Tucking—
1. Put the right-hand end of the strip of paper exactly to the right-hand end of the measure (Fig. 55).
2. One-eighth of an inch below the edge of the paper, with the lead-pencil, make dots corresponding to each line of the measure.
3. Hold the wrong side of the cloth towards you.
 4. Half-an-inch from the right-hand edge of the cloth lay the paper on, with the end markeda (Fig. 55) exactly at the sewing of the hem.
5. Holding the paper and cloth even, put the large needle through each dot.
6. Move the paper two inches to the left, and prick.
7. Again move the paper two inches to the left, and prick.
8. Turn to the right side, and, holding the hem towards you, crease by a thread at the first horizontal line of dots.
9. Holding the crease to the light of the window, see if it is exactly by a thread.
10. Make a crease, by a thread, at the second, third and fourth lines of dots.
11. Fold the cloth down at the second crease.
 12. Baste exactly by a thread on the first crease (Fig. 56).
13. Fold the cloth at the fourth crease, and baste on the third crease.
14. With the fine needle and thread, run each tuck close to the basting, taking up as little of the cloth as possible, and passing over twice as much.
Suggestions— Tucks are sometimes made lengthwise of the cloth, and sometimes across the cloth. The width and distance apart are a matter of choice.
The chief difficulty is in measuring and folding them; when it is decided at what distance apart and what width the tucks are to be made, a paper measure can be made as follows. — Make a mark as far from the end of the paper, as the sum of the distance apart and the width of the tucks; make a second mark beyond the first mark, the width of the tucks; make a third mark as far from the second mark, as the sum of the distance apart and twice the width of the tucks; make a fourth mark beyond the third mark, the width of the tucks; continue as for the third and fourth marks. When two tucks have been made, the next can be easily marked by folding the wrong side together at the second tuck, and making pin-holes at the folds of the first tuck. The edge of one tuck may form the guide for measuring the next, though it is better to mark and baste all the tucks for a short distance. Narrow tucks, one-eighth of an inch apart, are neat and pretty, but must be made very carefully, as the difference of a thread is quickly noticed.
· What is a tuck? What is its use?
· How should the tucks be sewed?
· Which way of the cloth can they be made?
· What is the chief difficulty in making tucks?
PLAITING
A plait is a fold made in a garment, for fullness. or trimming.
Materials— No. 8 needle, No. 50 thread, pins, and a piece of cloth nine and a half inches long and four inches wide, with a narrow hem at the ends and lower edge.
Plaiting—
1. On the raw edge of the cloth, with the right side towards you, measure one inch from the right-hand end, and mark it by cutting a small notch or inserting a pin vertically.
2. Mark every inch and a half to the left of this.
3. Fold the cloth at the first notch, and bring the fold to the edge of the hem.
4. Insert a pin in the middle of the three thicknesses of cloth.
5. Fold at the next notch, and bring it exactly to the underfold of the first plait.
6. Place a pin in the middle of the plait.
7. Fold and pin the other plaits in the same way.
 8. Baste with even stitches, one-fourth of an inch from the edge (Fig. 57).
Suggestions— Plaits can be laid either to the right or to the left. There can be spaces between the plaits, or they can meet, as in Fig. 57. If the plaits meet, the material must be three times the length that is desired, when finished. Box-plaiting is made by beginning at the middle, and laying a plait to the right, and another to the left; double box-plaiting is made by adding more side-plaits.
· What is a plait? What is its use?
· What different kinds of plaiting are there?
FELLING
A fell is a seam hemmed down to protect the edges.
Materials— No. 8 and No. 9 needles, No. 50 and No. 80 thread, and two pieces of cotton cloth, each five inches long and two inches wide.
Straight-way fell—
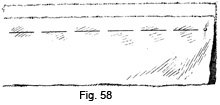 1. Place the pieces of cloth together, with one edge one-eighth of an inch below the other, and baste a narrow seam (Fig. 58).
2. Sew the seam with a running and a backstitch.
3. Take out the basting thread, unfold the pieces of cloth, and lay the seam over, so that the wider edge will be uppermost.
4. Turn to the right side, and press carefully, exactly at the sewing of the seam.
 5. Make a narrow hem (Fig. 59), tucking the ravellings under with the point of the needle.
Suggestions— Hem a fell cut on the bias, with the grain of the cloth, or from the wider part to the narrow, as drawers from the top down. A fell can be made by sewing it with the edges even, then pare one edge, being careful to have the right side of the sewing come on the upper side of the fell.
· What is a fell? What is its use?
· How are the pieces of cloth placed together?
· What should be the width of the seam?
· How should the seam be sewed?
· What is done, after the basting is removed? What is done next?
· How is a fell, cut on the bias, hemmed?
FRENCH SEAM
A French seam is a neat manner of joining materials that fray.
Materials— No. 8 needle, No. 60 thread, scissors, and two pieces of calico, each five inches long and two inches wide.
French seam—
1. Place the wrong sides of the calico together.
2. Baste one-eighth of an inch from the edge.
3. Run directly under the basting.
4. Cut the ravellings from the edges of the seam.
5. Turning the wrong side of the calico towards you, fold the right sides together, and crease at the sewing of the seam.
6. Baste, so that the raw edges are enclosed.
7. Half-backstitch the seam, being careful that no ravellings can be seen on the right side.
Suggestion— Trimming can be put on in this manner, having the seam very narrow.
· What is a French seam?
· Which sides of the cloth should be placed together?
· How wide a seam should be made?
· With what kind of stitches should the seam be finished?
Date: 2015-12-17; view: 1181
| <== previous page | | | next page ==> |
| HONEY-COMBING OR SMOCKING | | | FRENCH HEM ON DAMASK |