CATEGORIES:
BiologyChemistryConstructionCultureEcologyEconomyElectronicsFinanceGeographyHistoryInformaticsLawMathematicsMechanicsMedicineOtherPedagogyPhilosophyPhysicsPolicyPsychologySociologySportTourism
Remove split pin (A) and clevis pin (B)
To separate brake pedal from master
Cylinder pushrod
10  Unscrew the two bolts securing the master cylinder to the footrest bracket and remove the master cylinder and brake light switch.
11Release the clip securing the fluid reservoir hose to the master cylinder union and remove the hose. Inspect the hose for cracks or splits and renew it if necessary. If the hose clips are corroded or have weakened, use new ones (see illustration).
12Remove the screw securing the hose
®—^*3fi
v-^ H29662
Rear master cylinder components
union to the master cylinder and detach the union and O-ring (see illustration 9.11).Discard the O-ring as a new one must be used.
Overhaul
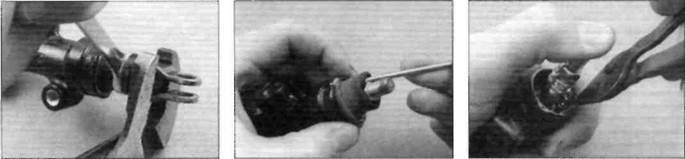
13Mark the position of the clevis locknut on the pushrod (ie its distance from the end of the pushrod), then slacken the locknut and thread the clevis and the locknut off the pushrod (see illustration).
14Remove the dust boot from the base of the master cylinder to access the pushrod retaining circlip (see illustration).
15Depress the pushrod against the master cylinder spring tension, remove the circlip using circlip pliers and remove the pushrod (see illustration).Withdraw the piston assembly and spring. If they are difficult to remove, apply low pressure compressed air to the fluid outlet. Lay the parts out in the proper order to prevent confusion during reassembly.
16 Clean all of the parts with clean brake fluid or denatured alcohol. If compressed air is available, use it to dry the parts thoroughly (make sure it's filtered and unlubricated). Caution: Do not, under any circumstances, use a petroleum-based solvent to clean brake parts.
17 Check the master cylinder bore for corrosion, scratches, nicks and score marks. If the necessary measuring equipment is available, compare the dimensions of the piston and bore to those given in the Specifications section of this Chapter. If damage is evident, the master cylinder must be renewed. If the master cylinder is in poor condition, then the caliper should be checked as well.
18 The dust boot, circlip, piston assembly and spring are all included in the master cylinder overhaul kit. Use all of the new parts, regardless of the apparent condition of the old ones. If the seal and cup are not already on the piston, fit them according to the layout of the old piston assembly.
19Install the new spring in the master cylinder wide end first.
20 Lubricate the new piston, seal and cup with clean brake fluid. Install the assembly into the master cylinder, making sure it is the correct way round (see illustration 9.11).
|
Date: 2016-01-14; view: 770
| <== previous page | | | next page ==> |
| As serious injury could result. | | | Hold the clevis and slacken the locknut |