CATEGORIES:
BiologyChemistryConstructionCultureEcologyEconomyElectronicsFinanceGeographyHistoryInformaticsLawMathematicsMechanicsMedicineOtherPedagogyPhilosophyPhysicsPolicyPsychologySociologySportTourism
Make 5-7 questions to the text and discuss them in a group.
15. Make presentation to the topic “Measurement uncertainty”.
Unit 5
MEASUREMENT ERROR, ACCURACY AND PRECISION
Practice reading the following words.
Accurate, proceeding, uncertainty, hitherto, purpose, traceable, negligible, caliper, associate, micrometer, biases, precision, measuring.
2. In the science of measurement it is important to distinguish between measurement uncertainty and error, accuracy and precision. Are the notions related? Which way do they differ? Discuss in groups.
3. Read and translate the text.
TEXT A
Before proceeding to study ways to evaluate the measurement uncertainty, it is very important to distinguish clearly between the concepts of uncertainty and error. In the VIM, error is defined as a result of a measurement minus a true value of a measurand. In turn, a true value is defined as a value that is consistent with the definition of the measurand.
True value is equivalent to what hitherto we have been calling actual value.
In principle, a (true or actual) value could only be obtained by a ‘perfect’ measurement. However, for all practical purposes, a traceable best estimate with a negligible small uncertainty can be taken to be equal to the value of the measurand (especially when referring to a quantity realized by a measurement standard, such an estimate is sometimes called conventional true value). To illustrate this, assume that a rod’s length is measured not with a caliper, but with a very precise and calibrated traceable) micrometre. After taking into account all due corrections the result is found to be 9.949 mm with an uncertainty smaller than 1 µm. Hence, we let the length 9.949 mm be equal to the conventional true value of the rod.
Now comes the inspector with his/her caliper and obtains the result 9.91 mm.
The error in this result is then equal to (9.91 − 9.949) mm = −0.039 mm. A second measurement gives the result 9.93 mm, with an error of −0.019 mm.
After taking a large number of measurements (say 10) the inspector calculates their average and obtains 9.921 mm, with an error of −0.028 mm (it is reasonable to write 9.921 mm instead of 9.92 mm, since the added significant figure is the result of an averaging process). The value −0.028 mm is called the systematic error; it is defined as the mean that would result from a very large number of measurements of the same measurand carried out under repeatability conditions minus a true value of a measurand (figure 1).
 Figure 5.1. Systematic error
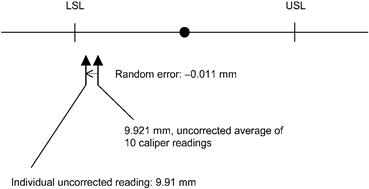
Return now to the individual measurement results. The first was 9.91 mm.
With respect to the average, its error is (9.91 − 9.921) mm = −0.011 mm. This value is called a random error; it is defined as a result of a measurement minus the mean that would result from a very large number of measurements of the same measurand carried out under repeatability conditions (figure 2).
 Figure 5.2. Random error
The sum of the random error and systematic error constitute total error.
Error and uncertainty are quite often taken as synonyms in the technical literature. In fact, it is not uncommon to read about ‘random’ and ‘systematic’ uncertainties. The use of such terminology is nowadays strongly discouraged.
It is also important to define the related concepts of accuracy and precision.
The former is the closeness of the agreement between the result of a measurement and a true value of the measurand. Thus, a measurement is ‘accurate’ if its error is ‘small’. Similarly, an ‘accurate instrument’ is one whose indications need not be corrected or, more properly, if all applicable corrections are found to be close to zero. Quantitatively, an accuracy of, say, 0.1 %—one part in a thousand—means that the measured value is not expected to deviate from the true value of the measurand by more than the stated amount.
Strangely enough, ‘precision’ is not defined in the VIM. This is probably because many meanings can be contributed to this word, depending on the context in which it appears. For example, ‘precision manufacturing’ is used to indicate stringent manufacturing tolerances, while a ‘precision measurement instrument’ might be used to designate one that gives a relatively large number of significant figures. We take the term ‘precision’ as a quantitative indication of the variability of a series of repeatable measurement results.
Date: 2016-04-22; view: 1444
| <== previous page | | | next page ==> |
| Look at the picture below and complete the text with appropriate words. | | | Read the texts A-C and match them with the pictures. |