CATEGORIES:
BiologyChemistryConstructionCultureEcologyEconomyElectronicsFinanceGeographyHistoryInformaticsLawMathematicsMechanicsMedicineOtherPedagogyPhilosophyPhysicsPolicyPsychologySociologySportTourism
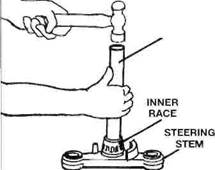
Drive the bearing outer races out with a brass drift as shown
bearings and races and check them for wear or damage.
3 The outer races should be polished and
free from indentations and pitting. Inspect the
bearings for signs of wear, damage or
discoloration, and examine the bearing ball
retainer cage for signs of cracks or splits. Spin
the bearings by hand. They should spin freely
and smoothly. If there are any signs of wear
on any of the above components both upper
and lower bearing assemblies must be
renewed as a set. Only remove the outer
races from the frame headstock if they need
to be renewed - do not re-use them once they
have been removed.
| rcfflfl|g!|Installation ofnew bearing wUMImt 0Ufer races is made much |
Renewal
| Hint |
| easier if the races are left overnight in the freezer. This them to contract slightly |
| causes making them a looser fit. |
4 The outer races are an interference fit in the
frame headstock and can be tapped out with
a suitable drift (see illustration).Tap firmly
and evenly around each race to ensure that it
is driven out squarely. It may prove
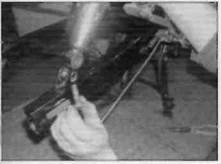
7 To remove the lower bearing inner race from the steering stem, use two screwdrivers placed on opposite sides of the race to work it free, if the bearing is firmly in place it will be
|
| BEARING DRIVER |
|
| BEARING PULLER |
| STEERING STEM |
| 0685H |
| 9.7 Using a bearing puller to remove the bearing from the steering stem |
| 9.8 Drive the new bearing on with a suitable driver or length of pipe |
£±i^
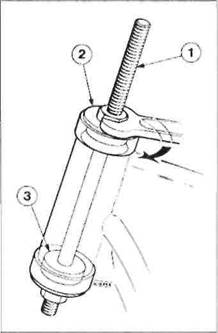
9.6 Usinga drawbolt to fit the outer races into the headstock
1 Long bolt or threaded bar
2 Thick washer
3 Guide for lower race
necessary to use a bearing puller (see illustration).Take the steering stem to a Honda dealer if necessary. Check the condition of the dust seal that fits under the inner race and renew it if it is worn or damaged.
8 Fit the new lower bearing inner race onto the steering stem. A length of tubing with an internal diameter slightly larger than the steering stem will be needed to tap the new bearing into position (see illustration).Ensure that the drift bears only on the inner edge of the bearing race and does not contact its working surface.
9 Install the steering stem (see Section 8).
| | |
10Rear shock absorbers -
removal, inspection and installation
Removal
1Place the machine on its centre stand. Position a support under the rear wheel so that it does not drop when the shock absorbers are removed, but also making sure that the weight of the machine is off the rear suspension so that the shocks are not compressed.
2 Remove the seat cowling (see Chapter 8) and the exhaust silencer (see Chapter 4).
3 Working on one shock at a time, unscrew the shock absorber lower mounting bolt, pull the shock towards the rear of the bike so that
Frame, suspension and final drive 6»13
10.3a Remove the lower mounting bolt...
it is free of the lower mounting bracket, and then pull it off the upper mounting bracket (see illustrations).
Inspection
4 Inspect the damper rod for signs of wear, corrosion or pitting. Damage to the surface of the rod will wear the oil seal and lead to oil loss and lack of suspension damping.
5 Dismantling of the shock absorbers requires the use of a spring compressor. It is advised that this task is entrusted to a Honda dealer or suspension specialist. Note that apart from the mounting bolts, bushes and spacers, individual components are not available for the shock absorbers.
| A |
Warning: The spring is under considerable pressure. It is advisable to wear some form of eye and face protection when carrying out this operation. Note that the shocks must be set to their minimum preload setting before dismantling.
6Check the action of the damper rod. Compress the rod into the damper body, then pull it out of the body; movement should be slow and progressive. If the rod binds in the body it is likely to be bent. If there is no damping to the rod movement, the damping oil has leaked out of the shock. In either case the shock in unserviceable. Individual component parts are not available and worn or damaged shock absorbers should always be renewed as a pair.
7 Check the spring for cracks and other damage. If the shock has been dismantled, measure the spring free length and compare it to the specifications at the beginning of this Chapter. If it is defective or has sagged below the service limit, the shocks should be renewed as a pair - the springs are not available separately.
8 If the shock absorber mounting bushes are a loose fit or show signs of deterioration, renew them. The bushes are a press fit in the ends of the shocks. Use a suitable lubricant when fitting new bushes and always renew bushes as a set. If necessary, withdraw the inner sleeves from the lower mounting bushes to aid removal of the bushes and renew the sleeves if worn.

Date: 2016-01-14; view: 853
| <== previous page | | | next page ==> |
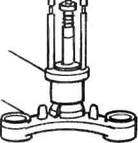
| Adjuster nut (A) and bearing cover (B) | | | B ... then pull the shock off the upper bracket |