CATEGORIES:
BiologyChemistryConstructionCultureEcologyEconomyElectronicsFinanceGeographyHistoryInformaticsLawMathematicsMechanicsMedicineOtherPedagogyPhilosophyPhysicsPolicyPsychologySociologySportTourism
Heater hose union screw (arrowed)
Lift off the top cover and remove the spring
Diaphragm sealing groove (A) and tab recess (B)

|
|
7.5a Thread a 4 mm screw (arrowed) into the jet needle holder...
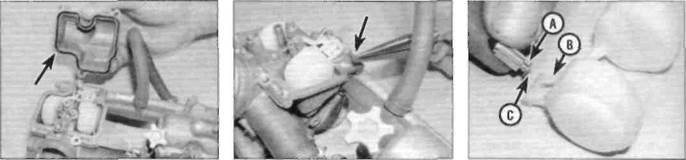
they fit against the carburettor bodies (see
Illustration).
3Unscrew and remove the top cover
retaining screws. Lift off the cover and remove
C Remove the spring (B) and discard the O-ring (A)
7.5b... and pull the holder out of the piston
the spring from inside the vacuum piston (see
Illustration).
4Carefully peel the diaphragm away from its
sealing groove in the carburettor and
Remove the jet needle from the piston with the washer (arrowed)
withdraw the diaphragm and piston assembly.
Note how the tab on the diaphragm fits in the
recess in the carburettor body (see
Illustration).
Caution: Do not use a sharp instrument to
Displace the diaphragm as it is easily
Damaged.
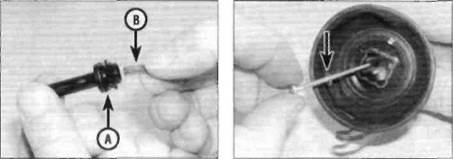
5 Toremove the jet needle holder from the
piston, thread a 4 mm screw into the top of
the holder (one of the top cover retaining
screws is ideal), then grasp the screw head
with a pair of pliers and carefully draw the
holder out of the piston. Note the spring that
fits inside the holder. Discard the O-ring on
the holder as a new one must be used (see
illustrations).
Caution: Do not push the needle holder out of the piston by pushing up on the needle.
6Push the jet needle up from the bottom of the piston and withdraw it from the top (see illustration).Note the washer that fits on the needle between the head of the needle and the piston.
7 Remove the screws securing the float chamber to the base of the carburettor andremove it. Remove the gasket and discard it as a new one must be used (see illustration).
8Using a pair of thin-nose pliers, carefully withdraw the float pin (see illustration). Ifnecessary, displace the pin using a small punch or a nail. Remove the float and unhook the float valve, noting how it fits onto the tab on the float (see illustration).
|
Date: 2016-01-14; view: 771
| <== previous page | | | next page ==> |
| Carefully lift the carburettors off the inlet stubs | | | Main jet (A), jet holder (B) and pilot jet(C) |