CATEGORIES:
BiologyChemistryConstructionCultureEcologyEconomyElectronicsFinanceGeographyHistoryInformaticsLawMathematicsMechanicsMedicineOtherPedagogyPhilosophyPhysicsPolicyPsychologySociologySportTourism
Elysana’s Second Quest
If you haven't got the picture yet, this babe is trouble with a capital "T". At some point after completing her first quest (usually about the time you hit 7th or 8th level), you'll receive a letter from her inviting you to come to Wayrest to take care of another little matter for her. The second little matter is escorting her "cousin" somewhere.
This is very straightforward. Once you accept the quest, the cousin's face will appear on your screen. Go to the designated town, find the designated person and deliver the cousin. You are supposed to deliver the cousin to a random NPC in a random town.
You might be surprised by who you get to deliver her to. I've delivered the cousin to Gortwog, Brisienna and even Elysana, herself. Some of these had all sorts of interesting quest implications since they jumped the gun and started me off on other quests a little early.
In any event, if you have not completed the Blades quest, you should start running into thugs fairly soon. One of them is supposed to have a piece of paper that will mark Lysandus' Tomb on your overland map. Don't hold your breath waiting for it to happen.
This is probably the buggiest of the Main Quests. Although I cannot confirm this, I suspect the quest originally involved an unimplemented feature of overland travel that would generate random encounters while traveling (perhaps something along the same lines as the "Climate Survival" advantage in the character generation process). I say this because of comments that your passenger is supposed to make at various points as the quest progresses.
If the quest were to play out the way it appears it should, you should have to fight three or four sets of thugs: one set when you first pick up your passenger and leave Wayrest Castle, another set when you arrive at your destination and a third set at or about the time that you deliver your passenger to your contact. At each of these points, your passenger is supposed to make comments that would clue you in to the fact that you have been set up.
In actual fact, these comments pop up when Lord Woodborne's assassins start disturbing your rest after you locate the emperor's letter and return it to Mynisera. If you are lucky, you'll get your reward and a little extra gold for delivering your passenger safely. If you're unlucky, you'll find that the "quest from hell" won't terminate and you'll have minor problems with thugs for the rest of the game.
The only reason to take this quest is if you don't know where Lysandus is actually buried or if you get your jollies out of being hounded by people who want to kill you. If you're sitting around with nothing to do, you might want to take it just for the occasional excitement of having random assassins pop up. If you don't feel like messing with all of this, either take the Blades quest or cheat to get the location of the tomb.
Lich's Soul
You must be at least 7th level and have completed Morgiah's quest to be offered this quest. The summons will usually arrive as soon as you finish distributing your attribute points upon reaching 7th level. If the messenger arrives before you are 7th level, save the game and rest for about 6 hours and you will level.

The King of Worms will send you a letter via UPS (Undead Postal Service). After killing the delivery zombie, you'll find the letter stitched into it. The King of Worms wants you to run an errand for him. If you don't come quickly, you can count on his zombie reminder service to keep the matter fresh on your mind (this handy reminder feature was a bug that was fixed by one of the later patches, so if you don't get your daily reminder, don't sweat it)
Go to Scourg Barrow and down to the King's office (taking potshots at the liches and vampires if it makes you happy). He'll tell you that there's a lich haunting the Castle Sentinel dungeon and he wants you to soul trap it. Your reward? Information.
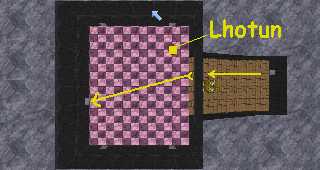
| You enter Sentinel Castle just as you did to take up Lhotun's Quest. He's still sitting there if you want to wave on your way to the dungeon. |
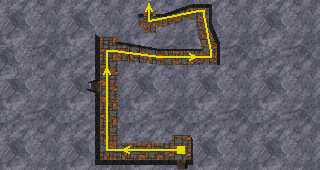
| Go out the back door of the Grand Hall and to the back door on the north wall. You will find an elevator there that will take you up to the throne room. |
| Go through the first opening on the right (south) wall and through the door at the end. At the end of this passage is another elevator. Use it. |

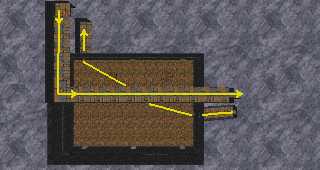
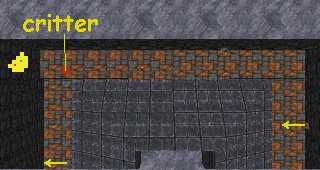
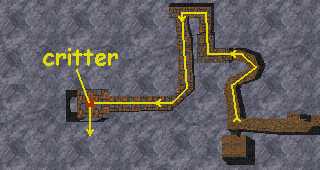
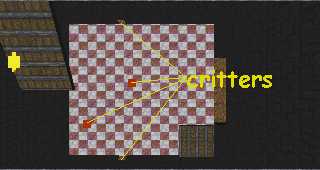
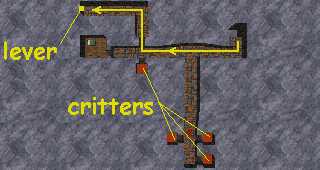
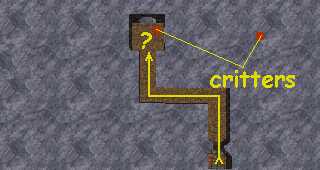
| After a long walk down a seemingly endless corridor, take the first opening on the left wall and then the first passageway on the right wall (don't go through any doors). You will run into three human critters on your way. |
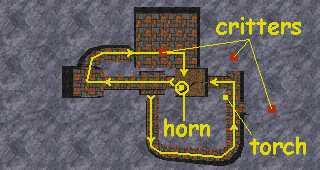
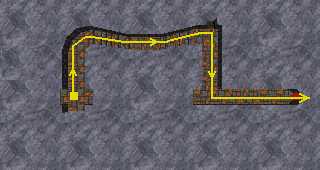
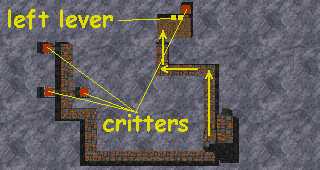
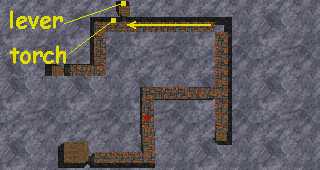
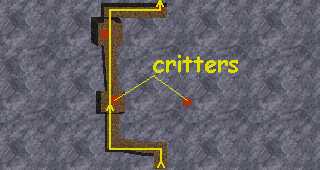
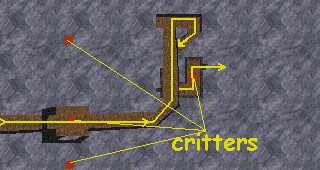
| Go through the door at the end and follow the passage to an elevator. Go up and get off at the first opening. Pull the lever you find in the room at the end, then take the elevator all of the way up to the top. |

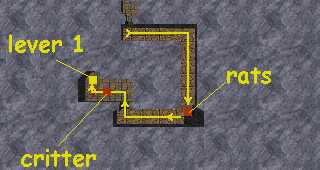
| The lever lifted a set of blue bars blocking a doorway. Go across the room and take the elevator on the other side (it's the only unblocked doorway) all the way to the bottom. |

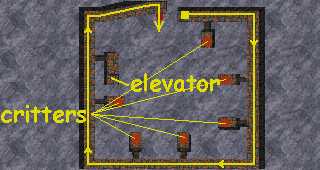
| DO NOT pull the lever by the elevator. Instead, go around the corner and take that elevator to the SECOND opening. |
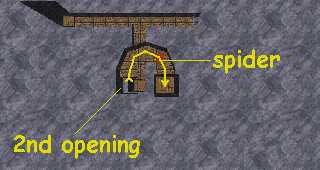
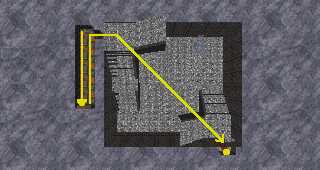
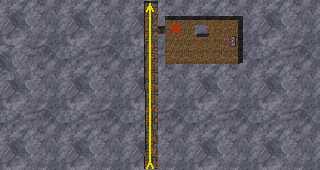
| Kill the Spider and take the elevator to the top. |

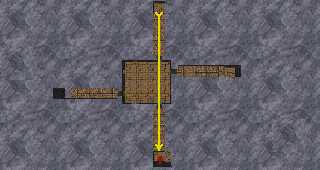
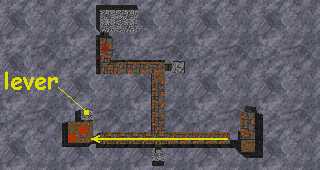
| Go east from the top until you get to a lever. Pull it. Now go back to the elevator and north, across the room and take the elevator down to the bottom. |

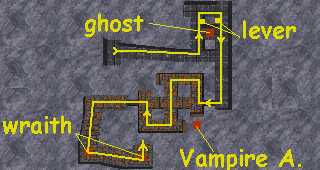
| Deal with the Ghost and pull the lever you find in the room at the end of the passageway. |
| Take the elevator back up to the top, go across the room and take the elevator back down, past the spider, and down the bottom corridor again. |
| The blue bars are gone and you can deal with the Wraith (if you didn't take care of him earlier). Pull the lever and ride the elevator all the way to the top. |

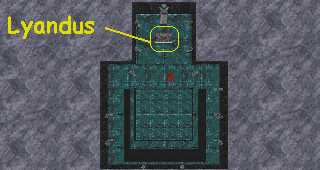
| The doorway is now open and you can go deal with the Lich. Remember that you need Mithril or better weapons to hit him. If you wait at the corner, you can shoot him through the wall. The exit will be directly across from you when you come back to the room at the top. |
Assuming that your bones aren't keeping the lich company, go back to the King of Worms. He'll tell you about the Battlemage who helped the first emperor conquer Tamriel and was later betrayed by the emperor. The Battlemage eventually became the Underking. The King of Worms cautions you about what could happen if Zurin Arctus (the Underking) ever gets his mortal body back. You'll get a magical something-or-other for your troubles and you've gained a few brownie points with the King of Worms (now isn't that special?).
The Painting
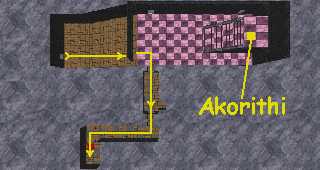
At some point after completing Lhotun's quest (usually about the time you reach 7th level) you'll receive a letter from Queen Akorithi "asking" you to come see her. This makes for some interesting story lines because her summons will usually show up at about the same time that you get the summons from the King of Worms. If you time it right, you can do his quest, talk to Akorithi on the way out, deliver the lich's soul to the King of Worms and then move on to Wayrest.
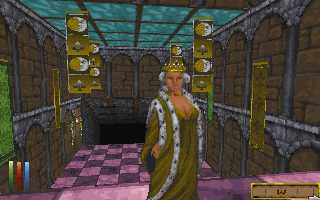
You will find the Queen in the Throne Room of Sentinel Castle. Go through the Door at the back of the Entry Hall, through the Arboretum to the Opening in the back of the Right Wall and take the Elevator up to the Next Floor. The Throne Room will be beyond the Door at the end of the Passage. Notice that everything related to the Queen is capitalized? That's because she's of Royal Blood and isn't about to let anyone forget it. Anyway, she wants you to retrieve an item from Wayrest Castle and is willing to give you a few hundred gold to get the job done.
This is a good spot to talk about dungeon preparation. Getting out of this dungeon is a lot tougher than getting in. If you don’t have a "Recall" spell, get it. If you can’t cast spells, go make an item that will cast the spell for you. If you can’t do that, get yourself a new pair of boots, because you’re going to be doing a LOT of wandering around before you manage to get out of Wayrest.
| The dungeon is accessed from the hall behind the throne room in Wayrest. Use the door at the back, on the right (north). Unless you’re in the mood to redecorate the hallway in blood red and brain-matter gray, an “Invisibility” spell will get you past the guards at the door (you’ll probably have to kill one who’s blocking the hallway, but it’s possible to get by with a little creative maneuvering). There is a knight guarding the doorway and a couple of spell casters guarding the knight, so be prepared for a bit of a tussle. |
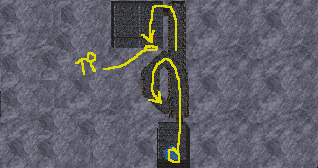
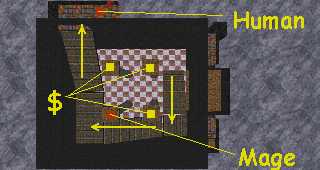
| Once you’re through the door, take the stairs to the left. Use the teleporter at the top. You will meet one human in the passageway and there is another in the room behind you. |
| What comes next is a series of three teleporters. The squares mark the spot where you appear. There will be critters in two of the rooms (I don't think the programmers could fit one in the second room, but they would if they could). |

| From the last room, go out into the hall, through the door, turn left, and keep following the corridor until you see a door directly in front of you. There will be humans and critters to keep you company along the way. |

| Behind the door is a sunken tunnel filled with water. I couldn't mark all of the critters on the map, but don't doubt for a moment that they will find you. On the west side is an underwater tunnel that will take you into another chamber. Go out the door on the east side, up the stairs and squirm your way through the window in the wall blocking the passage. |
| It will take some wiggling to get through the window. Follow the passage beyond (there are a couple of humans that will come out to say "Hi") until you reach a door in the west wall. Go through it and use the door in the south wall in the room beyond. |

| Go up the stairs; follow the corridor, taking the first left passageway. There is usually a knight in the first room on the left. From here it's pretty easy because there are no side doors or passages. |

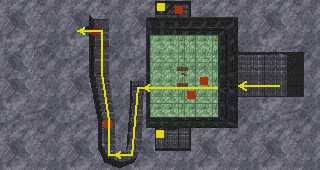
| Just keep following the passage down until you get to the big room at the end. No critters in this portion unless something randomly pops up. |

| The painting is on the pyramid in the center of the room. Climbing up on it should unlock the doors on each wall. Except for the south wall, there are human fighter-types behind each door (2 each behind the northeast doors). Pick up the painting. "Use" it to find out what really happened to Lysandus. You can always lie about it to Akorithi when you report back to her. |

| Getting out is a bit of a problem if you didn't anchor a "Recall" somewhere. Go all of the way back to where you last teleported and go through the secret door in the other room. |
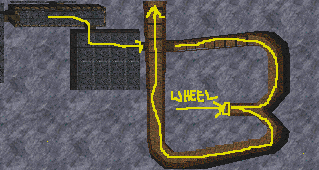
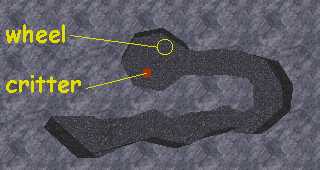
| Follow the narrow tunnel until it forks. Turn the wheel at the base of the fork, then keep going and through the door at the end. |
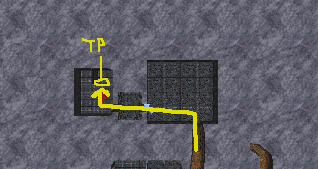
| Across the hall from this room there is another teleporter. Use it. |
| Go through the door and follow the corridor until it ends with a door on the left. Go through that door and use the teleporter. This part was the tricky part. Getting the rest of the way out is just a matter of following directions. |
There will be a secret door in the south wall of the room where you appear. Take the tunnel to the end; turn left when you get out the door. Go through the door (watch out for the hole in the floor if you pulled the lever in the little teleporter room on your way in) and out the south door of the room. Turn east at the first 4-way intersection, take the first corridor to the left and you'll see the main hall at the end. Remember, if you didn’t kill the guards on the way in, they’ll be looking for you on the way out.
When you report back to Akorithi, she will ask you whether you looked at the Painting or not. If you say, "Yes," your rep will take a slight hit in Sentinel and she will fuss at you about sticking your nose into the affairs of Royalty. If you say, "No," (in other words, if you lie) you will probably get away with it. She will pat you on the head, give you your gold and send you on your way.
The Blades
You must be at least 8th level and have completed the Painting quest for Queen Akorithi to activate this quest. You will receive a letter from one of the Underking's agents which asks for a meeting. The meeting will take place in a tavern in a random town in Sentinel. You will have 30 days from the time you get the letter to get to the meeting, but this is a little buggy. If you travel to any other province besides Sentinel after receiving the letter, the letter will usually disappear from your inventory. The time limit given by the Underking's agent does not jive with what you actually have. Like the Courier quest, go with what's in your log.
Now that you've made buddies with the King of Worms, it's time to foil one of his schemes. He's planted a cursed item in the Blades stronghold (Castle Llugwych in Ykalon province). The Underking wants you to get it before it can do any harm.
There are two ways to get to the item: the hard way and the easy way. The hard way involves getting yourself to the lower levels of the southeast corner of the dungeon and then making a long series of pulling switches and riding elevators. It's a good way to kill a few hours, kill a few critters and work on skills. It gets tiring after a while, so I usually resort to the easy way.
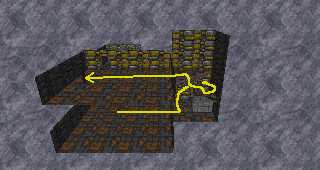
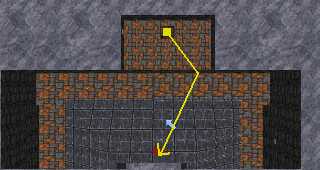
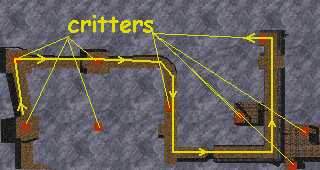
| You enter the castle in a large room with a door across from you and one on either side. Go across; kill the orc and skeletal warrior in the next room. There are rooms to the north and south of you that have treasure piles in them. The northern room also has a warrior-type. Go out through the door in front of you. Follow this corridor around (there's a Mage waiting for you at the bend) until you get to a door on your right (west). Go through it. |
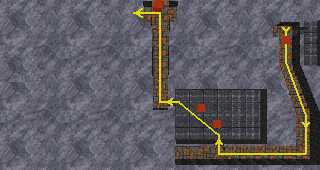
| Go up the stairs to the south (a warrior-type is waiting for you). Follow this corridor until you get to a door on your right (north). Go through this room (a human and an animal occupy the room) and out the west door. Follow the corridor until you get to a 4-way junction with a dead-end (and a warrior-type) in front of you. Turn left (west). |
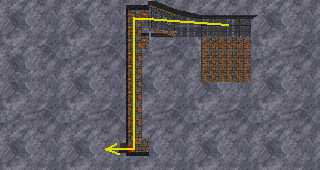
| Follow the passage through a small room (animal) and up a curving passageway. When you get to the 4-way intersection, go south. Follow this corridor until you get to the door (south). Two critters may come out of the rooms to the east and west. |

| Go through it and south until you get to the T-intersection. Turn east (or cut through the room with the critters and treasure pile). Go up the short ramp and follow the passage until you get to a door on your left (south). |
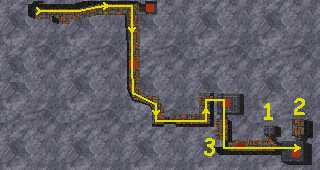
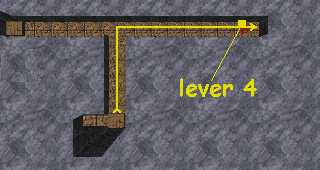
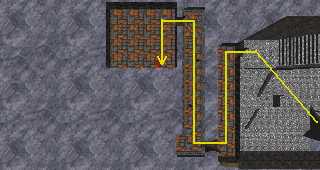
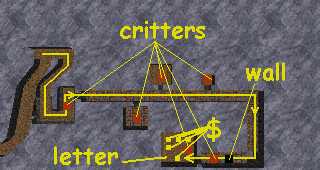
| Follow the corridor to its end. There will be a door in front of you (east) and a door to your left (north). Through the eastern door is a room with a bad guy. The lever in room 1 should open a door in the corridor above you. The lever in room 2 unlocks an elevator. Now go back to the elevator shaft (3) and take it up (it's already at the top when you get to it). |
| You'll be facing west in a corridor that turns north just in front of you. Take the opening on the right (east). The north-south corridor has another elevator at the north end, by the way. There will be a bad guy (random) in front of the door and a Vampire Ancient behind the door. Behind the door at the end of the short hallway is a room with a pyramid, 2 gargoyles, 1 regular vampire and a critter in the side room. The object you want is on top of the pyramid. |
The Vampire Ancient can be a tough fight for a character 10th level or less. If he's too much for you, let him chase you back to the elevator shaft while you ride the elevator all of the way to the bottom. He will wait for you to come back (no one ever claimed that DF vampires were terribly bright).
From the bottom of the elevator, go east at the first 4-way intersection (there should be an elevator at the end). Ride it up to a Y-shaped passageway and take the right (northern) branch. You'll find a secret door a couple of paces past the corner. Take that elevator up and you'll be at the north end of the corridor leading to your destination (the Vampire Ancient should still be around the corner, guarding the southern elevator shaft).
After retrieving the item, the Underking's agent will remove the curse from the item and let you keep it (it's a random magic item, meaning that your odds of getting something fairly cheesy are pretty good). He'll also tell you where Lysandus is buried and mark it on your map (the tomb is in Menevia province).
To the extent that the quest results in your getting information which you could get elsewhere, I would classify it as an "optional" quest. To the extent that it's a lot easier and more fun than dealing with random assassins, it's a required quest.
Medora's Tower (standard walkthru)
You must be at least 8th level in order to complete this quest. In order to set Lysandus' ghost to rest, you need the help of Medora Derinni, Lysandus' mage and mistress. Lhotun told you where her tower was. There are several entrances to the tower. There's the front door and, for those who like a challenge, there are a couple of entrances at the top of the tower. All enter into the same place on the map.
The path to Medora is fairly short, but deadly. If you're 8th level, you MIGHT survive the trip using this walkthru. I've taken serious damage at 30th level, so it's no picnic. If you want a much easier way of going, there is a shorter path that avoids many of the pre-placed critters and puts you up against random critters instead (random critters are pretty much based on your level).
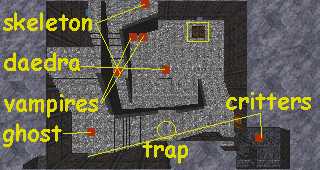
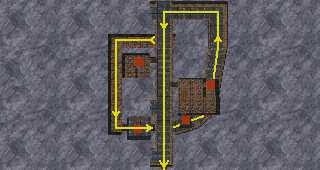
| Go through the door to your left as you enter the tower. You'll find two Skeletal Warriors on the other side. Go down the stairs (two vampires at the bottom) and up the stairs on the other side of the tower to the very top. The second landing is a trap that loads when you cross it and triggers when you hit the stairs on the other side. You can avoid it entirely by levitating over it. There is a ghost at the third landing, which might act as a shield for you, but Spell Reflection does not seem to work with this one. |
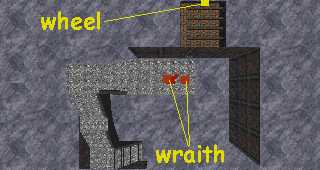
| There will be two wraiths waiting for you at the top. By this point they should be no problem for you. The door at the top will be locked. Pick it, bash it or cast "Open" on it. Turn the wheel on the back wall above the fireplace (you may need to turn slightly in order to see it - it tends to fade in and out) to open the trapdoor at the bottom. Odds are that you'll have a Daedra Seducer to contend with at the bottom. She usually manages to get stuck in the central column. If you want to, shoot her full of arrows before dropping through the trapdoor. |
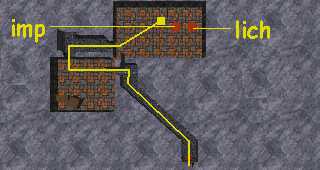
| Drop through the trapdoor. You'll find a lich and an imp. Of the two doors that lead from this room, one opens into a corridor. Go through that door and stop where the passage turns. There's a secret door to your left. Go through it and out the door on the other side of the room. |
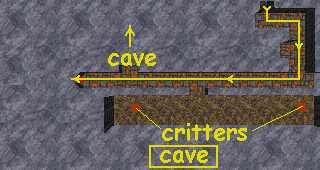
| Follow that corridor until it T's. You need to go right. Go down the hall. You'll pass a room with a bridge over a cave. There are two critters on your side of the cave. At least one (probably both) will come out to get you. Once you're past the cave, you'll come to a room with a large pyramid in it. |
| Go across the pyramid (there's a critter at the bottom - if your Stealth skill is high enough, he'll probably leave you alone) and through the door opposite the one you came in. |
| The back wall of the room is a very steep incline going up. It's tough, but it is possible to climb it. I almost always levitate up, but trying to climb at the sides is usually more successful than trying in the center. Go around the corner at the top and you'll come to a room that looks like a maze. The door you pass is where the other walkthru will hook into this one. There are three wraiths in the room. Don't go through any doors. You'll want to take the opening that has a ramp leading down on your left and right and a corridor in front. Take the ramp down (It doesn't matter which one -- they both go to the same place and both have a vampire on them). Kill the vampire and keep going down. |
| Taking the stairs down at the tapestry, you'll come to a room with two square pillars and a ghost. One of the pillars will have a lever on each side of it. Pull the two that have banners across from them (the east and west sides of the pillar). Don't pull any others (unless you want to mess with a Vampire Ancient). Go the to doorway that has a banner with a gold bull next to it. Go through that and out the other door. You'll see stairs leading up. There will be two wraiths on the stairs. |

| There will be a Lich waiting for you at the top. Sometimes you can get him to follow you down the stairs to the room with the movable walls. If you can do this, you can pin him on the other side of a wall and fill him full of arrows. If not, swing your sword and do it the old-fashioned way. Go through the doorway and Medora will be right in front of you. |

| Medora will be most happy to help you lay Lysandus' ghost to rest. But she's locked in the tower and can't do much. You need to retrieve a Unicorn's Horn from Nulfaga and bring it back to her. If you enjoyed the trip to Medora, cheer up. You'll get to do it a few more times. |
Medora's Tower (shortcut)
The standard walkthru has been around for so long that I don't even remember where it came from. I think Bethesda came up with it and everyone has been following it blindly (including me) for what seems like forever. I finally got tired of getting spelled by all of the liches and vampires and looked for a shorter (translate: easier) way to get to Medora. I found it and here it is:
| Run down to the end of the entrance hallway to draw the Skeletal Warriors away from the door. Wait until you hear them on the other side of the wall and then go back to the door. Levitate (or walk) across to the landing diagonally across from you (something will probably come through the door) and turn the wheel. This moves a stone plug farther down the entrance hallway. |
| Go back to the entrance and down the hallway. Go through the door and turn right (north). There will be a random critter in the corridor. Go to the door at the end and through it. You will find a teleporter in this room. Use it. |
| From where you appear (there will be a random water critter in the room with you), go through the door and up the stairs. Behind the door at the top (there will be a random undead in the room) is another teleporter. Turn slightly to your left so you are looking at the teleporter almost edge-on and click on it. |
| You appear on top of a closed trapdoor (there is another random critter in the room -- if you turned before clicking, it will be in front of you). Go through the door in the south wall and up the side of the pyramid. Click on the hanging chain to cast "Levitate" and fly up to the top of the platform directly above you. |
| There will be a random critter near the wall at the back of the platform. Go up the west (left) stairs. Something will come get you from the opening to your left (another random critter). Go through the door on the right at the end of the corridor. |
From this point you follow the standard walkthru. There will be three wraiths in the room behind the door, a vampire on the ramp going down on the other side (it doesn't matter which ramp you take -- there is a vampire on each of them), a ghost in the room with the levers (pull the ones facing the tapestries), two wraiths on the stairs going up and a lich right outside of Medora's room. To get out, just go back the way you came and follow the chain of teleporters until you get back to the entrance hallway.
Unicorn Horn (Shedungent)

| Getting to the Unicorn Horn is a pretty quick trip (unless you really feel like exploring Shedungent again). Go into Nulfaga's chamber (remember to say "shut up" to the banner to get in). Nulfaga is still nuttier than a fruitcake, so ignore her and go out the door on the other side. |

| The first door on your right has three levers in it. These raise and lower portcullises (portcullisi?) in another part of the dungeon and will allow you to get back out by the long route. The second door on the right is where you would come in if you had taken the long route to get to Nulfaga. Follow the passage up the stairs and down the other side. There is a random critter in the small room to the left. If it is capable of opening doors, it will try to come out and play with you (isn't it nice to be popular?). |
| Keep following the corridor until you get to a set of stairs on the left. There is a critter a short way past the stairs that will sometimes come out to play, but this does not always happen. At the top of the stairs you will find a four-way junction (and a playmate). This whole area is a series of ramps and landings that you are welcome to explore if you are of a mind to do so. If not, you want to go south from this junction. |
| Follow the corridor around until you see a torch on the left-hand wall (west). Clicking on it will open the passageway so you can get to the Horn. There is a critter directly in front of you, but it's the one at the end of the right-hand passage that usually manages to get in a good backstab before you know it's there. After getting rid of your friends, turn left and go up the ramp to another landing, where you will go north. In the room at the end of this passage is another critter (playmates all over the place, huh?). The door you need is in the south wall, but it's a "secret" door and difficult to see. The horn will be on the bed. Retrieve it and take it back to Medora. |
Barenziah's Book
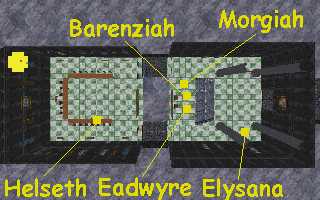
Shortly after reaching 9th level, having completed Helseth's Blackmail Quest and assuming you are still in the good graces of the nobility of Wayrest (not an easy task since almost everything you do seems to offend them), Queen Barenziah will send you a letter asking you to visit her to discuss some business of mutual interest. Her business is needing you to retrieve a chapter of an unauthorized biography ("correct wayward revolutionaries," as she so euphemistically puts it). She promises you information and a few GP's if you will take care of the matter for her.
If you move quickly, the book will be somewhere in the depths of Orsinium, normally in the eastern chamber under the big pyramid. There is a trick to getting to this room. Unlike similar set-ups in other dungeons, there are no chains hanging down from the platform to cast levitate on you. You will either need your own Levitate, a "Slowfall" spell/potion/device or be willing to take the damage from jumping down.

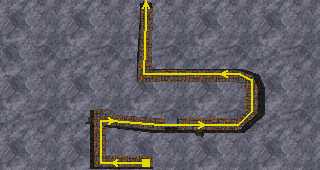
| Once you've jumped into the northeastern fountain and gone up the stairs to the left, you need to get into the maze above the pyramid chamber. Take the first left (east), ignore the next left, and take the third left (north). Around the corner you will find a wheel on the wall. Click it to unlock the doors below the pyramid. |
Go back to the platform and Levitate, Slowfall or jump down into the pyramid. If you choose Levitate or Slowfall, be cautious of the three critters (usually Orcs of some kind) at the bottom. They have a very bad habit of moving right under you, making it impossible for you to land (they can hit you, but you can't see to hit them - this is especially true of Slowfall). There are also critters in each of the four rooms and the doors to these rooms are now unlocked. This could get a little hairy.
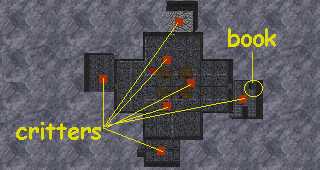
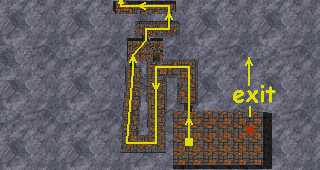
| The book will be in the eastern chamber. Pull the lever in the small closet to raise a platform that will allow you to access a wheel on the side wall. Clicking on the wheel will teleport you back on to the platform above the pyramid. You get out of Orsinium the same way you came in unless you have a "Recall" anchored. |
If you don't feel like messing with the wheel, you can attempt to open the doors yourself. You will need an "Open" spell, some item "of Undeniable Access", an outrageous lockpicking skill, or the Skeleton Key artifact (all four wouldn't hurt). Cast your spell or use the item until the door opens. The cheapie "Open" spell you probably made to practice your Mysticism skill will work if you have patience. By this point your odds of success are fairly good if you are persistent and the extra skill practice never hurts.
If you do not move quickly, the book will be moved to the depths of z:\CorvDoc\doclecture3\morgiah.htmlScourg Barrow.
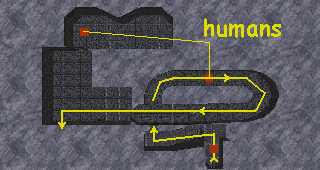
Instead of heading for the King of Worms, you want to head for the Rift. There are no stairs leading to the bottom of the Rift, so you will either need to Levitate, Slowfall or Jump. The floor of the rift has occasional critters on it (mostly animals at the end where you start and humans farther down), but the real danger comes from the Humans who populate the upper ledges. They like to shoot arrows at you and it’s at least moderately difficult for you to return the favor. The ledges connect, but it is a long, tedious process to get from ledge to ledge without levitating or using the floor of the Rift.

| Go all of the way to the end of the Rift. You will be looking for a secret panel on the south wall when you get to the end. Clicking on the panel will open it. |
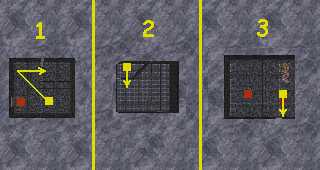
| At the bottom you will find a round cave that has a single critter in it and a wheel set in the floor. Turn the wheel and go back up to the floor of the Rift. |
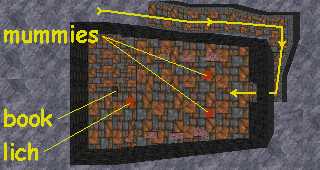
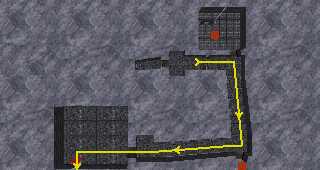
| The wheel raised a portcullis that blocked the passage on the other side of the Rift. Go down the passage to the bottom. You will find a room similar to the Necromancers Headquarters. There will be two mummies and a lich in the room. The lich can't come down off of the platform at the end, but he can still sling spells at you. The book should be on the black altar at the back of the room. |
The two mummies are no great shakes, but the Lich’s ranged spells are killer. He never seems to run out of magica, so either have some sort of Spell Resistance/Reflection up or be willing to take the damage while making a frontal assault.
The information that you gain from this little excursion is that Barenziah and the Emperor were lovers, she became pregnant and he had the pregnancy terminated against her will. It sort of explains why there is no love lost between Wayrest and the Empire. Since you do not need to have this information to complete the Main Quest, this particular quest is entirely optional.
Scourg Barrow is probably the largest of the Main Quest dungeons. It is disappointing to see all of that effort wasted on a couple of short excursions to the Necromancers and a "maybe" trip to fetch a book. If you have the time and inclination, Scourg Barrow is worth an explore all on its own. Stock up on drinks and munchies because you will be at it for a while.
Lich Dust
You must be at least 10th level to activate this quest. At some point after delivering the Unicorn Horn to Medora, she will contact you and tell you to go see Gortwog about the Dust of Restful Death, which is supposed to put Lysandus' spirit to rest.
This quest may also be accidentally activated if you try to do Elysana's second quest (The Setup) and Gortwog is the person you're supposed to see. It seems that if you try to talk to Gortwog at any time after talking to Medora for the first time, it activates this quest prematurely.
Gortwog will tell you that the dust will only calm Lysandus, not put him out of his misery. In return for his help in telling you where to locate the Dust, Gortwog wants Medora's support for his claim to the "heart of Tiber Septim" (the magic dingus you're supposed to be finding).
The Dust will be in a random dungeon in Balfiera province, in a random location within the dungeon. This quest has a lingering bug that prevents the quest dungeon from appearing on your overland map. Use the <ctrl>+f1 cheat to get it and then follow your usual dungeon crawling routine.
The key is that you're not looking for the component; you're looking for a mummy that will have the dust and a letter on its body. If you're using one of the later patches, the dust and letter will be on a green background (like any other quest object). If you're not using a patch, make sure that the mummy has lich dust AND a letter that says something about Medora. If it doesn't have both, then you haven't killed the right mummy. The letter makes interesting reading, but you have to “use” it several times to get all of the information out of it. When you've got the dust and letter, take them to Medora. She will make a few comments about Gortwog and the Orcs and tell you to come back in a month to get the finished product.
Lysandus’ Tomb
How you kill the month is up to you. Personally, I either anchor a "Recall" outside of Medora's tower (you're asking for trouble if you try to teleport INTO anything), then find some location that will take me 30 days travel time, go there, and teleport back to get the dust. Or I travel 15 days away and then travel back (Daggerfall is 19 days).
There is apparently no time limit on picking up the dust. I've run as much as 45 days past the end of the month and still been able to get the dust. If you're 10th level, you would be wise to be prepared for a fight before taking this one on. There are some very nasty critters keeping Lysandus company.
There are three ways to get the location of Lysandus' Tomb. First, you can successfully complete the quest for the Underking. Upon delivering the item from Castle Llugwych to the Underking's agent, the tomb will be marked on your map for you. Second, you can talk to Elysana in the Wayrest Court. The quest to escort her cousin will net you a string of assassins, one of whom will have a note with the location of the tomb (this doesn’t work very well). The third method is to cheat. There are two ways of doing this: you can either use the cheat mode keystroke (<ctrl>+f1) to put all dungeons on your map and then look for it in the Menevia Province or you can travel south (overland) from Westcastle. You'll get there eventually.
Here's a curious one: Lysandus was king of Daggerfall, fought with Sentinel over Betony and died in Anticlere. Why is he buried in Menevia? Personally, I think it was the result of a dart toss at Bethesda. Travel to the tomb and be prepared for a LONG walk.
Make sure you've got the dust before you go into the tomb. Many an over-eager/greedy player sold it off or dropped it and then couldn't finish.

| You'll enter the tomb in a large room with statuary on both sides and two doors at the other end. Go through the door on the left. Follow the passage around and take the first opening on the left (north). Follow this corridor through a door and keep going until you get to a floating skull. Click on it and you'll be teleported to another room. |
| Go out through the door in front of you. Follow this new passage, not going through any side doors. If you did not anchor a "Recall" somewhere, you will need to come back to this room to get out of the tomb. |
| When you get to a door to the west (left) and an opening to the east (right), go right, up the ramp (watch out for the pit at the top) and onward until you come to a door. |
| Go through the door, turn left (east), and follow the passage. Take the first right (east) passageway and go down. When you get to the 4-way intersection, go right (north). |
| Go east at the T-intersection and through the door. |

| Turn left and follow the passage, turn only when the passage does and stop when you get to the first door to your left. Go through this door. |

| At the T-intersection, go left (north). At the 4-way intersection, go right (east). Follow the passage around, go through any doors in front of you, go through the next 4-way and go through the first door on your left (east). Critters will be jumping out of the rooms that you pass. |

| This new passage is very long. Turn right at the second T-intersection, then go left at the next T-intersection. The passage will end at an elevator. Pull the lever and ride it. |
| OK. Now to get you to Lysandus, himself. The entrance to the tomb is right behind the wall at the top of the elevator. Too bad there is no "Passwall" spell in Daggerfall. Follow the passage around (random critters behind all but the last two doors – could be easy/killer depending on your level). Take the next elevator down and pull the lever that you find at the bottom. Now go back up and enter the tomb. |

| There will be three critters to your left when you enter this big room. In the southeastern big pillar, there is now an open door with a lever behind it. Pull the lever and the middle of the room will start to drop down. Run and jump on it before it gets too far down. |
| There will be a couple of critters at the bottom, but usually they manage to fall into the pit under the elevator. Lysandus is in the big coffin at the north. Pretty fancy digs for someone who was buried on the sly. |
If you have the Dust in your inventory when you click on Lysandus' coffin, you should get a nifty animation where Lysandus tells you who killed him and how to put him to rest (the answer to "whodunit?" is "Lord Woodborne of Wayrest" -- the mysterious "W." giving the assassins their instructions).
Getting back out again is another long walk. Go all of the way back to the room where you appeared after clicking the skull. If you go through the other door, you will get to another floating skull. Clicking on it will teleport you back near the entrance.
Woodborne Hall
After Lysandus tells you that Lord Woodborne is the guilty party, Woodborne Hall in Wayrest appears on your map. There are two ways to dispose of Woodborne: (1) kill him yourself (after all, he's done nothing to make your life easier) or, (2) let King Eadwyre kill him for you.
The first problem you encounter is getting into the dungeon. There are several sections of a large ramp that have to be moved into place in order to get to it. The first part of the quest involves a series of elevator rides and lever pulls. If you don't feel like messing with riding the elevators, go pull both elevator levers and use "Levitate" to get around. If you don't feel like messing with levers and elevators at all, just levitate to the top of the hall and pick the lock on the door at the top. For those who want to explore, pull levers, practice skills and pick up some goodies, here is how to lower the ramp. The levers can be pulled in any order; so don't worry if you don't do it in exactly this order. After you enter Woodborne Hall, there will be a door on either side of you. There are elevators behind each door that will take you to the four levers you need to pull in order to position the ramp.
For those who want to just get on with it, go to the Dungeon Entrance.

| As you enter the Hall, there will be doors to your right and left. These lead to elevators that will take you to the appropriate levers to lower the pieces of the ramp. The entrance to the dungeon proper is at the top of the hall. |
| Directly in front of you is a critter, with other critters behind pillars (out of view) and in the side rooms of the main hall. |
| We'll start with the south (right) elevator. At the bottom, go north to a room with two levers on the wall. The left one moves a section of ramp. The right one opens a secret door with two critters behind it. |
| Take the elevator back up to the next higher landing and go west. At the end of the hall is a room with two critters and a side room with a lever on the back wall. This lowers another section of the ramp. |
| Now, back to the top and the elevator to the north (left). This elevator is tricky. It takes off when you try to step on it and pulling the levers just sends it out into the void. At the first landing, go west. When you get to the torch, click on it to open the door and reveal the lever. |
| At the top landing, follow the passage until a door opens. Deal with the critter (sometimes it's treasure, so check your map to find the door) and go through the northern door. The lever is at the end of the passage (there's usually a critter in this hall, too). |
| All of the pieces of the ramp are now in place and you can just walk up to the entrance. There will be a critter at the top of the ramp (usually human) and a mage on top of one of the pillars behind you. The other three pillars have treasure piles on top of them. Sometimes the critter at the top is nice enough to open that locked door for you, sometimes not. |
The Dungeon Entrance
| Go through the door at the top of the ramp, Follow the corridor to a series of ramps and landings (like Shedungent and Lysandus' Tomb). Keep going north and through the door to a straight passage going north. |
| There will be a secret door (critter behind it) about 2/3 of the way down the straight passage. Go through the door and you will be in another series of ramps and landings. |
| At the first landing, save the game because you have a decision to make and it doesn’t always work correctly. Do you kill Woodborne yourself? Or do you let King Eadwyre do it for you? |
Route to the Letter
| If you choose to let Eadwyre do the dirty work, go east from the landing until you get to a T-intersection. Go east. Do not go through any side doors. After rounding a couple of corners, you'll come to a door in front of you. |
| Critters will jump out of the side rooms to get you as you go down the passage. When you get to the elevator shaft and look around the corner, you'll see a stone wall blocking your way. Ride the elevator up and then down and then back to the passage and the block will be gone. There are two spell slingers in the room with the letter and 5 or 6 treasure piles. |
The letter describes Woodborne 's plans for becoming King of Wayrest. If you talk to King Eadwyre after collecting the letter, the king will order Woodborne arrested and executed. You are supposed to get a few thousand gold for your efforts, too. Sometimes the old skinflint just doesn't come through, but check your inventory. If you see a pile of coins in Miscellaneous, that's your reward money.
Route to Woodborne
| From the landing, go north to the next landing and go east. Follow this passage to the first opening on the left (east) and go through the door. Follow the passage north through a 4-way intersection. |
| Go north through the 4-way intersection and follow the corridor until you get to a T-intersection where you'll go north again. Follow the corridor around. |

| When you get to the Y-intersection, take the left (east) passage. You 'll find Lord Woodborne near the end of it. He looks like any other fighter-type, so you won't know until you hit him that you've got the right critter. |
Once Woodborne is disposed of, you'll (hopefully) see the animation of Lysandus being put to rest. All of the spooks will disappear from the streets of Daggerfall and you will have completed the second of the Emperor 's missions and should be entitled to a little well-deserved rest. (yeah, right)
If you do not see the animation, restore your saved game (you did save at the landing, didn’t you?) and try the other option. If neither of these work, exit the game, run fixsave on your saved game AND on a game saved before entering Woodborne Hall. Now relaunch and try each option one more time. You’ll get it eventually.
Interlude #2
After putting Lysandus to rest by taking care of Lord Woodborne, you will hopefully have a little breathing space. If you tackled Lysandus's Tomb at 10th level, you should have a couple more levels before the next major quest kicks in (emphasis on "should" -- it's a little flaky in this regard).
Your next quest is going to be to retrieve the Totem of Tiber Septim. That's the Magical Dingus of Ultimate Power that everyone seems to be so hot to get their hands on.
Once you have the Totem, everyone who likes you will send you a letter offering rewards for giving them the Totem. On the other hand, everyone who dislikes you will just send thugs to take it off of your dead body, and the thugs show up just about every night (makes it difficult to get your beauty sleep).
Decide very quickly how many nightly hit squads (three thugs per group) you can handle and then spend your time building rep with as many people as possible to avoid getting thugs from them. The two major players that you cannot do quests for are the Underking and the Emperor, but they tend to be somewhat tolerant in the negative rep department. Everyone else (Gothryd, Gortwog, Eadwyre, Akorithi, and the King of Worms) can and does send thugs.
Use your breather wisely.
The Totem
You are supposed to be about 14th level before this quest kicks in, but I've had it launch as early as 10th or 11th level. The quest itself isn't too terribly difficult; it's the after-effects that can get a little hairy. You'll receive another letter from Brisienna asking you to meet her in a random tavern somewhere in Wayrest province. Don't ignore this letter. The mission? Retrieve the Totem of Tiber Septim (a.k.a. "The Magical Dingus of Ultimate Power") from the treasury at Daggerfall Castle. I didn't mark it on the maps, but the red squares are critters (hopefully you've figure that out by now).
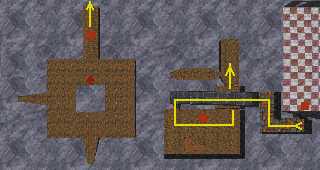
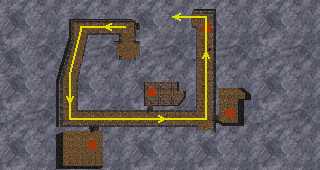
| You enter through the front door, just like usual. The entrance to the dungeon is the door on Gothryd's side of the throne room and it will be locked. Kind of hard to get lost at this point -- keep going until you get to the big room with the platforms and pillars. Levitate over to the big platform in the middle and go out the north door. |
| Go west and follow the ledge around to a passageway with a critter in it. You go through the first door on the north. |

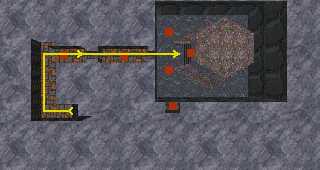
| This is the treasury room. There are Knights and Barbarians scattered around the upper levels of the room. When you get to the bottom, they will be Battlemages and Spellswords (see the last map for locations). |

| After disposing of the opposition, jump down into the big hole in the middle and follow the east passage on the south wall. You'll go underwater and run into an Atronach at the bottom. Turn the wheel and come back up. The vault is now lowered (blocking your escape route -- ooops!). Now use the west passage on the south wall. There are three chains in the back corner. The right one casts a water-breathing spell. The left one teleports you above the vault, but somewhere in mid-air. Clicking the middle chain will teleport you to a ledge near the vault. |
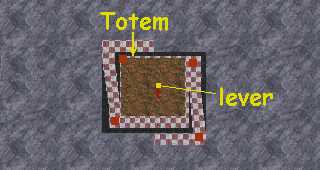
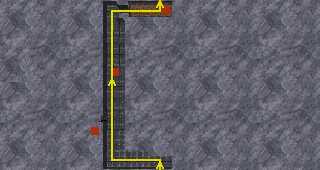
| On the top of the vault is a lever. Pull it and some blue bars will move up, opening the chamber with the Totem (it's the Papoose-looking thing on the pedestal). The treasure in the vaults is nothing to rave about. You can look for the other triggers if you want, but it's generally not worth the effort. |
Although it took a few levitates to get to the Totem, getting back can be done with a few running jumps. If you didn't take care of the Knights and Battlemages in the Throne Room, you'll probably have to deal with them on the way out. Once you're out of Castle Daggerfall, the real fun begins.
Interlude #3
You've had subtle (and not-so-subtle) hints and clues about the Totem, Numidium and Mantella for some time now. To review, Tiber Septim conquered Tamriel using something called the Numidium, which was created by his Battlemage. The Numidium was powered by the Mantella and was controlled by the Totem. Lord Woodborne had the Totem, Queen Abuk-i knew he had it, and it later disappeared. The Underking wants it, the Emperor wants it, Eadwyre wants it, Gortwog wants it, Akorithi wants it, Gothryd wants it and the King of Worms wants it.
You just snatched the Magical Dingus of Ultimate Power from Daggerfall, so everyone is going to be looking to you to give it to them. You have a year and a day to decide who gets it.
One of the great things about Daggerfall is that it does not have a static ending. You get to choose how the quest comes out. After you've collected the Totem, it will speak to you. It says it will only work for certain people. You're not one of them. Go ahead, try to use it and watch nothing happen. Your job is to decide who gets the Totem.
Nulfaga (after you have already delivered the Totem) will quote a riddle that details the possible recipients. It would have been better if you could have encountered the riddle beforehand, but this is the only place that it comes up. You have seven choices according to the riddle:
"Only Crowned Heads will hold the Totem True
First is one who killed, but did not kill another
Second is one who is two devoured by its young
Third is one who made one slave and many free
Fourth and Fifth are two who compete for mud
Sixth is one who brings a home to the homeless
Seventh is one who lords all, but does not lord at all."
Here's my own interpretation of its meaning:
"First is one who killed, but did not kill another": my best guess is that this refers to the King of Worms. I get it only through process of elimination, but it makes sense in a roundabout way with respect to the Lich's Soul quest. By his order the lich was killed, but the soul was trapped, so it wasn't really killed. The King of Worms promises you fame if you will give him the Totem and the dialog agrees with that, but nothing else seems to happen. The King of Worms will use the power of the Totem to become a god. The strange part is that after completing the Mantellan Crux, he's still under Scourg Barrow and there are no new temples to join.
"Second is one who is two devoured by its young": Who else but Eadwyre, king of Wayrest, who heads the most dysfunctional family in the Bay. Eadwyare will promise you gold (if you're on his good side), but won't deliver. In fact, he'll sic the guards on you (not much of a fight, actually, so don't be expecting any excitement at this point). Eadwyre will use the Totem to break free of the Empire.
"Third is one who made one slave and many free": My best guess for this line would be the Underking who made Numidium and helped establish the Septims as emperors of Tamriel. The Underking will give you the Necromancer's Amulet if you give him the Totem. Unlike the rest of the people who want the Totem, the only power the Underking wants is the power to die.
"Fourth and Fifth are two who compete for mud": The rulers of Daggerfall and Sentinel, Gothryd and Akorithi. Daggerfall and Sentinel were fighting over Betony at the time that Lysandus was killed. Each will use the Totem to overthrow the Empire, but they will give you 100,000 GP if you give them the Totem. There is a persistent bug that prevents Gothryd from sending you a letter, but be aware that you can give the totem to him if you wish.
"Sixth is one who brings a home to the homeless": Gortwog, the orc leader who wants an orcish homeland. Gortwog is supposed to give you a random artifact for the Totem and the dialog comports with that, but nothing appears in your inventory. I suspect that this is a bug which has never been fixed. Gortwog will use the Totem to create the free state of Orsinium.
"Seventh is one who lords all, but does not lord at all": my best guess is that this refers to the Emperor, titular head of a vast empire ("who lords all"), but whose writ runs mighty thin outside of the Imperial Province ("but who does not lord at all"). The Emperor will give you the Warlock's Ring if you give him the Totem. He will use the Totem to bring the rebellious provinces back in line and reestablish the power of the Septim dynasty.
Now comes fun time. Over the next few weeks you'll receive letters from the people who want it. Well, you'll receive letters from people where you don't have negative rep. If you've got negative rep with any of them, they'll send assassins to just take it away from you.
I can already hear the "ka-ching" of the cash register going off in some of your heads and see the dollar signs in your eyes, so let me satisfy your avaricious curiosity. Yes, the assassins work pretty much like they do in other quests: each group has the same stuff as the group before it, plus a few items. The truly greedy will capitalize on this by knowing who will get the Totem in advance and then making sure that they have negative rep with everyone else. This will produce a flood of assassins on a daily basis, and a ton of goodies for you to sell off. A word of caution, though: some of the assassins will be genuine Assassins (poisoned weapons and all), so be able to cure poison. The rest will be normal baddies (Knights, Archers and the like), except for the Orcs that Gortwog sends.
Remember, you have a year and a day in which to decide who gets the Totem. If you need to build up levels or work on skil
Date: 2016-01-03; view: 1645
| <== previous page | | | next page ==> |
| Prince Helseth's Blackmail Scam | | | The Mantella - Introduction |