CATEGORIES:
BiologyChemistryConstructionCultureEcologyEconomyElectronicsFinanceGeographyHistoryInformaticsLawMathematicsMechanicsMedicineOtherPedagogyPhilosophyPhysicsPolicyPsychologySociologySportTourism
KENSINGTON OUTLINE-STITCH
Kensington outline-stitching is done by taking a long stitch forward on the upper side, and a short stitch backward on the under-side of the cloth, and is used to form a line for ornament.
Materials—An embroidery needle, embroidery silk, and a strip of cloth.
Kensington outline-stitch—
1. Work from you, holding the cloth over the left forefinger.
2. Draw the needle through from underneath, at the lower end.
class="clear"  3. Insert the needle one-eighth of an inch above, and two or three threads to the right, bringing it out at the left one-sixteenth of an inch above the place where the thread comes through the cloth (Fig. 93).
4. Continue in this way, keeping the thread to the right of the needle, and being careful not to draw the stitches tight.
Suggestions— Some prefer keeping the thread to the left of the needle. Stem-stitching is similar to outline-stitching, except that the needle is put farther back.
BLANKET-STITCH
Blanket-stitching is used to secure and ornament the edges of woolen material.
Materials— An embroidery needle, embroidery silk, and a strip of flannel.
Blanket-stitch—
1. Work from left to right, holding the edge of the flannel towards you.
2. Beginning at the corner, insert the needle one-fourth of an inch from each edge, and take two running stitches to the edge, leaving an end of the thread to be cut off afterwards. This brings the thread in position for working.
3. Holding the thread under the left thumb, put the needle in where it was first inserted.
 4. Draw the needle through and over the thread (Fig. 94).
5. Holding the thread down with the thumb, insert the needle one-fourth of an inch to the right, and parallel with the previous stitch.
6. Draw the needle through, and over the thread, being careful that the thread lies loosely on the edge of the flannel.
7. Continue in this manner.
8. To fasten the thread, turn to the wrong side, take a running stitch under the last blanket-stitch. Draw the thread through, and cut it off.
9. To join the thread, put the needle in under the last stitch, as in beginning the work, and draw it out over the thread that lies along the edge.
 Suggestions— If the thread is not fastened and joined carefully, the symmetry of the stitches will be broken. The order of the stitches may be varied by taking them at different depths, and leaving spaces between, as in Fig. 95.
 A pretty border can be made with this stitch (Fig. 96), by making the first row the desired width from the edge, and taking the stitches for the second row through those of the first row, and so on.
EMBROIDERY KNOTS
Embroidery knots are used for ornamentation.
Materials— An embroidery needle, embroidery, silk, and a piece of flannel.
Embroidery knot No. 1—
1. Holding the flannel over the left forefinger, draw the needle through from underneath, at the place desired for the knot.
2. Take a small backstitch leaving the needle half-way through the flannel.
 3. Take the silk, where it comes through the flannel, and wind it twice around the needle (Fig. 97).
4. Holding the coil under the left thumb, draw the needle through and insert it where it came through the flannel, bringing it out where the next knot is to be made.
Embroidery knot No. 2—
1. Holding the flannel over the left forefinger, draw the needle through from underneath, at the place desired for the knot.
 2. Draw the silk towards you to the left; holding it under the thumb, bring the silk to the right, and cross below where the silk came out of the flannel (Fig. 98, a). Hold the loop thus formed under the thumb.
3. Insert the needle one or two threads back of a, bring it out at a, and pass it through the loop (Fig. 98).
4. Draw the needle and silk out straight upwards.
5. Insert the needle again at a, and bring it out where the next knot is to be made.
MARKING
Page 126 consists  of
of 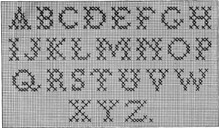 capital letters; page 127 consists of small letters and upright numerals; page 128 consists of small letters, suitable for fine material, and slanting numerals.
The material, thread and needle should correspond. The marking stitch consists of a cross-stitch taken over two threads of the canvas. To make the stitch, draw the needle through from underneath at the lower right-hand corner of the square for the stitch; insert the needle at the upper left-hand corner, bringing it out at the lower left-hand corner; insert the needle at the upper right-hand corner, and bring it out at the lower right-hand corner of the next stitch.
 Make no knots, but leave an end of the thread to be worked over with the first stitches, or it can afterwards be run in and out under the letter. Fasten the thread in the same manner. The stitches should all be crossed the same way; the thread should be fastened after finishing a letter, not carried from one to another. Have the back of the work look neat.
When marking on canvas is understood, fine material can be easily marked, by basting a piece of scrim over the place to be worked, and, after taking the stitches, drawing out the threads of the scrim.


Date: 2015-12-17; view: 1195
| <== previous page | | | next page ==> |
| CATCH OR HERRINGBONE-STITCH | | | Part IV—Drafting, Cutting, and Making Garments |