CATEGORIES:
BiologyChemistryConstructionCultureEcologyEconomyElectronicsFinanceGeographyHistoryInformaticsLawMathematicsMechanicsMedicineOtherPedagogyPhilosophyPhysicsPolicyPsychologySociologySportTourism
Pin Connections
How to use your Raspberry Pi like an Arduino

Finally got to experiment with the Raspberry Pi’s GPIO (General Purpose Input/Output) pins. I tried three methods: Python, Bash and C, and will describe each. Butfirst, here’ssomesetupinformation.
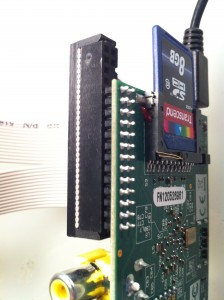
Connecting to the RPi’s GPIO header
I used an old floppy disk drive IDE ribbon cable. It has 34 pins, but the RPi’s header is only 26 pins, so part of the connector is unused. I soldered some breadboard-friendly header pins onto the other end, which is working pretty well so far. Bear in mind that some IDE cables may be more complicated than they look. Before powering anything up, make sure you check that each conductor is indeed separate and you’re not accidentally grounding or shorting anything. You can always make your own by getting some 26-conductor IDC connectors and using a vice to crimp it onto a piece of ribbon cable.
Pin Connections
…are confusing! There’s a master table here, and a diagram here. Looking at the diagram, my breakout header starts with 3.3V and moves left to right, top to bottom. Here are the pin connections from my header as pictured:
1) Pin 2: 5V
2) Pin 3: “GPIO0″. Connected to one end of the switch (the other end is connected to ground, since this GPIO pin has an internal pull-up resistor. This means that when the switch is not closed, the pin reads as “High,” and when closed, “Low.”
3) Pin 6: GND (note that it’s jumpered to my ground rail on my breakout board)
4) Pin 7: “GPIO4″. The anode of the LED through a 220-ohm resistor.
I’ll use this breakout board setup for all the following examples. Different libraries/tools use different pin numbers, adding to the confusion, so I’ll try to clear it up. Also note that I’m doing this through an SSH session, so there’s no monitor attached to the RPi. See my beginning instructions here if you don’t already have an SSH connection to your Pi.
Important Note: The RPi Wiki takes pains to remind you that these GPIO pins are unbuffered and unprotected, so if you short something out, you could fry your whole Pi, so be careful! There are a number of other breakout boards being developed that should make this safer.
Important Note: Any program that accesses the GPIO pins must be run as root, so if you get an error, remember to “sudo” your command.
Python: One of my preferred languages, so I figured I’d try it out. First, installpip (Pythonpackageinstaller):
1) sudo curl https://raw.github.com/pypa/pip/master/contrib/get-pip.py | python
2) Next, install the RPi.GPIO Python module:
3) sudo pip install rpi.gpio
4) Now, you can enter the python interpreter (sudo python) and do stuff like:
5) import RPi.GPIO as GPIO
GPIO.setup(7, GPIO.OUT)
GPIO.output(7, True)
GPIO.output(7,False)
Bash: Something I’ve always loved about Unix is the idea that everything is a file. On the Raspberry Pi, the GPIO pins are files too! With the pictured breadboard setup, we can do the following to turn the LED on and off (note that this uses the “BCM” pin numbering but the breadboard stays the same!):
(You can’t just put sudo before each command because the second command that the output is directed to would not be run as root. So, for simplicity, we drop into root first.)
sudosu -
echo "4" > /sys/class/gpio/export
echo "4" > /sys/class/gpio/export
echo "out" > /sys/class/gpio/gpio4/direction
echo "1" > /sys/class/gpio/gpio4/value
echo "0" > /sys/class/gpio/gpio4/value
To read from an input, ‘cat’ it like any other file!
echo "0" > /sys/class/gpio/export
echo "in" > /sys/class/gpio/gpio0/direction
cat /sys/class/gpio/gpio0/value
C: Good old C. The native example for C is really hairy, but luckily a plucky fellow named Gordon wrote an Arduino-like library just for the Raspberry Pi! Here’s what you need to do:
1) Download and install the library:
cd /tmp
wget http://project-downloads.drogon.net/files/wiringPi.tgz
tarxfz wiringPi.tgz
cdwiringPi/wiringPi
make
sudo make install
cd ../gpio
make
sudo make install
2) Your Pi’s system now has the wiringPi library installed, so we can write a little program that uses it.
cd ~
nanoblink.c
3) Type or paste in this program:
/*
* blink.c:
* Simple test program to blink an LED on pin 7
*/
#include <wiringPi.h>
#include <stdio.h>
int main (void)
{
int pin = 7;
printf("Raspberry Pi wiringPi blink test\n");
if (wiringPiSetup() == -1)
exit (1);
pinMode(pin, OUTPUT);
for (;;){
printf("LED On\n");
digitalWrite(pin, 1);
delay(250);
printf("LED Off\n");
digitalWrite(pin, 0);
delay(250);
}
return 0;
}
4) Andcompileit:
cc -o blink blink.c -L/usr/local/lib –lwiringPi
5) Andrunit:
sudo ./blink
6) You should have a happily blinking LED. Yay! Now for something more interesting:
/*
* buttonLED.c:
* Simple test program to change the blinking rate of an LED when a button is pressed
*/
#include <wiringPi.h>
#include <stdio.h>
int main (void)
{
intpin_LED = 7; // GPIO7 / header pin 7
intpin_switch = 8; // SDA0 / header pin 3
int del = 250;
printf ("Raspberry Pi wiringPi button LED test\n") ;
if (wiringPiSetup() == -1)
exit (1);
pinMode(pin_LED, OUTPUT);
pinMode(pin_switch, INPUT);
for (;;){
if (digitalRead (8) == 0){ // button pressed
del = 100;
} else {
del = 250;
}
digitalWrite(pin_LED, 1);
delay(del);
digitalWrite(pin_LED, 0);
delay(del);
}
return 0 ;
}
Where’s my analogRead?
Sadly, unlike an Arduino, the RPi doesn’t have an onboard ADC (Analog to Digital Converter). However, some of the breakout boards being designed will include an external ADC, such as the Gertboard. You can add your own external ADC, such as this one, by using the SPI bus on the RPi (the MOSI, MISO and SCK pins).
Date: 2015-02-28; view: 1837
| <== previous page | | | next page ==> |
| How to Eat Soup | | | HOW THE TIGER GOT ITS STRIPES |