CATEGORIES:
BiologyChemistryConstructionCultureEcologyEconomyElectronicsFinanceGeographyHistoryInformaticsLawMathematicsMechanicsMedicineOtherPedagogyPhilosophyPhysicsPolicyPsychologySociologySportTourism
Confetti Easter Eggs
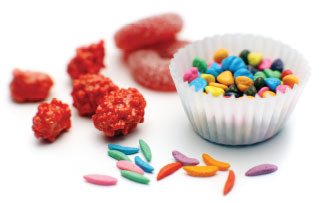
Dipping Easter eggs has never been so sweet. Coat egg-shaped cake balls in pastel-colored candy coating, and use corn syrup to attach colorful decorations. You’ll need 48 uncoated Basic Cake Balls, formed into egg shapes 48 ounces (3 pounds) pink, white, or yellow candy coating Deep, microwave-safe plastic bowl 48 paper lollipop sticks Styrofoam block Small paintbrush Light corn syrup Sanding sugar in various colors Large bowl Toothpicks Pastel confetti sprinkles To decorate Have the cake balls chilled and in the refrigerator. Melt the candy coating in a microwave-safe plastic bowl, following the instructions on the package. The coating should be about 3 inches deep for easier dipping. (I usually work with about 16 ounces of coating at a time.) When you are ready to dip, remove a few cake balls at a time from the refrigerator, keeping the rest chilled. One at a time, dip about ½ inch of the tip of a lollipop stick into the melted candy coating, and insert the stick straight into the bottom of a shaped cake ball, pushing it no more than halfway through. Dip the cake pop into the melted coating, and tap off any excess coating, as described in Dipping Methods. Let dry completely in the Styrofoam block. When the pops are dry, use a small paintbrush to paint a thin layer of corn syrup in a line around an egg. Do one line at a time. Right after you paint on the syrup, sprinkle it with one of the sanding sugar colors until all the corn syrup is covered. Work over a large bowl, so you can catch and reuse the sugar. Repeat, varying the designs and sanding sugar colors. Use a toothpick to apply small dots of melted coating to the egg, and attach confetti sprinkles in random or uniform designs. Let dry completely in the Styrofoam block.
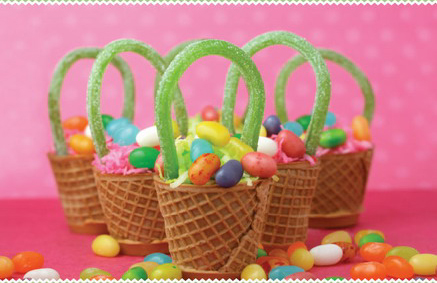
Easter Baskets
Use jelly beans, coconut, and ice cream cones to decorate these Easter basket cake bites. You’ll need 48 uncoated Basic Cake Balls 14-ounce package sweetened flaked coconut 2 large resealable plastic bags Pink and green pastel food coloring 48 sugar cones Serrated knife 16 ounces peanut butter candy coating 2 deep, microwave-safe plastic bowls Squeeze bottle Disc-shaped plastic candy mold (with cavity openings 13/8 inches wide) Baking sheet 48 ounces (3 pounds) chocolate or vanilla candy coating Spoon 48 green Sour Punch Straws 15-ounce bag jelly beans in assorted colors To decorate Have the cake balls chilled and in the refrigerator. Prepare the coconut the night before. Divide the coconut between the resealable plastic bags. Place a couple of drops of pink food coloring in one bag and add a little green coloring to the other. Close each bag and shake until the food coloring has been absorbed into the coconut. If you want the color to be darker, add another drop or two of food coloring to each bag. Let dry in the bag overnight. For the baskets, cut off the bottoms of the sugar cones, using a serrated knife, so you are left with tops that are 1½ to 2 inches tall. To complement the color of the sugar cones, melt the peanut butter candy coating in a microwave-safe bowl, following the instructions on the package, and pour it into a squeeze bottle. Pipe the peanut butter candy coating into one cavity of the disc-shaped candy mold. Press a sugar cone into the cavity. The open bottom of the cone should fit snugly inside the disc to create the bottom of the basket. Repeat with the remaining cavities. Place the filled candy mold on a baking sheet for stability and put it in the freezer for a few minutes to let the coating set. Remove from the freezer and lift the baskets from the mold by pulling gently on each sugar cone. Repeat to make the remaining sugar cone baskets. Melt the chocolate or vanilla candy coating in a deep, microwave-safe plastic bowl. The coating should be about 3 inches deep for easier coating. (I usually work with about 16 ounces of coating at a time.) When you are ready to coat, remove a few cake balls at a time from the refrigerator, keeping the rest chilled. One at a time, cover a cake ball with the melted chocolate or vanilla coating as described in Dipping Methods, and drop it into a basket with the spoon. You don’t have to be concerned about a smooth finish, because these will be hidden from view by the coconut and cones. For the handles, immediately insert each end of a Sour Punch Straw into the basket, on either side of the cake ball, before the coating sets. Once dry, the coating will help secure the basket handles in place. Place some of the prepared colored coconut on top of each cake ball while the coating is still wet. Press slightly so the coconut is glued to the coating. Use some of the coating to attach several jelly beans on top of the coconut for the eggs. Let dry completely.
Tips · To speed things up, use more than one plastic disc mold. · You can also use a squeeze bottle to add more coating before you sprinkle on the coconut. Make sure you pipe some where the straws are inserted, to help secure them. · Decorate these the same day you want to serve them. The straws may break if they stay bent for too long. · Save the sugar cone bottoms for the Ice Cream Cone Sundaes cake pops or the Clowning Around cake pops.
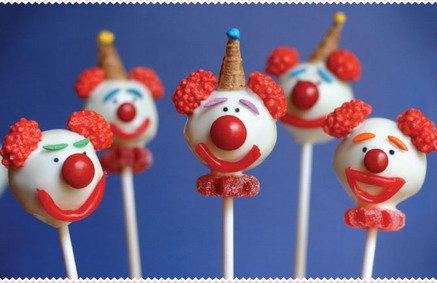
Clowning Around Get creative with candy and decorate funny faces in an assortment of expressions. You’ll need 48 uncoated Basic Cake Balls Serrated knife 48 or fewer sugar cones 48 ounces (3 pounds) white candy coating Deep, microwave-safe plastic bowl 48 paper lollipop sticks 96 French burnt peanut candies Styrofoam block Toothpicks 48 red regular or peanut M&M’s Confetti colorstick sprinkles Life Savers Gummies candies Fruit Roll-Ups Rainbow chip sprinkles Black edible-ink pen To decorate Have the cake balls chilled and in the refrigerator. Prepare the clown hats first. Using a serrated knife, cut off about 1 inch of the tips of several sugar cones and set the tips aside; you won’t need the tops of the cones. You don’t have to do enough for all the cake pops. Some clowns can be hatless. Melt the white candy coating in a microwave-safe plastic bowl, following the instructions on the package. The coating should be about 3 inches deep for easier dipping. (I usually work with about 16 ounces of coating at a time.) When you are ready to dip, remove a few cake balls at a time from the refrigerator, keeping the rest chilled. One at a time, dip about ½ inch of the tip of a lollipop stick into the melted candy coating, and insert the stick straight into a cake ball, pushing it no more than halfway through. Dip the cake pop into the melted coating, and tap off any excess coating, as described in Dipping Methods.
Right after dipping each pop, gently attach 2 of the burnt peanut candies in position for the hair, and attach the sugar cone piece on top for the hat. Hold each in place for a few seconds, until the candy coating sets like glue. Place the pop in the Styrofoam block to dry. Repeat until you’ve used up the sugar cone “hats” and all of the clowns have hair. For the face, use a toothpick to dot a small amount of melted candy coating in position for the nose and attach a red M&M. Hold it in place until set. Using the same technique, attach 2 colorstick sprinkles for the eyebrows, using matching colors. Then add 1 Life Saver Gummies candy for the collar by sliding it up the lollipop stick and attaching it to the clown head with more melted candy coating. Try cutting out small sections from the candy for a more decorative effect before you attach it. For the mouth, cut about a 1-inch rectangular piece of Fruit Roll-Up candy and roll it up tightly. Attach it, using more melted candy coating as glue. Attach a colored rainbow chip sprinkle on the top of the sugar cone hat with candy coating. Draw eyes with an edible-ink pen and let dry completely in the Styrofoam block. Tips · Switch things up. Don’t make all the clowns alike. Some can go without hats and without collars. Some can have different-sized noses made of red peanut or regular M&M’s. Attach the eyebrows and mouths at different angles for varied expressions. · Reserve the tops of the sugar cones for the Easter Baskets, if you like.
Date: 2016-01-14; view: 552
|