CATEGORIES:
BiologyChemistryConstructionCultureEcologyEconomyElectronicsFinanceGeographyHistoryInformaticsLawMathematicsMechanicsMedicineOtherPedagogyPhilosophyPhysicsPolicyPsychologySociologySportTourism
B. Internal Signal Routing
All the lines you see in Edit and the signal path window on the device are stereo signals.
Input 1 is routed into the left side of the first line in the signal. Input 2 is routed into the right side. This is important to know if you plan on using multiple instruments simultaneously.
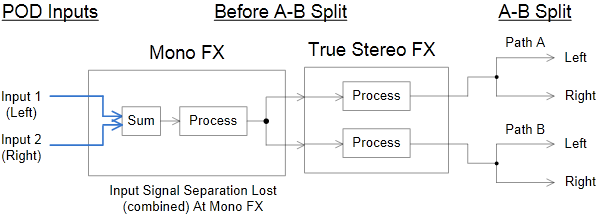
When a signal hits a mono effect (including amp models), the stereo signal is mixed down into a mono signal, processed by the effect, then split back into a stereo signal with equal left and right signals.
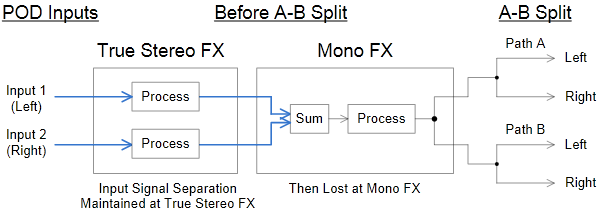
When the signal hits a “True Stereo” effect, each half of the signal is processed separately and output to the same side of the stereo field that it entered. There are two other styles of stereo effects that blend the processed signals into the output and do not keep the two channels separate.
Appendix A has diagrams that show how the four types of processing are applied inside the effects.
Appendix B has a table that tells you which type of processing each effect uses.
When the signal hits the channel splitter, the left half of the signal is fed to Channel A and split into a stereo signal with equal left and right signals. The same thing happens with the right half of the signal and Channel B.
To keep Inputs 1 and 2 from being combined do not put any FX before the A-B Split OR use only “True Stereo” FX before the A-B Split (see Appendices A and B). Then after the A-B Split, Input 1 will go to Path A and Input 2 will go to Path B and you can use whatever FX you want without combining the two signals (until the Mixer). Same FX processing occurs through Paths A and B and After the Mixer.
Here are a few diagrams that I hope help:

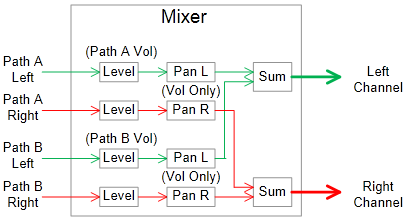
The mixer works a little bit deceptively. Think of it like this - first the mixer levels are applied to each Channel's stereo signal, adjusting the left and right signals equally. Then each channel has its pan setting applied to it. Think of pan as two separate volume controls for each channel - left volume and right volume. From 100% left to 0% (center), the left volume is 100%. As the pan moves from 0% to 100% right, the left volume goes from 100% to 0%. Vice versa regarding pan settings and right volume. So at 100% left the right half of the signal is completely muted and 100% right the left side is muted. At 0% both sides keep their original volume. Once each channel has the level and pan settings applied to it, the left side of Channel A and left side of Channel B are mixed down and output to the left side of stereo signal leaving the Mixer. Same for the right settings.
Top of Pod Setup
C. Running Direct (PA/board/computer or DAW/monitors/headphones)
Use this method if you want to run the Pod straight into a PA system, mixing board or mixing board for live purposes or a computer/DAW, home stereo, or headphones for recording or practicing. The Pod will completely simulate a guitar rig - amp (including pre-amp and power amp) and speakers (including cabinet). If you want, you can disable some of these features and use other gear to get that tone - like a speaker simulator device or a convolution reverb device/software that is using an impulse response (IR) designed to mimic a guitar cabinet.
You can additionally use effects from the Pod or use external effects, placing them before the Pod or in its effects loop (or even after if you use 1/4" or XLR output).
Running this way generally means you must choose "Studio/Direct" as your output mode, to enable cab/mic simulation (see output modes section), unless you are running external speaker simulation (such as an IR). Otherwise, your tone will be very harsh. Even in this case, I still recommend using "Studio/Direct" output mode and using the "no cab" option for your cabinet selection, simply to reduce complication.
However I should point out that you can use the cab models with a non-"Studio/Direct" output mode as a mild EQ effect, and it will sound relatively natural with an external speaker simulator/IR. I don’t recommend this, as it seems to dial out some of the high end, which is the area most difficult to dial in with the Pod; but it may be fruitful to experiment with if you don't mind losing some highs.
Here are a few guidelines to keep in mind for this connection type:
- If connected via USB, the Pod ASIO driver control panel has a default option of adding +18 db to the signal. This will often push it into clipping. If you have clipping, try turning this off.
- The Pod's ASIO driver is pretty low latency, if your computer is powerful enough to handle it. I've never had good experiences with high-quality audio over USB, so I connect via SPDIF to a firewire interface. My latency is extremely low (3 ms). I get no pops or clicks with 128 buffer size.
- Connecting digitally to a DAW (or an advanced mixing board) via USB, SPDIF, or AES avoids converting the sound to analog then back to digital, which will add a bit of noise and distortion into the tone.
- If you're using the 1/4" output(s) from the Pod and also using external effects, it's likely better to place them after the Pod's output rather than in its effects loop, to save on a possibly unnecessary D/A/D conversion. For other output connections or if your effects are level-sensitive, this might not be possible.
- The 1/4" outputs will sum to mono if only one of the two outputs is being used. In contrast, the XLR outputs will never sum to mono.
- The effects loop send connection is actually a 3-ring stereo connection. If you know what you're doing, you can use this as an additional unbalanced output.
- 1/4" unbalanced cable is subject to interference, often produced by florescent lighting. Use XLR where possible for better tone, especially where long runs of wire are necessary.
Top of Pod Setup
Date: 2016-01-03; view: 1053
| <== previous page | | | next page ==> |
| Iv. Live-Voiced Cabs | | | Ii. Using a real amp as a pre-amp |