CATEGORIES:
BiologyChemistryConstructionCultureEcologyEconomyElectronicsFinanceGeographyHistoryInformaticsLawMathematicsMechanicsMedicineOtherPedagogyPhilosophyPhysicsPolicyPsychologySociologySportTourism
Create a lab environment
Both physical computers and virtual machines can be added to a standard environment. If you have virtual machines that are managed by SCVMM, it’s better to add them to an SCVMM environment instead.
Each machine has to be running one of these operating systems: Windows XP SP3, Windows Vista SP2, Windows 7 SP1, Windows 8, Windows Server 2008, or Windows Server 2012.
1.On each machine:
o Configure a user account and a password that has administrative privileges. All the machines must have the same username and password. It doesn’t matter whether the account is a domain or a local account.
o Make sure that file sharing is enabled.
2.Install Test Controller on a server (go to installation instructions).
3.Open Microsoft Test Manager and connect to your team project and test plan.
4.Start the new environment wizard.

5.Choose the Standard environment and type the Name of the Environment.
6.Define the environment by adding the computers. Enter the fully-qualified domain name of each computer.Set the role of each machine, for example to Web Server or Database Server. You can either choose a role from the drop-down list, or invent your own role name. In manual testing, the role names help you remember how you intend to set up each machine. 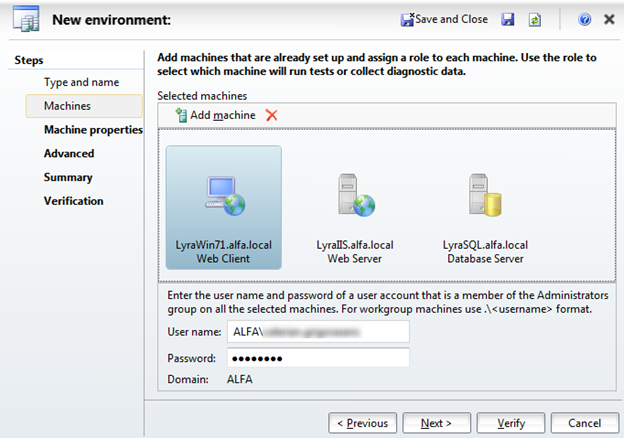
7. Machine properties step can be omitted.
8.In the Advanced Step complete the following fields:
a) Choose the Test controller to run tests in the environment. This is the test controller which will be used to run the tests in this Lab Environment.
b) Check checkbox “Configure environment to run UI tests” and select the Web Client machine on which will be run UI tests.
c) Specify the user account for the test agent.

9.In the Summary step you can check the information and go to next step.
10.Click “Verify” button to initiate the verification and complete the creation of the lab environment. When the environment’s status is ready, this means that test agents have been installed on each machine, and that they are communicating with your team project’s test controller. The test agents let you collect diagnostic data from its machines while you run your test.
In most cases, when you create lab environments, you shouldn’t manually install test agents on the machines in your environments. Lab Management automatically installs and configures test agents in your lab environments when it creates them. These are the exceptions:
· If you are creating a network isolated environment, before you store the environment in your team project library, install test agents in the environment by running the "Microsoft Visual Studio Agents" CD or the downloaded ISO image.. However, you should not configure those test agents. For information about setting up a network isolated environment, see Creating and using a network isolated environment.
· If you’re creating a lab environment that contains any Windows XP machines, you must manually install test agents on the Windows XP machines, and then perform some extra steps. See Configuring Lab Environments that Contain Windows XP or Windows Server 2003 Machines.
Note: In case if the Test Agent doesn’t install and configure automatically on the specific machine, you will need to install and configure the agent manually.
Date: 2015-12-24; view: 1052
| <== previous page | | | next page ==> |
| Automate a test case | | | Create a release template |