CATEGORIES:
BiologyChemistryConstructionCultureEcologyEconomyElectronicsFinanceGeographyHistoryInformaticsLawMathematicsMechanicsMedicineOtherPedagogyPhilosophyPhysicsPolicyPsychologySociologySportTourism
STOCKING-WEB STITCHStocking-web stitches are used for filling in a hole in stockinet, so as to present the same appearance as the woven stockinet, and are made on a foundation of strands. Materials— A long-eyed needle, No. 7 needle, No. 40 thread, a piece of coarse stockinet three inches square, yarn to match in color and quality, and a piece of cardboard two inches square. Stocking-web stitches— 1. In the centre of the stockinet, cut carefully, by a thread, an inch square. 2. Ravel the edges until the loops are clear and even. 3. With the wrong side of the stockinet to the cardboard, fold over the edges and baste carefully. 5. Hold the ribs of the stockinet vertically. 7. Swiss-darn (page 90) over these stitches, and work across the strands with a stitch similar to grafting, inserting the needle between the strands in beginning and finishing the loop (Fig. 67). 8. Finish the row by Swiss-darning over two or three loops beyond. 9. Turn the work around, and one row above, work back in a similar manner. 10. Continue working up the strands, and finish by grafting the last row of loops made, to the loops of the stockinet. For what are stocking-web stitches used? On what are they made? CLOTH DARNING Cloth darning is used to strengthen worn places, or to draw together the edges of a tear or cut. STRAIGHTWAY-DARN Materials— No. 9 needle, No. 80 red, blue and pink thread, and two pieces of cotton cloth, each three inches and a half square. Straightway-tear— Darned with vertical stitches. A blue thread represents the tear. 1. Crease across the middle of one of the squares of cloth. 3. Make two creases, one, one-fourth of an inch above; and one, one-fourth of an inch below the running. 4. Leaving an inch at both ends, make a running on each crease, with pink thread (Fig. 68). (The pink threads are boundary lines for the stitches). 5. Hold the tear over the cushion of the left forefinger. 7. Take six running stitches upwards, bringing the needle out a little below the upper pink line (Fig. 69, b) and leaving an end of the thread to be cut off later. 8. Finish the row, by inserting the needle above the line; draw it through below the line for beginning the next row. 9. Taking up the threads of the cloth, which were passed over in the preceding row, bring the needle out a little above the lower pink line. 10. Insert the needle below the line, and draw it through above the line for beginning the next row. 11. Make two rows, between this row and the end of the tear. 12. Beginning the fifth row above the lower line, put the needle, at the third stitch, down through the blue line or tear (Fig. 69, c). 13. Take two more stitches, bringing the needle out below the upper pink line. 14. Finish the row; and continue in the same manner, always putting the needle at the third stitch, down through the tear, to secure the edges. 15. In finishing the darn, make four rows beyond the tear. Straightway-tear— Darned with slanting stitches. 1. Crease, and run a square of cloth as before (Fig. 68). 3. On a line, slanting so as to cut off one-eighth of an inch on the opposite line, take six running stitches, bringing the needle out; a little below the upper line (Fig. 70, b), and leaving an end of the thread to be cut of later. 4. Insert the needle above the line, and pointing it towards you, take six stitches on a line, all having the same slant. Bring the needle out above the lower line at the sixth stitch. 5. Insert the needle below the lower line and take six stitches, having the same slant as before; at the fourth stitch, draw the needle down through the tear (Fig. 70, c). 6. Continue in this manner, always drawing the needle down through the tear, at the fourth stitch. 7. In finishing the darn, make several rows beyond the tear. BIAS—DARN Materials— Same as for a straightway-darn (page 93). Bias-darn, or across both the warp and the woof—A blue thread represents the tear. 1. Crease the square of cloth diagonally from corner to corner. 2. Leaving two inches at each end, run on the crease with blue thread. 3. Make two creases, one, one-fourth of an inch above; and one, one-fourth of an inch below the running. 4. Leaving an inch and a fourth at both ends, make a running on each crease with pink thread. 5. Thread the needle with red thread. 7. Beginning the fifth row above the lower line, draw the needle down through the tear at the fourth stitch (Fig. 71, c). 8. Take three more stitches, bringing the needle out below the upper line. 9. Insert the needle above the line, to finish the row; drawing it out below the line for the next row. 10. Continue in this manner, always drawing the needle down through the tear, at the fourth stitch. 11. In finishing the darn, make several rows beyond the tear. CORNER-DARN Materials— Same as for a straightway-darn (page 93). Corner-darn— A blue thread represents the tear. 1. Crease one side of the cloth one inch from the edge. 2. At right angles with the crease, make another crease one inch from the edge. 4. With the pink thread run on the crease, on both sides of the angle, one and a half inches from point a (Fig. 72). 5. Crease an angle half-an-inch inside the first angle. 6. With the pink thread, run on the crease, on both sides of the angle, one inch (Fig. 72). 7. Crease half-way between the two angles, and run with blue thread. 8. Using red thread, make a large knot (cut it off afterwards), and insert the needle from the right side, at the corner (Fig. 72, b). The knot is made to aid in drawing up the corner, 9. Run to point a, putting the needle down through the tear, at the fourth stitch. 10. Slightly curving to the right, return to point b. 11. Make a row very close and to the left of the first row, taking the stitches alternately. 12. Slightly curving to the left, return to point b. 13. At the left, make a row directly on a line with a thread of the cloth, to the outer pink line. 14. Make a curved line at the right to point b. 15. On the opposite side of the corner, make a row on a line with a thread of the cloth, as far as the outer pink line. 16. Making a line, curving to the left, return to point b. 17. Beginning at the corner, darn both sides with vertical stitches (page 94), or slanting stitches (page 94). Date: 2015-12-17; view: 587
|
 4. With the fine needle and thread, connect the upper and lower loops, as in Fig. 66.
 6. Having the coarse needle threaded with the yarn, insert it one or two loops to the right of the lower row, and one row above (Fig. 67, a).
 2. Leaving an inch and a fourth at each end, make a running on the crease, with the blue thread (Fig. 68).
 6. Threading the needle with red thread, insert it at the right of the lower pink line (Fig. 69,a).
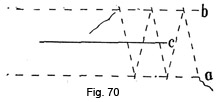 2. Threading the needle with red thread, insert it at the right of the lower pink line (Fig. 70, a).
 6. At the right, and beyond the blue line or tear, make four rows of eight stitches each, (as for a straightway-darn, page 94) on a line with the vertical threads of the cloth (Fig. 71).
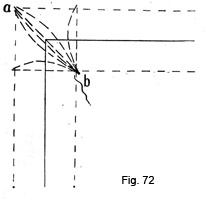 3. Call the vertex of the angle a (Fig. 72).