CATEGORIES:
BiologyChemistryConstructionCultureEcologyEconomyElectronicsFinanceGeographyHistoryInformaticsLawMathematicsMechanicsMedicineOtherPedagogyPhilosophyPhysicsPolicyPsychologySociologySportTourism
Chocolate Cupcake PopsEveryone loves a chocolate cupcake, but for even more fun add swirls to the top for a decorative touch. And don’t stop at chocolate; these can be made using any candy coating color scheme. You’ll need 48 uncoated Basic Cupcake Pops 48 ounces (3 pounds) chocolate candy coating 2 deep, microwave-safe plastic bowls Dish towel Wax paper 2 baking sheets 48 paper lollipop sticks Styrofoam block Toothpicks 16 ounces white candy coating Small squeeze bottle
To decorate Have the molded cupcake shapes chilled and in the refrigerator. Melt the chocolate candy coating in a microwave-safe plastic bowl, following the instructions on the package. The coating should be about 3 inches deep for easier dipping. (I usually work with about 16 ounces of coating at a time.) When you are ready to dip, remove a few cupcake shapes at a time from the refrigerator, keeping the rest chilled. One at a time, take a cake ball and, holding it by the mounded top, dip the bottom into the melted chocolate candy coating—just to the point where the mounded shape starts. Remove it from the chocolate, turn it upside down, and swirl your hand in a circular motion. This will cause any excess chocolate coating to slide down slightly. When the coating reaches the bottom of the mounded cupcake top shape, you can stop. Have a dish towel handy to wipe off your fingertips, as it is highly likely that you’ll get some coating on them. Don’t use water to rinse your hands, as getting water in the coating can make it unusable. Place the half-coated cupcake shape on wax paper–covered baking sheets, with the candy-coated side up. Immediately dip about ½ inch of the tip of a lollipop stick into the chocolate candy coating, and insert the stick straight into the flat, chocolate-coated bottom of the cupcake while the coating is still wet. Push it no more than halfway through. Continue with the rest of the cake balls and let dry completely in the Styrofoam block.
Now you’ll decorate the tops, resulting in a finished cupcake pop. Holding its lollipop stick, dip the top of a cupcake in more of the melted chocolate candy coating. It should completely cover the rest of the exposed cupcake and meet the edge of the first chocolate coating. Remove the cupcake pop from the coating, and turn it right-side up. If the chocolate is too hot, it will start to drip down the sides. If this happens, let the coating sit for a few minutes to thicken. Then when you dip the tops, the coating will stay in place. Use a toothpick to touch up any areas the melted chocolate didn’t cover. Let the pops stand in the Styrofoam block to dry completely. Melt the white candy coating in the second plastic bowl, and pour it into the squeeze bottle. Pipe white swirls on the top of each cupcake pop for decoration and let dry.
Tips · You can make these using pastel colors for a totally different look. · You can dip the shaped cupcakes entirely in chocolate candy coating instead of using the two-step method; however, the cupcake tops will not be as defined.
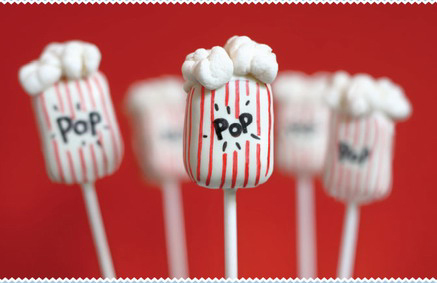
Popcorn Bags
Turn any movie night into a sweet experience with these “popcorn” cake pops. You’ll need 48 uncoated Basic Cake Balls 48 ounces (3 pounds) white candy coating Deep, microwave-safe plastic bowl 48 paper lollipop sticks Styrofoam block Small, sharp knife 144 miniature marshmallows Black edible-ink pen Red edible-ink pen To decorate Remove the cake balls from the refrigerator and mold them into rectangular shapes to resemble popcorn bags. After shaping, put the cakes in the freezer for about 15 minutes to firm them up for dipping. Once they are firm, transfer them to the refrigerator. Melt the white candy coating in a microwave-safe plastic bowl, following the instructions on the package. The coating should be about 3 inches deep for easier dipping. (I usually work with about 16 ounces of coating at a time.) When you are ready to dip, remove a few cake balls at a time from the refrigerator, keeping the rest chilled. One at a time, dip ½ inch of the tip of a lollipop stick into the melted candy coating, and insert the stick straight into a rectangular cake ball, pushing it no more than halfway through. Dip the cake pop into the melted coating, and tap off any excess coating, as described in Dipping Methods. Place in the Styrofoam block to dry. Prepare the popcorn. Use a sharp knife to make 2 or 3 diagonal marks on each mini-marshmallow. Don’t cut through the marshmallows. When the cake pops are dry, dip the tops back in the melted candy coating. Hold them right-side up and attach 3 mini-marshmallows to each one. The marshmallows will attach more quickly if the candy coating is not too hot. Repeat until all the cake pops have marshmallows attached, and let dry completely in the Styrofoam block. Write “POP” on the front of each cake pop with a black edible-ink pen. Draw vertical lines on each pop using a red edible-ink pen. Return them to the Styrofoam block to let the ink dry completely.
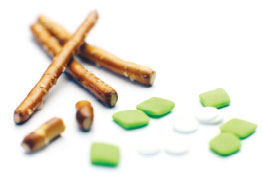
Apple Pops
These are great little treats for teachers, for the first day of school or just for fun. You can make them plain or with sprinkles and edible-ink details for personality. You’ll need 48 uncoated Basic Cake Balls Wax paper Baking sheet 48 ounces (3 pounds) red candy coating Deep, microwave-safe plastic bowl 48 paper lollipop sticks 24 pretzel sticks, broken into ½-inch pieces 48 green jumbo diamond sprinkles or similar green candy Styrofoam block Toothpicks 96 large white confetti sprinkles Black edible-ink pen
To decorate Reshape the round cake balls so they are slightly wider at the top than the bottom. You can press down on the top and up on the bottom with your fingertips to make subtle indentations, creating an apple shape. Place the apple-shaped cake balls on a wax paper–covered baking sheet and put in the freezer for about 15 minutes to firm them up for dipping. Once firm, transfer them to the refrigerator. Melt the red candy coating in a microwave-safe plastic bowl, following the instructions on the package. The coating should be about 3 inches deep for easier dipping. (I usually work with about 16 ounces of coating at a time.) When you are ready to dip, remove a few cake balls at a time from the refrigerator, keeping the rest chilled. One at a time, dip about ½ inch of the tip of a lollipop stick into the melted candy coating, and insert the stick straight into the bottom of an apple-shaped cake ball, pushing it no more than halfway through. Dip the cake pop into the melted coating, and tap off any excess coating, as described in Dipping Methods. While the coating is still wet, insert a pretzel piece on top for the stem, and attach 1 green jumbo sprinkle for the leaf. Place in the Styrofoam block to dry. Repeat until all the apple cake pops have the stems and leaves. When the pops are dry, use a toothpick to dot a small amount of melted candy coating in position for the eyes, and attach 2 white confetti sprinkles. Place in the Styrofoam block to dry completely. Draw on facial details, including pupils, eyelashes, and big smiles, using a black edible-ink pen. Place in the Styrofoam block to dry.
Date: 2016-01-14; view: 523
|