CATEGORIES:
BiologyChemistryConstructionCultureEcologyEconomyElectronicsFinanceGeographyHistoryInformaticsLawMathematicsMechanicsMedicineOtherPedagogyPhilosophyPhysicsPolicyPsychologySociologySportTourism
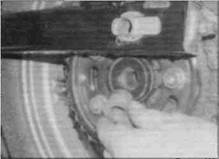
Support the wheel and withdraw the axlenoting the order for reassembly (see illustrations).
4Unscrew the axle nut and remove the nut and thespecial cranked washer (see illustration). 5Support the wheel then withdraw the axle and lower the wheel to the ground (see illustration). 6Disengage the chain from the sprocket and remove the wheel from the swingarm (see illustration). 7Remove the spacers located on each side of the wheel for safekeeping, noting how they fit (see illustration). 8If necessary, withdraw the chain tensioner assemblies from the ends of the swingarm (see Chapter 6). 9 Check the axle for straightness by rolling it on a flat surface such as a piece of plate glass (if the axle is corroded, first remove the corrosion with wire wool). If the equipment is available, place the axle in V-blocks and check the runout using a dial gauge. If the axle is bent or the runout exceeds the limit specified at the beginning of this Chapter, renew it. 10 Refer to Section 17 if wheel bearing Installation 11Apply a thin coat of grease to the axle, and also to the inside of the grease seal in the sprocket carrier and to both wheel spacers. If removed, slide the chain tensioner assemblies into the ends of the swingarm. 12 Manoeuvre the wheel between the ends of the swingarm and engage the chain on the sprocket. 13Fit the headed spacer into the grease seal in the left-hand side of the hub, then lift the wheel into position and slide the axle into place making sure that the plain spacer is located between the brake backplate and the swingarm (see illustration).Make sure that the axle has passed through both chain adjusters. 14 Fit the cranked washer and hand tighten the axle nut. Check the chain tension (see Chapter 1) and then tighten the nut to the specified torque setting, counter-holding the axle head on the other side of the machine. 15Align the brake torque arm with the brake backplate. Insert the bolt through the backplate first, ensuring that the bolt head locates in the recess in the backplate (see illustration),and install the bush, washer and
Date: 2016-01-14; view: 572
|