CATEGORIES:
BiologyChemistryConstructionCultureEcologyEconomyElectronicsFinanceGeographyHistoryInformaticsLawMathematicsMechanicsMedicineOtherPedagogyPhilosophyPhysicsPolicyPsychologySociologySportTourism
B Front brake caliper - Brembo type (V, W, SW, X, SX, Y and SY models)
| 6 Caliper bracket 7 Bleed valve 8 Dust boots 9 Slider pins |
| 10 32 mm piston 11 30 mm piston 12 Dust seals 13 Fluid seals |
1 Pad retaining pin
2 R-clip
3 Brake pads
4 Pad spring
5 Pad plate
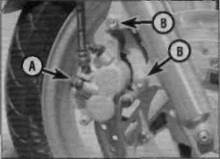
Hose banjo bolt (A), caliper mounting bolts (B)
caliper, then unscrew the hose banjo bolt and separate the hose from the caliper (see illustration). Note:If you are planning to overhaul the caliper and don't have a source of compressed air to blow out the pistons, the hydraulic system can be used to force the pistons out of the body once the pads have been removed. Disconnect the hose once the pistons have been sufficiently displaced.
4 Clamp the hose or wrap a plastic bag tightly around it to prevent fluid spills and stop dirt entering the system. Discard the sealing washers as new ones must be used on installation.
5 Unscrew the caliper mounting bolts, and pull the caliper off the disc (see illustration).Discard the bolts as Honda specify new ones must be fitted on reassembly.
6 If the caliper is just being displaced, unscrew the bolt securing the brake hose to the fork slider and secure the caliper to the motorcycle with a cable tie to ensure no strain is placed on the hose. Note:Do not operate the brake lever while the caliper is off the disc.
Overhaul
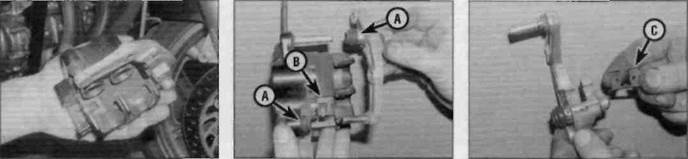
7 Pull thecaliper off the caliper bracket, noting how it fits.
8 Remove the slider pin boots, the pad spring inside the caliper mouth and the pad plate (if loose) on the caliper bracket, noting how they fit (see illustrations).Clean the exterior of the caliper with denatured alcohol or brake system cleaner. Make sure all old grease is removed from the slider pins. If the pad plate or the pad spring are badly corroded or worn they should be renewed.
|
Remove the caliper from the disc
A Remove the slider pin boots (A), pad spring (B)...
B ... and pad pla
(oj
7*6 Brakes, wheels and tyres
3.10 Remove the dust seal carefully to avoid damage to thebore and seal groove
9 Ifthe pistons have not been displaced
already and cannot be removed by hand (see
Step 3), force them out using compressed air.
If compressed air is used, place a wad of rag
between the pistons and the caliper to act as
a cushion, then use compressed air directed
into the fluid inlet to force the pistons out of
the body. Use only low pressure to ease the
pistons out and make sure both pistons are
displaced at the same time. If the air pressure
is too high and the pistons are forced out, the
caliper and/or pistons may be damaged. Mark
each piston head and caliper bore with a felt
marker to ensure that the pistons can be
matched to their original bores on reassembly
- this is particularly important on the Nissin
caliper fitted to R and T models because both
bores are the same diameter.
| A |
Warning: Never place your
fingers in front of the pistons in
an attempt to catch or protect
them when applying
compressed air, as serious injury could result.
10Using a wooden or plastic tool, remove the dust seals from the caliper bores (see illustration).Discard them as new ones must be used on installation. If a metal tool is being used, take great care not to damage the caliper bores. Remove and discard the piston seals in the same way.
11Clean the pistons and bores withdenatured alcohol, clean brake fluid or brake system cleaner. If compressed air is available, use it to dry the parts thoroughly (make sure it's filtered and unlubricated).
Caution: Do not, under any circumstances, use a petroleum-based solvent to clean brake parts.
12 Inspect the caliper bores and pistons for
signs of corrosion, nicks and burrs and loss of
plating. If surface defects are present, the
caliper assembly must be renewed. If the
necessary measuring equipment is available,
compare the dimensions of the pistons and
bores to those given in the Specifications
section of this Chapter, renewing any
component that is worn beyond the service
limit - note that the pistons/bores on the
Brembo caliper fitted to V-models onwards
differs by 2 mm. If the caliper is in bad shape,
the master cylinder should also be checked.
Date: 2016-01-14; view: 816
| <== previous page | | | next page ==> |
| B If the pads have worn to or beyond the wear limit (arrowed) they must be renewed | | | Caliper should move freely on the bracket |