CATEGORIES:
BiologyChemistryConstructionCultureEcologyEconomyElectronicsFinanceGeographyHistoryInformaticsLawMathematicsMechanicsMedicineOtherPedagogyPhilosophyPhysicsPolicyPsychologySociologySportTourism
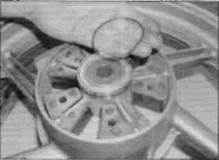
B ... then unscrew the sprocket nutsInspect the rubber damper ring
following the procedures described in Chapter 1. Rear sprocket 10Remove the rear wheel (see Chapter 7). Slacken the sprocket nuts before pulling the sprocket coupling out of the hub. 11Lift the sprocket coupling out of the hub, unscrew the nuts securing the sprocket to the coupling and remove the sprocket, noting which way round it fits (see illustrations). 12If necessary, remove the rubber damper ring from the flange riveted to the outer face of the sprocket and renew it if it is worn or damaged (see illustration). 13Install the sprocket onto the coupling with the stamped tooth number marking and riveted flange facing out. Apply some engine oil to the threads of the nuts and tighten them hand-tight. 14Press the coupling into the hub and tighten the nuts to the torque setting specified at the beginning of this Chapter. 15 Install the rear wheel (see Chapter 7), then adjust and lubricate the chain following the procedures described in Chapter 1. 16 Sprocketcoupling/rubber damper- check and renewal ^ 1 Remove the rear wheel (see Chapter 7). 2 Lift the sprocket coupling out of the hub (see illustration 15.11a).The coupling should be a press fit between the rubber dampers with no freeplay. Check the coupling for cracks and damage, and renew it if necessary.
Inspect the coupling dampers for wear and deterioration
3Remove the rubber dampers from the hub and check them for cracks, hardening and general deterioration and renew them if necessary (see illustration). 4Check the condition of the coupling O-ring and renew it if it is damaged or deteriorated. Smear the O-ring with grease before installing the sprocket coupling onto the hub. 5 Checking and renewal procedures for the coupling bearing are in Chapter 7. 6 Installation is the reverse of the removal procedure.
Check the condition of the coupling O-ring 7-1 Chapter 7 Brakes, wheels and tyres Contents Brake fluid level check.............................. see Daily (pre-ride) checks Brake light switches - check and replacement.......... see Chapter 9 Brake pad wear check.................................................. see Chapter 1 Brake hoses and unions - inspection and renewal................... 10 Brake system - bleeding and fluid change.................................. 11 Brake system check..................................................... see Chapter 1 Front brake caliper - removal, overhaul and installation........... 3 Front brake disc - inspection, removal and installation ......... 4 Front brake master cylinder - removal, overhaul and installation ... 5 Front brake pads - renewal........................................................... 2 Front wheel - removal and installation ..................................... 15 General information...................................................................... 1 Rear drum brake - removal, Degrees of difficulty Rear brake caliper - removal, overhaul and installation ........... 7 Rear brake disc - inspection, removal and installation.............. 8 Rear brake master cylinder - removal, overhaul and installation........................................................................... 9 Rear brake pads - renewal ........................................................... 6 Rear wheel - removal and installation.......................................... 16 Tyres - general information and fitting ...................................... 18 Tyres - pressure, tread depth and condition................................................. see Daily (pre-ride) checks Wheels - general check................................................ see Chapter 1 Wheels - alignment check............................................................. 14 Wheels - inspection and repair.................................................... 13 Wheel bearings - check................................................ see Chapter 1 Wheel bearings - renewal ............................................................ 17
Easy,suitable for novice with little experience I I Fairly easy,suitable |k for beginner with ^ some expenence Fairly difficult, suitable for competent vj^ Difficult,suitable for ^,
Verydifficult, suitable for expert DIY >jC Specifications Note: Where applicable, models are identified by their production code letter - refer to 'Identification numbers' at the front of this manual for details. Front brake - all models Brake fluid type................................................................................... DOT 4 Caliper bore inside diameter R and T models Standard....................................................................................... 27.000 to 27.050 mm Service limit (max)........................................................................ 27.060 mm V, W, SW, X, SX, Y and SY models Standard....................................................................................... 30.000 and 32.000 mm Service limit (max)........................................................................ 30.040 and 32.040 mm Caliper piston outside diameter R and T models Standard........................................................................................ 26.935 to 26.968 mm Service limit (min) ...................................................................... 26.910 mm V. W, SW, X, SX, Y and SY models Standard........................................................................................ 29.970 and 31.970 mm Service limit (min) ............. 4....................................................... 29.910 and 31.910 mm Master cylinder bore inside diameter R and T models Standard........................................................................................ 11.000 to 11.043 mm Service limit (max)........................................................................ 11.055 mm V. W, SW, X. SX, Y and SY models Standard........................................................................................ 13.000 mm Service limit (max)........................................................................ not available Master cylinder piston outside diameter R and T models Standard........................................................................................ 10.957 to 10.984 mm Service limit (min) ...................................................................... 10.945 mm V, W, SW, X, SX, Y and SY models Standard........................................................................................ 12.985 mm Service limit (min) ....................................................................... not available 7»2 Brakes, wheels and tyres Front brake - all models (continued) Disc thickness - all models Standard........................................................................................... 4.80 to 5.20 mm Service limit (min) ........................................................................... 4.00 mm Disc maximum runout.......................................................................... 0.10 mm Rear brake - R and T models Drum inside diameter Standard........................................................................................... 160.00 mm Service limit (max)........................................................................... 161.00 mm Shoe lining thickness Standard........................................................................................... 5.00 mm Service limit (min) ........................................................................... 2.10 mm Rear brake - V, W, SW, X, SX, Y and SY models Brake fluid type............................................................................................. DOT 4 Caliper bore inside diameter Standard........................................................................................... 34.000 mm Service limit (max)........................................................................... 34.040 mm Caliper piston outside diameter Standard........................................................................................... 33.970 mm Service limit (min) ........................................................................... 33.910 mm Master cylinder bore inside diameter Standard........................................................................................... 12.000 mm Service limit (max)........................................................................... 12.043 mm Master cylinder piston outside diameter Standard........................................................................................... 11.985 mm Service limit (min) ........................................................................... 11.955 mm Disc thickness Standard........................................................................................... 5.0 mm Service limit (min) ........................................................................... 4.0 mm Disc maximum runout.......................................................................... 0.10 mm Wheels Maximum wheel runout (front and rear) Axial (side-to-side) ........................................................................ 0.3 mm Radial (out-of-round)...................................................................... 0.3 mm Maximum axle runout (front and rear) ............................................ 0.2 mm Tyres Tyre pressures ................................................................................... see Daily (pre-ride) checks Tyre sizes Front................................................................................................. 110/80-17 57H Rear .............................................................................................. 130/80-17 65H Torque settings Front brake - R and T models Caliper mounting bolts.................................................................... 32 Nm Caliper pad retaining pin plug....................................................... 2.5 Nm Caliper pad retaining pin................................................................ 18 Nm Caliper slider pin (in caliper) .................................................................. 23 Nm Caliper slider pin (in caliper bracket)..................................................... 13 Nm Caliper bleed valve................................................................................... 5.5 Nm Master cylinder clamp bolts............................................................ 12 Nm Brake hose banjo bolts................................................................... 35 Nm Disc bolts ........................................................................................ 43 Nm Front brake - V, W, SW, X, SX, Y and SY models Caliper mounting bolts.................................................................... 32 Nm Master cylinder clamp bolts............................................................ 12 Nm Brake hose banjo bolts................................................................... 35 Nm Rear brake - V, W, SW, X, SX, Y and SY models Master cylinder mounting bolts .................................................... 12 Nm Brake hose banjo bolts................................................................... 35 Nm Disc bolts ........................................................................................ 43 Nm Front axle bolt...................................................................................... 60 Nm Front axle clamp bolt .......................................................................... 27 Nm Rear axle nut........................................................................................ 90 Nm Rider's footrest bracket bolts.............................................................. 45 Nm Silencer mounting bolt ................................................................................ 27 Nm Brakes, wheels and tyres 7*3 Date: 2016-01-14; view: 593
|