CATEGORIES:
BiologyChemistryConstructionCultureEcologyEconomyElectronicsFinanceGeographyHistoryInformaticsLawMathematicsMechanicsMedicineOtherPedagogyPhilosophyPhysicsPolicyPsychologySociologySportTourism
A Remove camchain tensioner bolt and washer
8.1b A copy of Honda's tensioner locking key can be made from a piece of 1 mm mild steel Engine, clutch and transmission 2»11
push it into the end of the tensioner body so that the key shoulders lock it in this position (see illustrations).Unscrew the camchain tensioner fixing bolts and withdraw the tensioner from the engine. 2 If the locking key is not available, use a small flat-bladed screwdriver to turn the plunger. Hold the screwdriver in place while unscrewing the camchain tensioner fixing bolts, then withdraw the tensioner from the engine (see illustration).The plunger will spring back out once the tension on the screwdriver is released, but can be easily reset on installation (see illustration). 3Discard the gasket as a new one must be used on reassembly. Do not dismantle the tensioner Installation 4Ensure the tensioner and engine faces are clean and dry and fit a new gasket to the tensioner. If the locking key is available, insert it in the tensioner body and turn it fully clockwise to retract the plunger into the body, then engage the key shoulders to lock the plunger. Install the tensioner on the engine and tighten its bolts to the torque setting specified at the beginning of this Chapter. Remove the key and install the tensioner centre bolt with a new sealing washer. 5 If the key is not available, turn the plunger fully clockwise with a flat-bladed screwdriver and hold it in this position while the tensioner is installed on the engine and the fixing bolts are tightened to the specified torque setting (see illustrations).Release the tension on the screwdriver and remove it. Install the tensioner centre bolt with a new sealing washer.
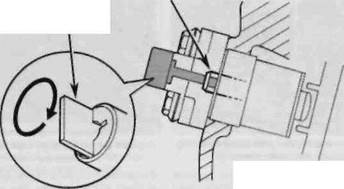
Camshafts- removal, inspection and installation Note:This procedure can be carried out with the engine in the frame. If the engine has been removed, ignore the steps that do not apply. Place rags over the spark plug holes and the cam chain hole to prevent any component from dropping into the engine on removal. Removal 1 Remove the valve cover (see Section 7). 2 Unscrew the timing inspection plug and the centre plug from the left-hand engine cover. Discard the plug O-rings as new ones should be used. The engine can be turned using a socket on the alternator rotor bolt and turning it in an anti-clockwise direction (see illustration).Alternatively, place the motorcycle on its centre stand so that the rear wheel is off the ground, select a high gear and rotate the rear wheel by hand in its normal direction of rotation. 3 Turn the engine until the line next to the 'O' mark on the alternator rotor aligns with the notches in the timing inspection hole, and the
Date: 2016-01-14; view: 880
|