CATEGORIES:
BiologyChemistryConstructionCultureEcologyEconomyElectronicsFinanceGeographyHistoryInformaticsLawMathematicsMechanicsMedicineOtherPedagogyPhilosophyPhysicsPolicyPsychologySociologySportTourism
Fuel tap, O-ring and fuel filter
additional protection against freezing is needed. 10 Install the cap by turning it clockwise until it reaches the first stop then push down on the cap and continue turning until it will turn no further. 11Start the engine and let it reach normal operating temperature, then check for leaks again. As the coolant temperature increases, the fan behind the radiator should come on automatically and the temperature should begin to drop. If it does not, refer to Chapter 3 and check the fan and fan circuit carefully. 12If the coolant level is consistently low, and no evidence of leaks can be found, have the entire system pressure checked by a Honda dealer.
Warning: Petrol (gasoline) is extremely flammable, so take extra precautions when you work on any part of the fuel system. Don't smoke or allow open flames or bare light bulbs near the work area, and don't work in a garage where a natural gas-type appliance is present. If you spill any fuel on your skin, rinse it off immediately with soap and water. When you perform any kind of work on the fuel system, wear safety glasses and have a fire extinguisher suitable for a Class B type fire (flammable liquids) on hand. Check 1 Remove the fuel tank (see Chapter 4) and check the tank, the tank filler cap, the fuel tap, the fuel hose and the fuel tap vacuum hose for signs of leakage, deterioration or damage; in particular check that there is no leakage from the fuel hose. Renew any hoses that are cracked or deteriorated. 2 If the fuel tap to tank joint is leaking, tightening the retaining nut may help. Hold the tap to prevent it twisting while tightening the nut. If leakage persists, the tank must be drained of fuel, the tap removed and its O-ring renewed. It is advised that this is done when there is minimal fuel in the tank. In this way the tank can be rested on its right-hand side whilst the tap is removed. Alternatively, with the tap in the RES position, apply a vacuum to the end of the vacuum pipe to allow the fuel to drain through the fuel pipe and into a suitable container. Remove the tap by unscrewing the retaining nut. Use a new O-ring (see illustration)on refitting and take care not to overtighten the retaining nut. 3 If the carburettor gaskets are leaking, the Filter cleaning 4Cleaning or renewal of the fuel filter is advised after a particularly high mileage has been covered. It is also necessary if fuel starvation is suspected. The fuel filter is mounted in the tank and is integral with the fuel tap. 5 Remove the fuel tank (see Chapter 4) and the fuel tap (see Step 2), and carefully pull the filter off the fuel supply tube (see illustration).Once the filter is dry, clean the gauze with a soft brush or low pressure compressed air to remove all traces of dirt and fuel sediment. Check the gauze for holes. If any are found, a new filter should be fitted (it is available separately). A damaged filter will allow dirt particles to enter the tap body. 6 Check the condition of the tap O-ring and renew it if it is in any way damaged or deteriorated. It is advisable to renew it as a matter of course.
1 All models covered in this manual are fitted with a sealed, maintenance-free battery which requires no topping-up. Note:Do not attempt to remove the battery filler caps, if fitted, to check the electrolyte level or battery specific gravity. Removal will damage the caps, resulting in electrolyte leakage and battery damage. 2 All that should be done is to check that the battery terminals are clean and tight and that the casing is not damaged or leaking. See Chapter 9 for further details. 3 If the machine is not in regular use, disconnect the battery and give it a refresher charge every month to six weeks, as described in Chapter 9. 13 Spark plugs- check and adjustment
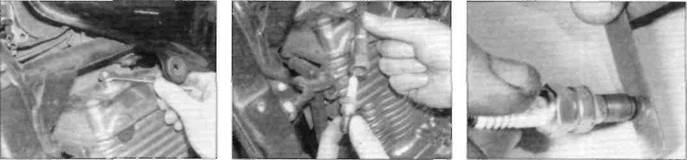
1Make sure your spark plug socket is the correct size before attempting to remove the plugs - a special plug spanner is supplied in the motorcycle's tool kit which is stored under the seat. 2 On R, T, V, W, X, and Y models, remove the radiator side panels; on SW, SX and SY models remove the fairing (see Chapter 8). 3 Clean the area around the plug caps to prevent any dirt falling into the spark plug access passages. 4 Check that the cylinder location is marked on each plug lead and mark them accordingly if not. Pull the spark plug cap off each spark plug (see illustration).Clean the area around the base of the plugs with low pressure
Every 8000 miles 1.13
compressed air to prevent any dirt falling into the engine. 5 Using either the plug spanner supplied in the motorcycle's toolkit or a deep socket type wrench, unscrew the plugs from the cylinder head (see illustrations).Lay each plug out in relation to its cylinder; if either plug shows up a problem it will then be easy to identify the troublesome cylinder. 6 Inspect the electrodes for wear. Both the centre and side electrodes should have square edges and the side electrodes should be of uniform thickness. Look for excessive deposits and evidence of a cracked or chipped insulator around the centre electrode. Compare your spark plugs to the colour spark plug reading chart at the end of this manual. Check the threads, the washer and the ceramic insulator body for cracks and other damage. 7 If the electrodes are not excessively worn, and if the deposits can be easily removed with a wire brush, the plugs can be re-gapped and re-used (if no cracks or chips are visible in the insulator). If in doubt concerning the condition of the plugs, renew them, as the expense is minimal. 8 Cleaning spark plugs by sandblasting is permitted, provided you clean the plugs with a high flash-point solvent afterwards. 9 Before installing the plugs, make sure they are the correct type and heat range and check the gap between the electrodes (see illustrations).Compare the gap to that specified and adjust as necessary. If the gap must be adjusted, bend the side electrode only and be very careful not to chip or crack Date: 2016-01-14; view: 587
|


 13.5a... then unscrew the spark plug