CATEGORIES:
BiologyChemistryConstructionCultureEcologyEconomyElectronicsFinanceGeographyHistoryInformaticsLawMathematicsMechanicsMedicineOtherPedagogyPhilosophyPhysicsPolicyPsychologySociologySportTourism
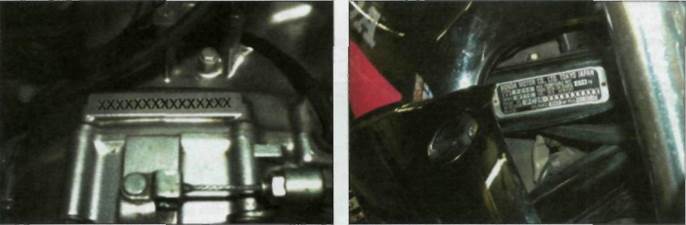
The colour code label is stuck to the rear mudguard
Engine number location Frame number location o.io Bike spec and Performance data Bike spec
Weights and dimensions Overall length.......................................................... 2090 mm (82.3 in) Overall width ........................................................... 720 mm (28.3 in) Overall height R, T, V. W, X, Y models ...................................... 1050 mm (41.3 in) S-W, S-X, S-Y models......................................... 1160 mm (45.7 in) Wheelbase R, T, V, W, X, Y models ...................................... 1430 mm (56.3 in) S-W, S-X, S-Y models......................................... 1435 mm (56.5 in) Seat height .............................................................. 775 mm (30.5 in) Ground clearance .................................................... 145 mm (5.7 in) Engine weight................................................................ 56 kg (123 lb) Dry weight (no fuel and oil) R and T models........................................................ 170 kg (375 lb) V, W, X, Y models..................................................... 173 kg (381 lb) S-W, S-X, S-Y models ............................................ 179 kg (395 lb) Max. payload (rider, passenger, luggage, accessories).. .184 kg (406 lb) Performance data
Maximum power Claimed ............................... Maximum torque Claimed .............................. Top speed Estimated ................................... 115 to 120 mph (185 to 193 km/h) Acceleration Time taken to cover a 'A mile from a standing start.... 13.5 seconds Terminal speed after V4 mile............................. 97.5 mph (157 km/h) Average fuel consumption Miles per Imp gal, miles per litre, litres per 100 km............................. 49 mpg, 10.7 mpl, 5.8 1/100 km Fuel tank range Based on average fuel consumption rate........... 196 miles (315 km) Performance data sourced from Motor Cycle News road test features. See the MCN website for up-to-date biking news. r^TIwww.motorcyclenews.com Bike spec and Performance data o-n Engine Type ..................................................................................................... Liquid-cooled, 8V parallel twin cylinder, 20" inclined from vertical Capacity............................................................................................... 499 cc Bore and stroke ................................................................................. 73 x 59.5 mm Compression ratio ........................................................................... 10.5 :1 Camshafts............................................................................................ DOHC, chain-driven Carburettors......................................................................................... 2 x 34 mm flat-slide Keihin VP type Ignition system.................................................................................... Digital transistorised with electronic advance Clutch................................................................................................... Wet multi-plate, cable-operated Gearbox .............................................................................................. 6-speed constant mesh Final drive chain ................................................................................ RK 525SMOZ5 or DID 525V8 (108 links) Chassis Frame type .......................................................................................... Double cradle of tubular and box-section steel construction Fuel tank capacity (including reserve) ........................................... 18 lit (4.0 Imp gal, 4.8 US gal) Fuel tank reserve .............................................................................. 2.5 lit (0.55 Imp gal, 0.66 US gal) Rake....................................................................................................... 27°20' Trail R, T, V, W, X, Y models................................................................... 113 mm (4.45 in) S-W, S-X, S-Y models .................................................................... 108 mm (4.25 in) Front suspension Type ................................................................................................ 37 mm oil-damped telescopic forks Travel ............................................................................................. 115 mm (4.5 in) Adjustment........................................................................................ non-adjustable Rear suspension Type ................................................................................................ Twin shocks acting on a steel, box-section swingarm Travel ............................................................................................. 117 mm (4.6 in) Adjustment ....................................................................................... 5 position pre-load Wheels ............................................................................................... 17 inch 6-spoke alloys Tyres Front................................................................................................. 110/80-17 57H Rear ................................................................................................ 130/80-17 65H Front brake CB500R and T models.................................................................... single 296 mm disc with Nissin 2-piston sliding caliper All other models ............................................................................. single 296 mm disc with Brembo 2-piston sliding caliper Rear brake CB500R and T models.................................................................... 160 mm drum All other models ............................................................................. single 240 mm disc with Brembo single piston sliding caliper Model development CB500-R (1994 model year) CB500-T (1996 model year)Th® naif-faired cbsoos sport model was The very first CB500 model was the The CB500-T was introduced in November introduced in February 1998. The S model CB500-R, introduced in October 1993. 1995. There were no significant changes from dlf,eredfrom ne standard m°de''"k^T-9 The CB500 uses a new 180° parallel twin the R model. "f* instrumentation, a square headlight set in engine, with a balancer shaft to smooth out ~Dcnn ., HM. , , . tne fa,nn9' and a dlfferent handlfar mountln9 engine vibration. Drive to the double overhead CB500-V (1997 model year)arrangement. Colours were red, yellow and camshafts is by a centrally-positioned chain Tne CB500-V was introduced in November b|ack. for direct operation of the four valves per 1996. The front brake caliper changed to pncnn y anfj q Y MQQQ cylinder. The engine is liquid-cooled, although Brembo manufacture, previously Nissin, The «D3UU-A diiu o-/\\ 5»»o the cosmetic finning on the cylinders and rear disc brake, also manufactured by model year) head give the appearance of an air-cooled Brembo, replaced the drum brake used on Jhe CB50Q_X were intro(juced |n engine. The clutch is a conventional wet multi- previous models. npramhpr lqqa Th„rp were no Sjanjfjcant plate unit and the gearbox is 6-speed. Drive to This year saw the start of CB500 Cup race *%£ ^ ^LTSdS. ^ the rear wheel is by chain and sprockets. series. One of the production models was """ yo° ""'" UIB tJ,ov,uu The engine sits in a double cradle frame, available in silver with cup logo on the fuel CB500-Y and S-Y (2000 with box-section tubing for the upper rails, tank to celebrate the race series. Front suspension is by conventional oil- pRenn \a# **nt\ e \KI HQQO model year) damped 37 mm forks. Rear suspension, V/DOUU-W ana O-W [laao Jhe CB500.Y and s.y were introduced in rather unusually, is by twin shock absorbers, model year)September 1999. There were no changes Braking is by a single disc at the front and The CB500-W was introduced in October from previous models apart from graphics. drum at the rear. 1997. There were no significant changes from Colours were black, red and metallic blue and The CB500-R was available in black, red, the V model apart from colours and graphics, all models had gold anodised wheels. green and blue colour schemes. It continued The CB500-W was available in red, yellow, The CB500-Y and S-Y models continued unchanged through 1995. black and silver. unchanged through 2001, o.i2 Safety First! Professional mechanics are trained in safe working procedures. However enthusiastic you may be about getting on with the job at hand, take the time to ensure that your safety is not put at risk. A moment's lack of attention can result in an accident, as can failure to observe simple precautions. There will always be new ways of having accidents, and the following is not a comprehensive list of all dangers; it is intended rather to make you aware of the risks and to encourage a safe approach to all work you carry out on your bike. Asbestos • Certain friction, insulating, sealing and Fire • Remember at all times that petrol is highly
• Always disconnect the battery earth terminal before working on any part of the fuel or electrical system, and never risk spilling fuel on to a hot engine or exhaust. • It is recommended that a fire extinguisher of a type suitable for fuel and electrical fires is kept handy in the garage or workplace at all times. Never try to extinguish a fuel or electrical fire with water. Fumes • Certain fumes are highly toxic and can quickly cause unconsciousness and even death if inhaled to any extent. Petrol vapour comes into this category, as do the vapours from certain solvents such as trichloro-ethylene. Any draining or pouring of such volatile fluids should be done in a well ventilated area. • When using cleaning fluids and solvents, read the instructions carefully. Never use materials from unmarked containers - they may give off poisonous vapours. • Never run the engine of a motor vehicle in an enclosed space such as a garage. Exhaust fumes contain carbon monoxide which is extremely poisonous; if you need to run the engine, always do so in the open air or at least have the rear of the vehicle outside the workplace. The battery • Never cause a spark, or allow a naked
• Always disconnect the battery ground (earth) terminal before working on the fuel or electrical systems (except where noted). • If possible, loosen the filler plugs or cover when charging the battery from an external source. Do not charge at an excessive rate or the battery may burst. • Take care when topping up, cleaning or carrying the battery. The acid electrolyte, evenwhen diluted, is very corrosive and should not be allowed to contact the eyes or skin. Always wear rubber gloves and goggles or a face shield. If you ever need to prepare electrolyte yourself, always add the acid slowly to the water; never add the water to the acid. Electricity • When using an electric power tool, inspection light etc., always ensure that the appliance is correctly connected to its plug and that, where necessary, It is properly grounded (earthed). Do not use such appliances in damp conditions and, again, beware of creating a spark or applying excessive heat in the vicinity of fuel or fuel vapour. Also ensure that the appliances meet national safety standards. • A severe electric shock can result from touching certain parts of the electrical system, such as the spark plug wires (HT leads), when the engine is running or being cranked, particularly if components are damp or the insulation is defective. Where an electronic ignition system is used, the secondary (HT) voltage is much higher and could prove fatal.
X Don'tstart the engine without first ascertaining that the transmission is in neutral. X Don'tsuddenly remove the pressure cap from a hot cooling system - cover it with a cloth and release the pressure gradually first, or you may get scalded by escaping coolant. X Don'tattempt to drain oil until you are sure it has cooled sufficiently to avoid scalding you. X Don'tgrasp any part of the engine or exhaust system without first ascertaining that it is cool enough not to bum you. X Don'tallow brake fluid or antifreeze to contact the machine's paintwork or plastic components. X Don'tsiphon toxic liquids such as fuel, hydraulic fluid or antifreeze by mouth, or allow them to remain on your skin. X Don'tinhale dust - it may be injurious to health (see Asbestos heading). X Don'tallow any spilled oil or grease to remain on the floor - wipe it up right away, before someone slips on it. X Don'tuse ill-fitting spanners or other tools which may slip and cause injury. X Don'tlift a heavy component which may be beyond your capability - get assistance. X Don'trush to finish a job or take unverified short cuts. X Don'tallow children or animals in or around an unattended vehicle. X Don'tInflate a tyre above the recommended pressure. Apart from over-stressing the carcass, in extreme cases the tyre may blow off forcibly. • Doensure that the machine is supported securely at all times. This Is especially important when the machine is blocked up to aid wheel or fork removal. • Dotake care when attempting to loosen a stubborn nut or bolt. It is generally better to pull on a spanner, rather than push, so that if you slip, you fall away from the machine rather than onto it. • Dowear eye protection when using power tools such as drill, sander, bench grinder etc. • Douse a barrier cream on your hands prior to undertaking dirty jobs - it will protect your skin from infection as well as making the dirt easier to remove afterwards; but make sure your hands aren't left slippery. Note that long-term contact with used engine oil can be a health hazard. • Dokeep loose clothing (cuffs, ties etc. and long hair) well out of the way of moving mechanical parts.
• Doremove rings, wristwatch etc., before working on the vehicle - especially the electrical system. • Dokeep your work area tidy - it is only too easy to fall over articles left lying around. • Doexercise caution when compressing springs for removal or installation. Ensure that the tension is applied and released in a controlled manner, using suitable tools which preclude the possibility of the spring escaping violently. • Doensure that any lifting tackle used has a safe working load rating adequate for the job. • Doget someone to check periodically that all is well, when working alone on the vehicle. • Docarry out work in a logical sequence and check that everything is correctly assembled and tightened afterwards. • Doremember that your vehicle's safety affects that of yourself and others. If in doubt on any point, get professional advice. • If in spite of following these precautions, you are unfortunate enough to Injure yourself, seek medical attention as soon as possible. Daily or (pre-ride) checks o Note:The daily (pre-ride) checks outlined in the owner's manual covers those items which should be inspected on a daily basis. Engine/transmission oil level check The correct oil • Modem, high-rewing engines place great demands on their oil. It is very important that the correct oil for your bike is used. • Always top up with a good quality oil of the specified type and viscosity and do not overfill the engine.
Before you start: • Start the engine and allow it to reach Caution: Do not run the engine in an enclosed space such as a garage or workshop. • Stop the engine and place the motorcycle Bike care: • If you have to add oil frequently, you should check whether you have any oil leaks. If there is no sign of oil leakage from the joints and gaskets the engine could be burning oil (see Fault Finding).
Unscrew the oil filler cap (arrowed) from the right-hand crankcase cover. The dipstick is integral with the oil filler cap, and is used to check the engine oil level. Using a clean rag or paper towel, wipe off all the oil from the dipstick. Insert the clean dipstick back into the engine, but do notscrew it in.
Remove the dipstick and observe the level of the oil, which should lie somewhere between the upper and lower level lines (arrowed). If the level is below the lower line, top the engine up with the recommended grade and type of oil, to bring the level up to the upper line on the dipstick. Do not overfill. o.i4 Daily (pre-ride) checks Brake fluid level checks A Warning: Brake hydraulic fluid can harm your eyes and damage painted surfaces, so use extreme caution when handling and pouring it and cover surrounding surfaces with rag. Do not use fluid that has been standing open for some time, as it absorbs moisture from the air which can cause a dangerous loss of braking effectiveness
Before you start: • Support the motorcycle on its centre stand on level ground, and turn thehandlebars until the top of the front master cylinder is as level as possible. The rear master cylinder reservoir is located below the seat cowling on the right-hand side of the machine. • Make sure you have the correct hydraulic fluid - DOT 4 is recommended. • Wrap a rag around the reservoir being worked on to ensure that any spillage does not come into contact with painted surfaces. • Access to the rear reservoir cap is restricted by the seat cowling. Unscrew the reservoir mounting bolt to gain access to the cap if topping up is required. Bike care: • The fluid in thefront and rear brake master cylinder reservoirs will drop slightly as the brake pads wear down. • If any fluid reservoir requires repeated topping-up this is an indication ofan hydraulic leak somewhere in the system, which should be investigated immediately. • Check for signs of fluid leakage from the hydraulic hoses and components - if found, rectify immediately. • Check the operation of both brakes before taking the machine on the road; if there is evidence of air in the system (spongy feel to lever or pedal), it must be bled as described in Chapter 7. The front brake fluid level is visible through the sightglass in the reservoir body - it must be above the LOWER level line (arrowed).
If the level is below the LOWER level line, remove the two reservoir cap screws and remove the cap, the diaphragm plate and the diaphragm. Top up with new DOT 4 hydraulic fluid, until the level is just below the UPPER level line cast on the inside of the reservoir (arrowed). Do not overfill, and take care to avoid spills (see Warningabove).
The rear brake fluid level is visible through the reservoir body - the fluid level must be between the UPPER and LOWER level lines (arrowed). Remove the reservoir mounting bolt and carefully manoeuvre the reservoir out to access the cap. Daily or (pre-ride) checks 0.15
Tyre checks The correct pressures: • The tyres must be checked when cold,not immediately after riding. Note that low tyre pressures may cause the tyre to slip on the rim or come off. High tyre pressures will cause abnormal tread wear and unsafe handling. • Use an accurate pressure gauge. • Proper air pressure will increase tyre life and provide maximum stability and ride comfort. Tyre care: • Check the tyres carefully for cuts, tears, embedded nails or other sharp objects and excessive wear. Operation of the motorcycle with excessively worn tyres is extremely hazardous, as traction and handling are directly affected. • Check the condition of the tyre valve and ensure the dust cap is in place. • Pick out any stones or nails which may have become embedded in the tyre tread. If left, they will eventually penetrate through the casing and cause a puncture. • Iftyre damage is apparent, or unexplained loss of pressure is experienced, seek the advice of a motorcycle tyre fitting specialist without delay. Tyre tread depth: • At the time of writing UK law requires that tread depth must be at least 1 mm over 3/4 of the tread breadth all the way around the tyre, with no bald patches. Many riders, however, consider 2 mm tread depth minimum to be a safer limit. Honda recommend a minimum of 2 mm on both tyres. • Many tyres now incorporate wear indicators in the tread. Identify the triangular pointer or 'TWI' mark on the tyre sidewall to locate the indicator bar and renew the tyre if the tread has worn down to the bar.
Measure tread depth at the centre of the tyre using a tread depth gauge.
0*16 Daily or (pre-ride) checks Date: 2016-01-14; view: 641
|


 Remember...
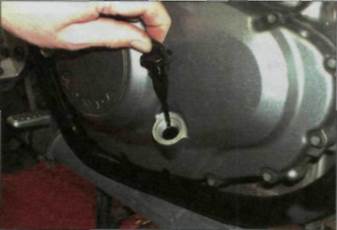
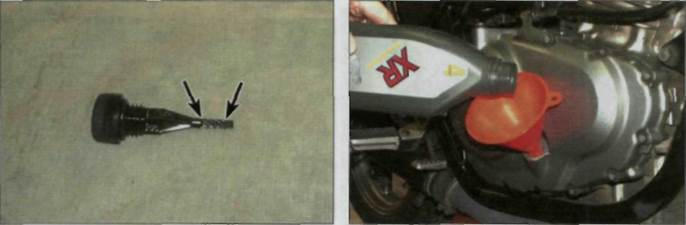

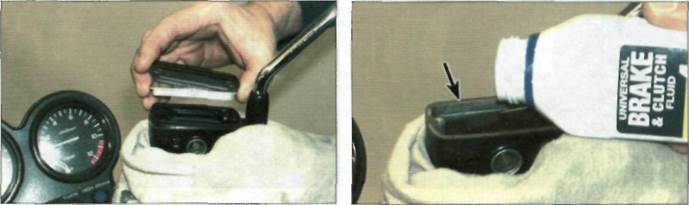
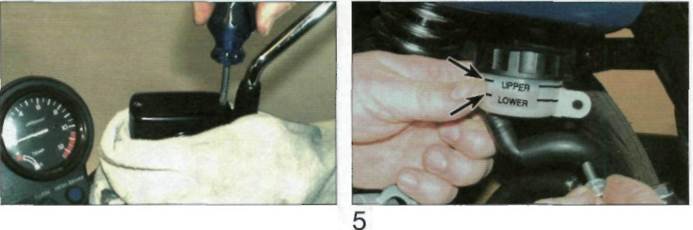 plate and cap. Tighten the cap screws securely.
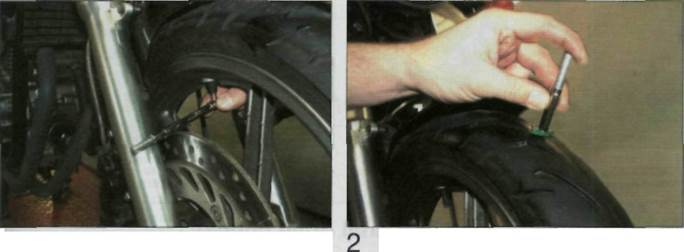 Check the tyre pressures when the tyres are coldand keep them properly inflated.
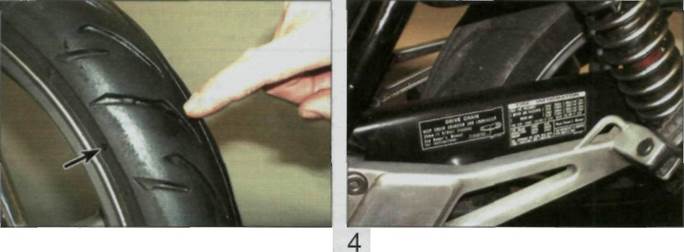 3 Tyre tread wear indicator bar and its location marking (usually either an arrow, a triangle or the letters TWI) on the sidewall (arrowed).