There are six parts to the Mantella quest. Solving problems and puzzles in the previous sections accesses each subsequent part.
There are no dungeons that look like mating octopi here (yea!). But it's a pretty complicated problem and very easy to get lost. It is commonly believed that once you're into the Mantellan Crux, you're stuck. This is not necessarily so.
As long as you have a "Recall" spell anchored somewhere outside the Crux, you can get out. Getting back in is a tougher nut to crack. It is true that Nulfaga is a one-way trip. She will not teleport you back into the Crux if you leave. But there is an entrance in the "real world". In order to find it you absolutely MUST have a ship. The Crux occupies the square just NW of the Small Ship (the Large Ship is SE of the Small Ship). Go northwest from your ship until you get a typical dungeon message at the top of your screen. You are now in the square that contains the entrance to the Crux. You'll need to do some searching, but eventually you'll find a large square of land with a big rock in the middle of it. The door on that rock is the entrance to the Crux. When you click on it, you will land at the same spot where Nulfaga sends you. If you find that you've bitten off more than you can chew and need to pack in some more training or make a couple of items before tackling it again, you can leave and still get back in.
DANGER: I have done the entire Crux without having the Mantella Quest active. The sequence of lever pulls and such to move you from one section to the next is the same without having the quest active, but unless you have a "Recall" anchored outside the entrance, you cannot get back out. THERE IS NO EXIT FROM THE CRUX EXCEPT BY "RECALL" OR THROUGH NULFAGA.
In order to complete the Mantella dungeon you absolutely, positively MUST be able to levitate. Whether by spell, device or potion, you've got to be able to do it or you'll never be able to finish. If you belong to the Mages Guild or the Temple of Julianos you should have access to the item-maker by this point. The Assassins Guild and all temples (except Kynareth and Julianos) give you access to potion makers. You can buy the "Levitate" spell from the Mages Guild whether you're a member or not and the Mages Guild (buy and cast “Buoyancy” a lot of times to bring the casting cost for the “Levitate” down to reasonable levels) and Kynareth provide access to a spell-maker to make your own spells.
If you're a spell-caster, you should have some way of restoring your magica points. It's seldom safe to rest, so you might want to stock up on "Restore Power" potions or keep a couple of Destruction-based items in reserve for sucking up magica points. My solution to the problem was through the item-maker. A Daedric Dai-katana has enough enchantment points for Vampiric Effect, Magica Leech and Feather Weight. So whapping the bad guys not only heals my health, it replenishes my magica (almost all critters in the Mantella dungeon can cast spells).
That just leaves fatigue to worry about and. "Heal Fatigue" is an awfully cheap Restoration spell. Or, for non-spell casters, “Never Tiring” items and “Stamina” potions are also fairly common treasures.
There are lots and lots of Daedra (Lords, Seducers, Fire, Frost) running around this dungeon. All of them like to toss spells at you. Something to reflect or absorb these spells is almost a necessity (unless you're very masochistic or seldom fail a saving throw). "Shalidor's Mirror" is the most potent version of Spell Reflection. By this point, your odds of successfully reflecting a spell with it should be close to 50%. You can make your own custom spell in the spell-maker, you can enchant an item, or you can get an artifact to do it. If you turn the totem over to the Emperor you'll get Warlock's Ring, which has Spell Reflection as one of its powers. If you turn the Totem over to the Underking you'll get the Necromancer's Amulet, which will absorb spells.
Bows are very handy. Bring a good one and lots of arrows. On the subject of weapons, they have a nasty tendency to break at the least opportune moment. Make sure your weapons and items are in "New" condition before you start and you should have no problems. It is always a good idea to keep a spare weapon or two handy, but especially here. Barring using a cheat to make it available, you will not be able to access your wagon. Whatever you bring with you is all you have. Don't count on picking up weapons from the critters in here. Most of them only tote money and potion ingredients. Some don't have anything. Remember, you need Mithril or better to hit most critters in the Crux
Lastly, make sure that you have everything you need, that you have trained all you're going to train and that you are not on the verge of picking up another level. Once you're in, you're in for the duration.
OK, now that you're armed to the teeth and loaded with magic stuff, it's off to the hunt for the great Magical Dingus of Ultimate Power.
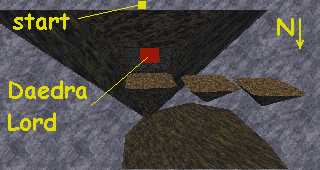
Floating Islands
You'll appear on an island floating in the middle of nothing (actually it's a big square chamber, but you've got to fly up and down the walls to see it on the automap). Right next to you is a statue. Clicking on its head will cast “Levitate” on you. Look up and you'll see an island floating above you. Fly up to it and pull the lever. Now fly down to the bottom of the starting island (kill the Daedra Seducer if you want to, but beware the Daedra Lord”s spells) and either take the elevator or fly down to an island with four doors on it.
The doors are not attached to anything, they're just doors standing up, but there is a Frost Daedra (th ranged spells) waiting for you. Click on the south door (and only the south door). Now go to the east edge of the island. Fly down a little bit and face west. You'll see a room with a lever in it. Go in and pull it.
Come back out, face west, and fly over to the west wall (you'll need to look at the automap to see when you've hit it). Face south and float up. You'll see an opening near the top. Go through the opening, down the hall, and up the shaft at the end. Follow the corridor north. If you go left at the junction, you'll come to a room with a couple of minor critters in it. If you go right at the junction, you'll come to a room with a treasure pile in it. If you go straight (the way you need to go), you'll pass an opening with blue bars over it and see a lever at the end of the corridor. Pull it and the blue bars will be gone.
Go through the opening and pull the second lever you come to. Keep going and pull the third. Don't pull the first because you'll have to come back and pull it again to reopen the passage.
Go to the end of the passage and pull the fourth lever.
Now, go back to the island with the statue. Go to the north side and fly down a little and face south. You'll see another chamber in the rock with a Daedra Lord in it.
Dispose of the Daedra Lord (if you didn't do it earlier) and step on the carpet to be teleported to the next section.
As an aside, if you managed to knock anything off of its perch and want to hunt it down and kill it, you'll find them on the floor of the chamber (assuming it survived the fall, which they almost always do).
The Pyramid
"Levitate" makes this section a whole lot easier. There is only one place where you must have it, but if you have the magica to spare, "Levitate" instead of using the elevators. From where you appear, go out the door and you'll find an elevator to the north. There is an Ancient Lich on the pyramid above you if you want to take care of it now rather than later. Take the elevator down.
You will arrive at the head of a path of floating stones that leads to an opening in a large island. There are two vampires and a Vampire Ancient on the island. Clicking on the two "groaning" headstones (they make groaning noises when you click on them) opens trapdoors inside the big pyramid. Click gently because it's possible to open and close a trapdoor with a single click. Clicking on the white headstone tells you about some guy named Benefactor, "whose body guards the way". The lever at the front of the chamber in the island controls an elevator down to the next stone path. The lever at the back opens a passage at the top of this big room. Take the elevator down to the next path of stones, dispose of the lich and ride the elevator at the end all of the way to the top.
Above you on the north wall is an opening. Levitate up to it. There are no critters here. Just a guy that looks like an assassin. Click on him and he asks you to say his name. Type, "Benefactor" and he'll open the top of the big pyramid. Go back out to the opening and head for the big pyramid.
If you didn't take care of the Ancient Lich earlier, he's going to be waiting for you. Once you take care of him, ride the elevator down into the pyramid. There will be two critters waiting for you at the bottom. If you clicked carefully on the groaning headstones, the trapdoor in the NE corner of the room will be open. Step on the elevator and go down.
There is a critter in the room at the end of the hall, but the door is frequently locked, so you might not have to worry about it. Drop down the shaft to the next room.
If you clicked carefully on the groaning headstones, the trapdoor in this room will be open. If not, you'll have to go out and do it again. If it's open, jump down the hole to be teleported to the next section.
Again, anything that you managed to knock off of its perch will be waiting for you on the floor of the chamber if you want to go hunt it down.
If you just absolutely, positively cannot get the second trapdoor to open, you’re going to have to do some creative levitating to get out of this section. Fly down to the bottom of the big pyramid island and try to levitate up through a crack between the polygons that make up the bottom of the island (it takes a lot of patience and a lot of Levitates, but it can be done). Once you’re inside the bottom of the island, levitate up into the small chamber below the trapdoor (you’ll have to slide in between the walls and the floor). All you have to do is get your feet to touch the floor of that little chamber to be teleported to the next section. I won’t try to fool you – this process is time-consuming and very frustrating, but it can be done.
The Shrine
From the room where you appear, go out the door and head south. There is an elevator to the north (more on this later). When you head out into the big chamber you'll see a pathway going around a big upside down mountain with an upside down shrine on it (no, your monitor isn't going funny). You need to open the east door of the shrine and pull the lever. Then go around to the west door and pull the lever.
Then go around to the south door and click on the big blue obelisk to teleport to the next section. There is a Frost Daedra behind the north door if you want to pick up a few GP's before teleporting.
If you take the elevator down, you'll run into a couple of critters in the hallway and a few treasure piles in the room at the end. You can use the elevator platforms here to take you up to the shrine above.
If you're really in the mood for some exploration, there are a few critters on the floor of the chamber. Have fun, but you'll need a "Levitate" to get off the floor.
Floating Skulls
The first part of this section involves a room with eight doorways and only one of them leads out (kind of hard to get lost with those odds). There are a few critters (usually Vampires, harpies or fighter-types) behind three of the doors. There is a cage behind one of them and clicking on the door opposite the cage will teleport you into the cage, which will descend into a room with four orcs in it. If you really feel like exploring, anchor a "recall" in the center of this room and start opening doors. If you get teleported into the cage, cast "recall" to get back out again.
Once out of the room, follow the corridor. There will be a passageway to the right a little way down. This leads to the room with four orcs in it (and there's usually a minor critter of some kind waiting at the first corner). If you follow the corridor until it T's and go right at the T, you'll come to the room with four orcs. You need to turn left at the T and go through the door to get the next part. The little north-south hallway is a safe place to rest if you need to.
There are four Fire Daedras on the floor of the chamber and one in one of the eyes of the central skull. Unless you really like being fireballed when you're not looking, it's probably a good idea to drop down to the floor and dispatch the Fire Daedra. Click on the cage and you'll be teleported back into the little north-south hallway. There are a bunch of fire atronachs on the walkways.
Go west along the path until you get to the first floating skull. Look up and click on the skull. It will give you a clue (something about all true followers lifting up their eyes, etc.) and start turning. If you paid attention to the clue, you should have a good idea that you're looking for skulls that face the big center skull. There are only two. Continue west until you get to the next skull, click on it and it will start turning. Go back to the intersection of the paths and go south. Start counting skulls. When you get to the third skull, click on it (it starts turning) and keep going along the pathway until you reach the end.
The fifth skull faces away from the big one. Clicking on it will cast "Heal" on you, but it won't turn. The rest of the skulls will either just start turning or will teleport you elsewhere in the chamber (usually right next to a small skull with nothing under your feet). There's a Fire Daedra in the right eye socket of the big skull. A bow shot will usually knock him off and he'll drop to the floor. Levitate over to the chamber behind the eyes of the skull (I've never been able to successfully jump, regardless of how high my stats and jumping skill are).
In the left eye socket (as you're facing the skull), you'll find Sheogorath. Talk to him if you want. Nothing will happen to you and he’ll make some comment about seeing you later.
The tricky part is the elevator inside the room behind the eye sockets. It goes up and down as you walk on the floor of the chamber. Since you probably have a "Levitate" active, step on the floor to make the elevator descend and then float over to the shaft and go down. There's a room with a large stone head at the bottom. You'll have to crouch down to get through the doorway. When you click on the head it will ask you, "how many defy me". Answer, "One" (the number of skulls facing directly away from the big one). This teleports you to a chamber with skulls on the shelves, which is the beginning of the next section.
Sword And Crossbow
To get out of the room, you need to click on one of the nine skulls. With the middle northern skull being 12:00, the skulls do various things according to their position:
8:00 -- makes a wailing sound
9:00 -- teleports you in front of the big skull in the previous section with nothing under your feet
10:00 -- makes an orcish grunting noise
11:00 -- makes a groaning noise
12:00 -- kills you (unless you have a LOT of health points)
1:00 -- opens the door (this is the one without a jawbone)
2:00 -- kills you (unless you have a LOT of health points)
3:00 -- teleports you to the end of the spiral passage in this section
4:00 -- teleports you to the top of the big skull in the previous section
The corridor beyond spirals around and out from the room where you appeared. There are several flesh and iron atronachs in it, but you should be able to easily take care of them by this point. If you really don't feel like fighting atronachs (why bother? it's not like they tote loads of goodies), click on the middle skull of the east shelf and it will teleport you near the end of the spiral corridor (there will be one atronach in front of you and one behind you). Go through the door at the end and up the stairs (there are a couple of human warrior-types near the top of the stairs).
You need to talk to Sheogorath to get out of this section. If you explore the first part, you'll find yourself in a bunch of inclining passages that look like a crossbow. In the middle shaft you will find an opening into a series of rooms and passages that look like a sword.
Sheogorath is in the room at the pommel of the sword. In the rooms at the ends of the crossguard are two fighter-types. Clicking on the statues in those rooms will teleport you out into the big chamber where you get to ride up and down an elevator while Daedra Lords take pot shots at you. You can use the sword or crossbow at either end of the elevator ride to teleport back to this section. Talk to Sheogorath. He will ask what his other weapon is. Answer, "crossbow" and then go all of the way down the central shaft. When you hit bottom, you'll be teleported to the big chamber.
You will start on a big stone with a sword stuck in it. There will be four Daedra Lords floating around you, so duck down into the hole next to you. At the bottom you will see two red banners and a box. Clicking on the left banner opens the box, revealing another box. Click on that to reveal a white gem. Click on the gem and the island will start sinking. Stay inside until it reaches the bottom.
Walk over to the big Crossbow and set yourself firmly into the notch of the bolt. Face back toward the big island and SAVE THE GAME.
This sequence generates more crashes on my system than anything else in the game. Click the left battleaxe to fire the crossbow. The bolt will stick into the target and cause the sword to tip over (hopefully taking you with it). Simply go up the sword to the pommel to get to the exit.
The Mantella
There are no levers to pull, no riddles to solve. Nothing like that in this section. Your whole job here is to stay alive and get to the Mantella. There are Daedra and Ghosts here. One in each room. Each room is square with three openings. There are no doors, so it's just a matter of getting through the rooms. From the room where you entered, exit to the west, go north, go west, go north, go east, go north, go north.
You're now in a dark passageway. If you look west you'll see a series of pits in the floor. Jump over them or levitate over them (levitate is best - you'll need it in a minute). Drop down the last pit and kill the Vampire Ancient if you're feeling feisty or need to make a safe place to rest. Float down the corridor until you get to a big chamber with a shrine-looking set-up in the middle.
Float over to it. The green gem-looking thing in the center is the Mantella.
Click on it and you'll be teleported back to Nulfaga. She'll show you the result of your actions. What you see depends on who you gave the Totem to. If you came in through the front door rather than through Nulfaga, you've probably got a big problem: getting back out. You see, the only way out is through her unless you have a "recall" anchored somewhere outside.
For better or worse, you have finished the Main Quest.
The End?
Unlike traditional CRPG's, after completing the Main Quest you are not finished unless you want to be. Once you exit Shedungent (be prepared for a drop because you appear several feet off of the ground), you are free to do whatever you want. The Guilds, Merchants and Nobles are still active, but you might have to overcome some negative rep with the NPC's that did not get the Totem. You can quest and dungeon-crawl to your heart's content, you can start a new game with a different character or just forget the whole thing (there aren't many players who take this option after the first playing).
Unfortunately, the completion of the Main Quest does not make any changes in the game environment. You won't hear anything about your exploits with the Totem or see any changes in the political structure of the Bay. Even though there is a short animation telling you the results of your actions, Bethesda could have made a bit more whoop-de-do at the end. On the other hand, “wishy-washy ending” is probably the most common complaint about any CRPG.
So keep your sword sharp and go exploring. There is much to see and do in Tamriel and you have only scratched the surface.