CATEGORIES:
BiologyChemistryConstructionCultureEcologyEconomyElectronicsFinanceGeographyHistoryInformaticsLawMathematicsMechanicsMedicineOtherPedagogyPhilosophyPhysicsPolicyPsychologySociologySportTourism
Tasks for independent work during preparation to practical classes.
Ministry of Public Health of Ukraine
Higher State Educational Establishment of Ukraine
"Ukrainian Medical Stomatological Academy"
"Approved"
at the meeting of the department
propedeutics of Prosthodontics
Head of the department
Associate Professor, Korol D.M. _________
"_____"_______________ 20___
RECOMMENDATIONS
FOR STUDENTS’ independent WORK
during the preparation to practical classes
| Academic discipline | Propedeutics of Orthopaedic stomatology |
| Module 1 | Propedeutics of Orthopaedic stomatology |
| Intensional module 3 | Basic technologies of dentures fabrication |
| Theme of the lesson | Technology of all plastic removable partial denture: substituting of beeswax on a plastic. Finishing and polishing. |
| Academic year | II |
| Faculty | Stomatology |
Poltava 2011
1. Actuality of the theme:
After checking of the prosthesis design in the clinic by a physician next the dental technician who makes the final modeling of wax prints and conducts plastering to the flask to replace the wax on the plastic.
At present, the industry produces a variety of chemical composition and properties of dental plastics, waxes. Each of them has its positive and negative qualities that allow to apply it in certain cases. Therefore, having a wide range of plastics, it is necessary to know their composition and properties to select those that best meet the stated objectives of orthopedic treatment.
2. Specific objectives:
- To determine the sequence of stages of models plastering by direct, inverse and combined method;
- To demonstrate on phantoms the technique of models plastering by direct method;
- To demonstrate on phantoms the technique of models plastering by inverse method;
- To demonstrate on phantoms the technique of models plastering by combined method;
- Determine the degree of maturation of the plastic dough;
- To characterize the composition and properties of materials for processing, grinding and polishing of removable partial laminar denture;
- To demonstrate on phantoms the technique of grinding and polishing of removable partial laminar denture;
Basic level training.
| Names of previous disciplines | Acquired skills |
| 1 Physics | Determine the physical and mechanical properties of materials used for grinding and polishing of removable partial laminar denture |
| 2.Chemistry. | Determine the composition and properties of dental plastics. |
Tasks for independent work during preparation to practical classes.
4.1.Theoretical questions to the lesson:
1. Methods of flasking prosthesis into the flask.
2. Indications for use of different flasking methods.
3. Flasking by the direct method.
4. Flasking by the reverse method.
5. Flasking by the combined method.
6. Stage of swelling of plastic dough.
7. Polymerization of prosthesis.
8. Possible errors during the polymerization of plastics and methods of their removal.
9. Excavation of the prosthesis from the flask and treatment.
10. Grinding of prosthesis.
11.Polishing ofprosthesis.
4.3. Practical work (task) that are fulfilled in class:
- Preparation of the model to the plastering to the flask
- Method of the flasking by the direct method
- Method of the flaskingby the reverse method
- Method of the flasking by the combined method
- Technology of polymerization
- Technology of prosthesis grinding
- Technology of prosthesis polishing
Content of the theme:
WAXING As has been stated, the form of the polished surfaces of a denture influences its retentive quality. In addition, it influences the esthetic values of the denture. The wax surfaces around the teeth are known as the art portion of the polished surface and should, for esthetic reasons, imitate the form of the tissues around the natural teeth. Any fancy or artificial festooning is distinctly out of place. A slight root projection to follow the individual tooth should be carried out. The upper part of the polished surface is known as the anatomic portion and should be formed in such a way as to lose none of the original border width of the impression. A slight surplus should be allowed for loss of base material during finishing.The form of the denture bases between the teeth and the denture border should be shaped in such a manner as to aid retention by the mechanical directional forces of the muscles and tissues. Generally speaking, fullness on the buccal and labial surfaces of the mandibular and maxillary dentures is desirable, and the opposite is true on the palatal surface of the maxillary denture to allow all the possible space for the tongue. The speech of the patient will be handicapped unless a contour comparable to that of the palate before the natural teeth were lost is developed. The thickness of the palatal part of the base will vary with the loss of bone from the residual alveolar ridge. The lingual flange of the mandibular denture should have the least possible amount of bulk except at the border, which should be quite thick. This thickness is under the narrower portion of the tongue, and it greatly enhances the seal by contacting the mucolingual fold. An excess of baseplate wax is added onto the buccal and labial surfaces of the mandibular and maxillary trial dentures. The bulk of the wax is cut back to the outer border of the cast, and then the small end of a knife is held at a 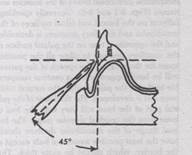 45-degree angle to the tooth surface to form the wax gingival margin (Fig.1).
Fig.1 Diagram illustrating angle of which knife is held in cutting gingival line.
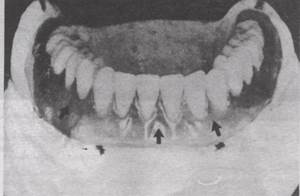 The common tendency is to cut this line too straight across from interproximal to interproximal and not leave enough wax in the interproximal spaces. It is well to leave a surplus of wax along the gingival line at this time and then, retrim when a complete view of the entire waxing is possible. Triangular markings can be placed as a guide to the length and position of the root indications, as long as it is kept in mind that the root of the maxillary canine is the longest, that of the lateral incisor the shortest, and that of the central incisor of a length between these two. On the mandibular denture, the root of the canine is the longest, that of the central incisor the shortest, and that of the lateral incisor between these two. The wax is scraped out of the spaces between these triangular indications, after which the wax root indications will become manifes. These sharp and rough root indications are now rounded with a large scraper and the spatula (Fig.2). They should not be overemphasized. Fig.2 Depressions between root indications.
The lingual surface of the mandibular denture may be made slightly concave without the con-cavity being extended under the lingual surface of the teeth. A projection of the tooth beyond the polished surface acts as an undercut into which the patient's tongue will slip, thereby causing the denture to be unseated.
 The palatal surface of the maxillar denture should be waxed to a neary uniform thickness of 2.5 mm. Thus, when the processed resin is smoothed and polished, the palate will be as thin as possible and yet be sufficiently thick to provide adequate strength. Lingual festooning restores part of the lingual surface of the tooth that is not supplied in artificial teeth. Wax is added and carved on the lingual side of the artificial teeth to imitate the normal lingual contours of each tooth (Fig.3)
Fig.3. Normal lingual contour of artificial posterior teeth is established during waxing procedure.
FORMATION AND PREPARATION OF THE MOLD
After the dentures have been waxed, they are prepared for flasking.
There are 3 methods of flasking: Direct , Reverse and Combined method.
Technique of Reverse method of flasking. The denture is tested in the flask to determine its height in relation to the height of the bottom half of the flask (Fig.4). The top half of the flask is placed in position to determine whether the teeth are too high in relation to the top of the flask. Approximately 1/8 to1/4 inch (3 to 6 mm) of space should be available between the teeth and the top of the flask. If the teeth are too high, the cast must be reduced in thickness The artificial rim of the cast should be flush with the top of the bottom half of the flask to prevent possible breakage of the cast in later separation of the two halves of the flask.

The distal ends of the lower cast may be high in relation to the remainder of the cast and: extend close to the posterior edge of the flask. This condition causes the distal ends of the cast to be at an acute angle to the rim of the flask. Thus the distal ends are vulnerable to breakage, and careful consideration is demanded when this angle is reduced so that the top half of the flask will separate easily.
 A mix of artificial stone is placed in the bottom half of the flask, and the cast, which has been painted with separating medium, is placed down into the stone until the artificial rim of the cast is nearly on a level with the top edge of the flask. The stone is leveled to a line between the edge of the cast and the rim of the flask. Separating medium is applied on the exposed surfaces of the core, and the top half of the flask is placed in position. The two flask halves must meet exactly. Then a mix of artificial stone is poured up to the level of the incisal edges of the anterior teeth and the tips of the cusps of the posterior teeth. The exposed stone is painted with separating medium, the flask is completely filled with artificial stone, and the lid of the flask is placed in position. Flask. The flask is placed in boiling water and allowed to remain from 4 to 6 minutes according to the size of the flask. The flask is removed from the water and opened from the side opposite the greatest undercut of the cast. After the flask is opened, the surplus wax is washed out with a stream of boiling water. When the water has been drained from the flask, the mold is washed again with boiling water containing a detergent, and then again with clean boiling water. Sol-vents such as chloroform are not used because of their effect on acrylic resin.
After the stone is dry, but still hot, the inside of the mold and the cast is painted with а ISOKOL using a camel's hair brush. The ISOKOL must not come in contact with the teeth or pool in the mold around the teeth. The tinfoil substitute is allowed to dry, and a second coat is painted on the inside of the mold. The flask is allowed to cool to room temperature.
Heat-Activated PMMA. These resins are commonly processed in a brass flask using a compression-molding technique (dough technique). The polymer and monomer are mixed in the proper ratio of 3:1 by volume or 2.5:1 by weight. Monomer is a sensitizer that can cause an allergic contact eczematous reaction on the skin or mucous membrane. When the monomer is completely polymerized, it is no longer a sensitizer or elicitor of allergic reactions. The mixed material goes through four stages: first, a wet, sandlike stage; second, a tacky fibrous stage as the polymer dissolves in the monomer; third, a smooth, doughlike stage, suitable for packing into a mold; and fourth, a stiff, rubberlike stage. Dough formation is assisted by internal plasticizers chemically attached to the polymer beads that locally softens them and facilitates monomer diffusion.
After wax elimination, the dough is packed in a gypsum mold.
PACKING THE MOLD
When the mixture has reached a dough consistency, it is placed between two plastic sheets and formed into a roll about 1 inch (2.5 cm) in diameter. The roll is flattene'd so that it is about 1/4 inch (6 mm) in thickness, and pieces are cut to approximate the length of the flanges and the size of the palate. The pieces are positioned around the buccal, labial, and palatal surfaces of the upper mold, and around the buccal, labial, and lingual surfaces of the lower mold. The flask is сlosed in a press with a sheet of separating plastic between the two halves until they are almost in approximation. Then the flask is opened, the excess flash resin is cut away precisely at the denture border, and additional resin is added at those places that are deficient. This trial packing procedure is repeated until the mold is filled and no flash is formed. Then the flask is closed completely without the separating sheet. The slightest discrepancy in the closure of the two halves of the flask will cause an error in the occlusion.
The flask is transferred to a spring clamp. The spring clamp should be closed tightly, but the spring should not be fully compressed. This will allow the resin to expand upon processing and then finally to contract while still under pressure. After a wait of 30 to 60 minutes to allow the liquid to penetrate the powder thoroughly, the flask and clamp are placed in a curing unit.
The flasks are placed, under pressure, in a time-temperature controlled water bath to initiate polymerization of the resin.
The polymerization reaction is exothermic in nature and should be carefully controlled to avoid a marked increase in temperature, which may exceed the boiling point of unreacted monomer (100.8°C), leading to denture porosity. Gaseous porosity due to rapid heating and monomer evaporation appears as fine, uniform spherical pores, localized more often in the thicker portions of the denture.
Inadequate pressure during flask closure, an insufficient amount of dough present on packing of the mold, or improper mixing of powder/liquid components may also result in denture porosity. The resulting porosity will inevitably compromise the physical properties and denture esthetics and may promote the accumulation of denture deposits, which could adversely affect the health of the denture-supporting tissues.
In general, heat-activated acrylic resins are polymerized by placing the flasks in a constant-temperature water bath at 74°C (165°F) for 8 hours or longer with or without a 2- to 3-hour terminal boil at 100°C. A shorter cycle involves processing the resin at 74°C for approximately 2 hours then boiling at 100°C for 1 hour or longer.
Rapid-cure type resins. The resins are polymerized by rapidly heating the packed dough in boiling water for 20 minutes. The materials are hybrid acrylics, in which activation of the polymerization reaction is carried out through both chemical and without porosity.
It should be noted, however, that processing temperatures that are too tow or for shorter times increases the residual monomer content in the processed denture base. Excess residual monomer in the polymerized resin base could lead to tissue irritation, sensitivity, or even allergic геасtions in some patients. The plasticizing eftects of excess monomer could also adversely affect the properties and dimensional stability of the denture. Fortunately, allergies to residual monomer are relatively rare, and most patients are well аble to tolerate the 0.2% to 0.5% of residual monomer that often remains, even in a properly polymerized base.
After the polymerization procedure, the denture flasks are cooled slowly to room temperature to allow adequate release of internal stresses and thus minimize warpage of the bases. Deflasking than follows and should be done carefully to avoid fracture or flexing of the dentures.
The popularity and relative simplicity of the compression molding technique are usually over-shadowed by the high-processing stresses that are induced in the resins during polymerization. These stresses result from various factors. First, polymerization shrinkage, which occurs as polymer chains are formed, accounts for a volumetric shrinkage of about 7%.
Second, thermal shrinkage follows as the resin cools. In addition, differences in thermal contraction of the resin and gypsum mold collectively yield stresses in the resin. It is tempting to assume that the release of such cumulative stresses may give rise to dimensional changes and inaccuracies in the fit of the denture base. However, these changes have been found to be clinically insignificant in the fit of heat-activated acrylic resin denture bases, and in most instances they do not cause discomfort to the patient. Occlusal errors that are commonly encountered after processing are effectively corrected and the predetermined vertical dimension of occlusion restored through routine laboratory remount procedures.
Denture base resins are also subjected to a variety of stresses during function. Midline fractures of dentures during function have been considered a flexural fatigue failure because of cyclic deformation of the base during function. This is usually more evident in ill-fitting or poorly designed dentures. Impact fracture, on the other hand, may result from accidental dropping of the dentures by the patients. Denture fractures or distortions may be expected considering the far-from-ideal mechanical properties of conventional unmodifiedheat-activated resins, particularly their inferior tensile, flexural and impact strength as well as poor fatigue resistance.
Heat-activated PMMA is less frequently processed using an injection-molding technique. The resin mix is injected into a closed, sprued flask under continuous pressure. The resulting dentures usually demonstrate minimum polymerization shrinkage. Other plastics that are injection molded include polycarbonates, nylon, and polyvinyl acrylics. The latter plastics could be considered in patients with a confirmed allergy to the methacrylate monomer. However, high capital costs and sensitivity of the technique limit its application for denture fabrication.
Herner offered such curing cycle for heat cure material: The flask is immersed in cold water and is heated up to 60° C during 30 min. The flaks are held at such temperature 30 minutes. Water is brought gradually (not less than 30 min) to the boil and is boiled for 40-60 min. Total time approximately 3 hour.
No significant distortion takes place when the acrylic resin is processed at or below the manufacturer's recommended temperature. However, the level of monomer remaining in the cured acrylic resin clearly affects the degree of cytotoxicity of the denture base material. The flask is allowed to cool to room temperature.
Deflasking is completed, and the processed dentures are left on the casts.
Date: 2015-12-24; view: 1189
| <== previous page | | | next page ==> |
| B. The buccolingual relation of the teeth to the ridge. | | |