CATEGORIES:
BiologyChemistryConstructionCultureEcologyEconomyElectronicsFinanceGeographyHistoryInformaticsLawMathematicsMechanicsMedicineOtherPedagogyPhilosophyPhysicsPolicyPsychologySociologySportTourism
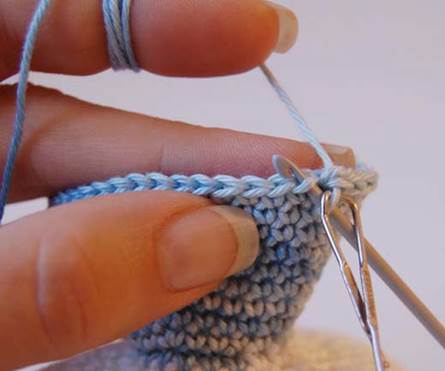
Next 11 sts (56) (Image 1) Rnd 2 finishedSpanky the Cat
Abbreviations ch(s) - chain(s) yo - yarn over sc - single crochet sl st - slip stitch sc2tog – single crochet decrease (work 2 sc together) st(s) - stitch(es) Rnd(s) - round(s) lp(s) - loop(s) Stitches and crochet techniques used Slip stitch - sl st Insert hook in next st, yo and draw through all loops. Single crochet - sc Insert hook in next st and draw up a loop (2 loops on hook), yo, draw through both loops on hook. Double crochet - dc Yo, insert hook in next st and draw up a loop (3 loops on hook), (yo, draw through 2 lps) twice. Invisible decrease - sc2tog Insert the hook in front loop of first st and in the front loop of the second stitch (3 loops on hook). Yarn over and draw up a loop through the first two front loops on hook, yarn over again and draw through remaining 2 loops on hook. Changing color Insert the hook in next stitch and draw up loop (2 loops on hook). Drop the first color, yo with new color and draw through 2 loops on hook. Continue with the new color. Magic adjustable ring Make a loop with your yarn leaving 3” long tail. Insert hook in center of loop made, yo and draw up loop. Yarn over, pull through to make your first chain. (Do not count this as your first sc) Continue to crochet over the loop and the yarn tail until you have the required number of scs for your first round. For example, if the pattern calls for 5 scs, then sc 5 times into the ring. (Insert hook into the center of the ring and draw up loop, yo and draw through both loops.) When counting stitches, don’t count the one on the hook. When you’re finished, pull the tail to close the ring. To make nice, invisible finish - thread tail onto tapestry needle. Insert needle under both loops of first st of the round. Insert needle between back and front loop of the last st of the last round and pull the yarn to secure. More instructions: http://www.pepika.com/free-patterns/amigurumi-course Materials - crochet hook (I used 2.5 mm) - less than half a skein of color A for head and body (I used white cotton, sport category) - small amount of color B for shirt (I used variegated blue cotton, sport category) - small amount of color C for feet (I used black cotton, sport category) - a pair of 8 mm black eyes - embroidery thread for facial features and sequin “buttons” - some sequins and little beads for “buttons” - polyfill to stuff - a little piece of white felt for eye patches (optional!) - a small piece of satin ribbon for a bow (optional!) - stitch marker, a long tapestry needle, scissors and sewing pins Finished size If done with 2.5 mm hook and appropriate yarn - 5.5” (14 cm) tall. Gauge In single crochet, using 2.5 mm hook - 11 stitches x 12 rows = 2” (5 cm) Instructions NOTE:Unless otherwise stated, all body parts are made by working in rounds without joining. Use a stitch marker to mark the end of each round so you know when you are starting another round. Move the marker up as your work progresses. Head Starting from top of head with Color A: Rnd 1:Ch 7, (sc, hdc, dc, hdc, sc) in 2nd ch from hook, 2 sc in next 4 chs, (sc, hdc, dc, hdc, sc) in next ch. Working back across foundation chain in free loops, 2 sc in each of 5 chs (28) Rnd 2:2 sc in next, 2 hdc in next, 2 dc in next, 2 hdc in next, 2 sc in next 10 sts, 2 hdc in next, 2 dc in next, 2 hdc in next, 2 sc in next 11 sts (56) (Image 1) Rnd 2 finished
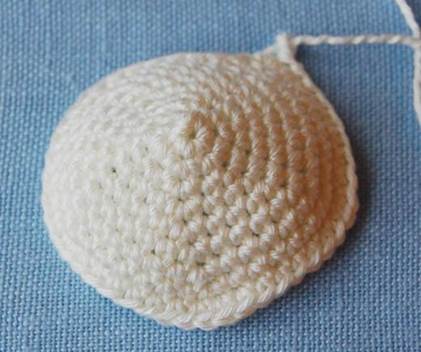
Rnd 3:(Sc in next 3 sts, 2 sc in next st) around (70) Rnd 4:(Sc in next 4 sts, 2 sc in next st) around (84) Rnd 5:(Sc in next 5 sts, 2 sc in next st) around (98) (Image 2) Image 2- The piece doesn’t lay flat on the surface; it’s all ruffled.
Rnds 6-7:Sc around (98) Rnd 8:Sc in next 5 sts, sc2tog (84) Rnd 9:Sc in next 3 sts, skip next 10 sts (to make an ear), sc in next 32 sts, skip next 10 sts (to make second ear), sc in next 29 sts (64 - not counting skipped sts) (Image 3) Image 3- Rnd 9 finished
Rnds 10-16:Sc around (64) Rnd 17:(Sc in next 14 sts, sc2tog) around (60) Rnd 18:(Sc in next 4 sts, sc2tog) around (50) Rnd 19:(Sc in next 3 sts, sc2tog) around (40) Rnd 20:(Sc in next 2 sts, sc2tog) around (30) If using safety eyes now is the time to insert them (instructions on Page 6). Rnd 21:(Sc in next st, sc2tog) around (20) Stuff head! (Image 4) Image 4- Stuffed head
If you’re afraid the stuffing might come out, sew ears together following the shape of the head and closing the opening! Rnds 22 & 23:Sc around (20) Change to Color B to make the shirt: Rnd 24:Sc around (20) (Image 5)
Rnd 25:(Sc in next 3 sts, 2 sc in next st) around (25) Rnd 26:Sc around (25) Rnd 27:(Sc in next 4 sts, 2 sc in next st) around (30) Rnd 28:Sc around (30) Rnd 29:(Sc in next 5 sts, 2 sc in next st) around (35) Rnd 30:Sc around (35) Rnd 31:(Sc in next 6 sts, 2 sc in next st) around (40) Rnd 32:Sc around (40) Rnd 33:(Sc in next 7 sts, 2 sc in next st) around (45) Rnd 34:Working in front loops only, sc around (45) (Image 6) - Working just in front loops
Rnd 35:(Sc in next 8 sts, 2 sc in next st) around (50) Rnd 36:Sc around (50) Rnd 37:(Sc in next 9 sts, 2 sc in next st) around (55) Fasten off! (Image 7)
Bottom part With magic adjustable ring and Color A (working from the bottom up): Rnd 1:5 sc into the center of ring (5) Rnd 2:2 sc in each st around (10) Rnd 3:(Sc in next st, 2 sc in next st) around (15) Rnd 4:(Sc in next 2 sts, 2 sc in next st) around (20) Rnd 5:(Sc in next 3 sts, 2 sc in next st) around (25) Rnd 6:(Sc in next 4 sts, 2 sc in next st) around (30) Rnd 7:(Sc in next 5 sts, 2 sc in next st) around (35) Rnd 8:(Sc in next 6 sts, 2 sc in next st) around (40) Rnd 9:(Sc in next 7 sts, 2 sc in next st) around (45) Fasten off leaving tail long enough to sew to the shirt (body)! (Image 8) - bottom part finished
Sew it to free (back) loops of Rnd 34 of the body! Sew 2/3, place stuffing and finish sewing. (Images 9 & 10)
Arms(make 2) With magic adjustable ring and Color A: Rnd 1:5 sc into the center of ring (5) Rnd 2:2 sc in each st around (10) Rnds 3-9:Sc around (10) Change to Color B Rnds 10-13:Sc around (10) Put stuffing into tips of arms leaving upper parts empty! Rnd 14:Sc2tog (5) Fasten off! With tapestry needle, weave tail through the front loops of remaining 5 stitches and pull tight to close. (Image 11)
Legs(make 2) With magic adjustable ring and Color A: Rnd 1:5 sc into the center of ring (5) Rnd 2:2 sc in each st around (10) Rnds 3-12:Sc around (10) Change to Color C to make shoes: Rnd 13:2 sc in next 5 sts, sc in next 5 sts (15) Rnd 14:Sc in next 2 sts, 2 dc in next 6 sts, sc in next 7 sts (21) Rnd 15 & 16:Sc around (21) Rnd 17:Sc in next 2 sts, (sc2tog) 6x, sc in next 7 sts (15) Stuff! Don’t put stuffing into upper parts of legs. The upper parts should be flat so the cat can sit without rolling over! Rnd 18:(Sc in next st, sc2tog) around (10) Put some more stuffing if needed! Rnd 19:Sc2tog (5) Fasten off! With tapestry needle, weave tail through the front loops of remaining 5 stitches and pull tight to close. (Image 12)
Tail With magic adjustable ring and Color A: Rnd 1:5 sc into the center of ring (5) Rnd 2:2 sc in each st around (10) Rnds 3-7:Sc around (10) Fasten off leaving tail long enough to sew to body! (Image 13)
TIP: If you prefer longer tail just sc around until desired length. You can also insert a pipe-cleaner into the tail to make it bendable. Date: 2015-12-24; view: 1151
|