CATEGORIES:
BiologyChemistryConstructionCultureEcologyEconomyElectronicsFinanceGeographyHistoryInformaticsLawMathematicsMechanicsMedicineOtherPedagogyPhilosophyPhysicsPolicyPsychologySociologySportTourism
Creating a Handle Force
In this section you create a handle force with a magnitude of 80N, representing a reasonable force to be applied by hand.
1) Select the Force (Single-Component)tool and do the following in the Force container on the Main Toolbox:
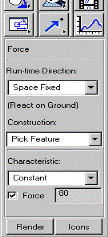
Ÿ Set the Run-time Direction to Space Fixed.
Ÿ Set the Characteristicto Constant.
Ÿ Select Force, and then set it to 80.
2) Select the following in the order listed:
Ÿ The handle
Ÿ A marker near the handle end point
Ÿ The location -18, 14, 0
Creating a Measure on the Spring Force
1) Right-click the spring, point to Spring: SPRING_1, and then select Measure. The Assembly Measure dialog box appears.
2) Set Characteristicto force.
3) Select OK. The spring measure strip chart appears.
4) Run a 0.2second, 50-step simulation.
A graph of the clamping force appears during the simulation, as shown next:
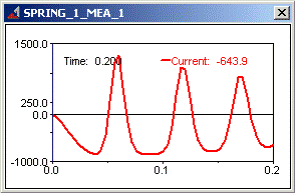
5) Select the Resettool to return to the initial model configuration.
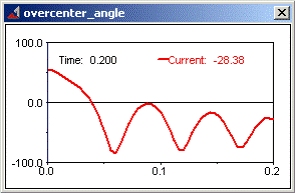
Creating an Angle Measure
1) From the Buildmenu, point to Measure, point to Angle,and then select New. The Angle Measure dialog box appears.
2) In the Measure Nametext box, enter the measure name as overcenter_angle.
3) Right-click the First Markertext box, point to Marker, and then select Pick.
4) Pick the markers to enter in your measure as shown in row 1 of Table 4.4 and illustrated in Figure 4.4.
Table 4.4 Overcenter_angle Measure Markers
| Angle points: | Marker location: | Coordinate values: |
| First Point | Any marker at POINT_8 | -1, 10, 0 |
| Middle Point | Any marker at POINT_3 (angle vertex) | 2, 8, 0 |
| Last Point | Any marker at POINT_9 | -6, 5, 0 |
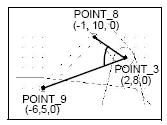
Figure 4.4 Graphical Representation of overcenter_angle
5) Repeat the above two steps for the Middle Markerand Last Marker.
6) Select OKto display your angle measure strip chart as shown next:
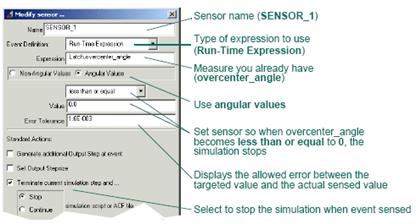
Creating a Sensor
You now create a sensor to detect when overcenter_angle goes below zero, meaning that the latch has toggled properly. When this condition is met, the sensor automatically stops the simulation.
1) From the Simulatemenu, point to Sensor,and then select New.
The Create Sensor dialog box appears.
2) Modify the Create Sensor dialog box as shown next, and then select OK:
Saving Your Model
Save your latch model to record your progress.
From the Filemenu, select Save Database As, and then save this file as test.
Date: 2015-12-18; view: 1027
| <== previous page | | | next page ==> |
| Performing an Interactive Simulation | | | Creating a Plot Using Physical Test Data |