CATEGORIES:
BiologyChemistryConstructionCultureEcologyEconomyElectronicsFinanceGeographyHistoryInformaticsLawMathematicsMechanicsMedicineOtherPedagogyPhilosophyPhysicsPolicyPsychologySociologySportTourism
CATCH-STITCHING ON A FLANNEL PATCHMaterials— No. 9 needle, fine silk to match the flannel, pins, and a piece of flannel five inches square; for the patch, a piece of flannel three inches and a half square. Catch-stitching on a patch— 1 Crease the garment, represented by the large piece of flannel, through, and across the centre (Fig. 74). 2. Mark the centre by inserting a pin; and one inch from the middle of each crease, insert a pin. 3. Crease a square, by a thread, on a line with the pins. 4. Cut the square out on the creasing, being careful in cutting the corners. 5. Crease through, and across the centre of the patch. 6. Place the garment on the desk, with the wrong side upwards. 7. Place the right side of the patch upon the garment, with the nap of the two pieces running the same way. 8. Match the creases, and put in pins. 9. With each edge of the patch even with a thread of the garment, baste one-fourth of an inch from the edge. 10. Holding the garment towards you, baste one-fourth of an inch from the edge of the hole. 11. Draw the needle through the garment from underneath, one-eighth of an inch from the raw edge. 14. Take out the basting threads, and press on the wrong side. Suggestions— In practical mending, judgment and consideration are necessary, and the material should be treated as common sense suggests; the object is to replace the torn or worn part with as little display as possible. A patch can be put on in various ways : as, hemming on the right side and overcasting the raw edges together on the wrong side; it can also be put on by stitching. A patch can be overhanded on the wrong side, so that the stitches may show less, but the corners are not easily turned. Catch-stitching should be used, when the material does not easily ravel, as on flannel. Thin, woolen materials can be hemmed. When a material is worn, it is better to hem the patch on, for, if it is overhanded, the strain comes on one thread at each side. Stripes, checks and figures should always match, as otherwise they attract attention. Care must be taken to have the warp and the woof of the patch run the same way as those of the garment, the straightest threads of the cloth generally represent the warp. The nap must also run in the same direction, which can be ascertained by passing the hand lightly over it. A patch can be either square or oblong, according to the shape of the damaged part, but should be large enough to cover the worn place. Fine thread or silk, matching the material, should be used; silk should be chosen a shade darker than the material, as it will work lighter. · What is a patch? What is its use? · In hemming on a patch, on which side of the garment should the patch be placed? · On which side, in overhanding on a patch? · How should the wrong side of an overhanded patch be finished? · What stitch is used in patching flannel? · Which side of the garment is the patch placed upon? · What is the object of patching? · What care should be taken concerning the warp and the woof? BIAS PIECING Bias piecing is the joining of two diagonal edges of cloth. Materials— No. 8 needle, No. 60 thread, pins, scissors, and a piece of calico five inches square, cut by a thread. Bias piecing— 1 Fold the square diagonally, from corner to corner. 2. Crease the fold, and cut on the crease. 3. From each piece of calico, cut two bias strips, each being one inch wide. 4. With 5. Place the right sides of the two middle pieces together, with the edges of the ends that are to meet even. 7. Holding the edges securely, insert the needle at a (Fig. 81) and sew across to b (Fig. 81), with a running and a backstitch. 8. Press open the seam, and cut off the corners that protrude. 9. Join the other two pieces in a similar manner, except that the upper edge must be moved to the right. Suggestions— To join the ends evenly, the seam must be begun at the vertex of one of the angles, formed at the side by the two pieces of cloth, and finished at the other. When many bias strips are required, they can be easily and accurately cut, by measuring for four widths, and then cutting into halves and quarters. · What is bias piecing? · Where should you begin so as to join the ends evenly? Where finish? PIPING Piping is a cord covered with material cut on the bias, and is used to strengthen and finish the edge of a garment. Materials— No. 8 needle, No. 60 thread, a small cord eleven and a half inches long, a bias strip of cotton cloth twelve inches long and one inch wide and a piece of cotton cloth eleven and a half inches long, four inches wide, hemmed at the ends and one side. Piping— 1. Place the cord on the wrong side of the bias strip, one-fourth of an inch from the lengthwise edge, and one-fourth of an inch from the end. 2. Fold the end of the bias strip, and then folding the edge over, baste close to the cord. 3. Holding the cord downwards, place the wrong side of the strip to the right side of the piece of cloth, with the raw edge of the fold even with the raw edge of the cloth. 4. Sew the piping to the edge, with a running and a backstitch, keeping close to the cord. 5. Turn to the wrong side, and hem the opposite edge down. · What is piping? · For what is it used? CORNERS MITRED To mitre a corner is to join two edges of cloth, so that they form a right angle. Date: 2015-12-17; view: 653
|
 12. Catch-stitch (see page 117) around the square, taking the inner stitches through the patch, close to the edge of the garment; and the outside stitches one-eighth of an inch from the edge, and through both thicknesses of cloth (Fig. 78).
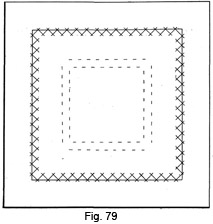 13. Turning the wrong side towards you, catch-stitch in the same manner, the edges of the patch to the garment (Fig. 79).
 the right sides upwards, place the strips on the desk in a line for joining, as in Fig. 80.
 6. Move the edge of the upper piece, one-fourth of an inch to the left (Fig. 81).