CATEGORIES:
BiologyChemistryConstructionCultureEcologyEconomyElectronicsFinanceGeographyHistoryInformaticsLawMathematicsMechanicsMedicineOtherPedagogyPhilosophyPhysicsPolicyPsychologySociologySportTourism
HONEY-COMBING OR SMOCKING
Honey-combing is drawing fullness. together for ornamental effect.
Materials— No. 8 needle, a piece of fine woolen cloth eleven inches long and three and a half inches wide, silk to match, and a red and a blue pencil.
Honey-combing—
 1. On the right side of the cloth, and beginning at one end, mark the entire length, as in Fig. 34, placing red dots in the place of diamonds, and blue clots in the place of circles.
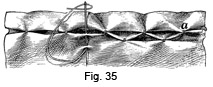 2. Drawing the needle through from underneath at a (Fig. 34), take up a few threads of the cloth at b (Fig. 34), and fasten a and btogether with two or three over and over stitches (Fig. 35, a).
3. Passing the needle underneath, bring it out at the next red dot (Fig. 34,c), and fasten c and d together.
4. Continue to the end of the row, fastening together the red dots which are connected in Fig. 34.
5. Beginning the second row at the right, fasten together, in a similar manner, the blue dots (circles, Fig. 34)
 6. Work the third row as the first, and the fourth row as the second, and so continue (Fig. 36).
Suggestions— In honey-combing, exactness is required in marking the spaces. Instead of colored pencils, the dots may be marked with thread or chalk. To keep the honey-combing in position, the outer edges should be fastened to a lining, after it is finished.
· What is honey-combing?
· Where is exactness required in honey-combing?
· How is honey-combing kept in position when finished?
BINDINGS
A binding or band is used to strengthen and cover the raw edges of a seam.
Binding No. 1 — Sewed by stitching and hemming.
Materials— No. 8 needle, No. 50 thread, pins, scissors, and a piece of cotton cloth half-a-yard long and seven inches wide, notched in the middle, gathered and stroked (page 36), for the binding, a piece of cloth eight inches long and three inches wide.
Preparations—
 1. Find the middle of the band, and mark the place by cutting a notch (Fig. 37) at the edge of each side, or by taking a cross-stitch (Fig. 37) with colored cotton.
2. Cut off each corner of the band one-fourth of an inch deep (Fig. 37), to avoid having many thicknesses of cloth, when the corners are turned.
3. Loosen the gathering thread.
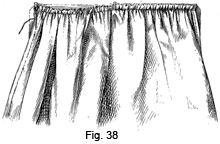
4. Holding the wrong side of the gathered piece towards you, place the middle of the band at the notch in the middle of the gathers, and put in a pin vertically, to hold them together (Fig. 38).
5. Pin the ends of the gathers one-fourth of an inch from each end of the band.
6. Tighten or loosen the gathering thread, so that the length of the gathered edge exactly matches that of the band.
7. Fasten the gathering thread by winding it around the pin.
8. With the point of the needle adjust the gathers, so that the fullness. is evenly distributed along the band.
9. Holding the gathers towards you, baste, with small stitches, a little above the gathering thread.
Stitching—
 1. Stitch the gathers to the band, exactly over the gathering thread, taking up only one gather at a time (Fig. 38).
2. Take out the pins, as you come to them.
3. If, when sewing, the gathering thread should be too short, loosen it by unwinding it from the pin.
4. When the band is stitched on, fasten the thread securely, cut off the gathering thread and take out the basting thread.
Hemming—
1. Turn up the band, and crease the opposite edge and the two ends, one-fourth of an inch deep.
2. Cut off the corners of the gathers above the stitching.
3. Fold the band over to the line of stitching.
4. Pin the middle of the folded edge to the middle of the line of stitching.
5. Pin the ends, being careful to have the corners exactly together.
6. Baste the band down, keeping the edge of the fold directly over the stitching.
7. Overhand each end, beginning at the gathers.
8. Hem the band down, taking a stitch in each gather, a little below the stitching. Do not allow the stitches to show on the right side.
Suggestions— A binding should be cut lengthwise of the cloth, when strength is required, or where much wear is coming, as on underclothing. A narrow binding for finishing a garment should be cut on the bias. The binding and gathering should be equally divided by notches, so that there may be no more fullness. in one part than in another. If there are but few gathers, half-backstitching can be used instead of stitching. Great care should be taken to have the ends of the band neat; some prefer to turn the ends of the band under before stitching, others stitch the ends of the band together, before putting it on to the gathers.
Binding No. 2 — Sewed by setting-in the gathers.
Materials— Same as for Binding No. 1.
Preparations—
1. Mark the middle of the band by a cross-stitch, and cut off the corners, as in Fig. 37.
2. Crease the four edges of the band.
3. Baste and overhand the ends, beginning at the corners.
4. Loosen the gathering thread.
5. Hold the right side of the gathers towards you.
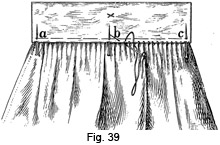 6. Pin the middle of one edge of the band to the middle of the gathers, and exactly over the gathering thread (Fig. 39, b).
7. Pin the ends of the gathers, inside the ends of the band (Fig. 39, a and c).
8. Draw up or loosen the gathering thread, so that it is the same length as the band, and fasten around the pin.
9. Arrange the gathers with the needle.
10. Baste the band on, so that the gathering thread is covered.
Setting-in of gathers—
1. Begin as for hemming, but make the stitch vertical on the side towards you.
2. Take up, close below the gathering thread, one gather and then a thread or two of the band (Fig. 39).
3. Take the next stitch by inserting the needle into the next gather (which should be directly under the place where the thread comes out of the band) and at the same time take up a thread of the band.
4. Take a stitch in each gather.
5. When this side is finished, fasten securely, and cut off the gathering thread.
6. Baste and sew the under part of the band in the same manner, taking care that the edge of the band corresponds exactly with the edge on the opposite side, in order that the band may not be twisted.
7 Do not let these stitches show on the right side.
Suggestions— The shape of the stitch is like the letter N, as in overhanding, but the slant here is underneath, while in overhanding it is on the top. A binding is more easily sewed on in this manner, if there is a double row of gathering. To strengthen a binding, where a button is to be placed, turn in one inch at the end of the band before folding it, and baste pieces of cloth on the under side where other buttons are to be placed; at the button-hole end, turn in half-an-inch. Cut a button-hole in a binding nearer the gathers than the folded edge, so that the garment will be held in place firmly.
 Binding No. 3—Sewed by overhanding.
Materials— Same as for Binding No. 1, with the larger piece of cloth gathered for overhanding to a binding (page 41).
Preparations—
1. Mark the middle of the band by a cross-stitch, and cut off the corners, as in Fig. 37.
2. Crease the four edges of the band.
3. Double each end, and beginning at the corners, overhand both ends.
4. Baste the lengthwise edges together.
5. Pin the middle of the band at the middle of the right side of the gathers.
6. Pin the ends of the gathers and band together.
7. Draw up or loosen the gathering thread, until it is of the same length as the band, and fasten around the pin.
8. Arrange the gathers with the needle, and put in pins vertically every two inches.
Overhanding—
1. Holding the band towards you, overhand the gathers to the band placing a stitch in each gather.
2. Take out the pins, as you come to them.
3. Fasten the gathering thread.
· For what is a binding used?
· In what three ways can a binding be sewed on?
· How can the middle of the band be marked?
· What should be done to the corners of the band? Why?
· Where should the gathered piece and band be pinned together?
· What should be done to the gathering thread? How is it fastened?
· How should the gathers be adjusted? How basted?
· Where and how should the gathers be stitched?
· How is the band prepared for hemming?
· Where should the band be pinned?
· How is the band basted?
· What should be done at each end?
· Where should the hemming stitches be taken?
· When is a binding cut lengthwise?
· What should be done to the ends of a band before setting in the gathers?
· How should the band be basted to the gathers?
· What letter should the stitch resemble?
· How can a band be strengthened, where buttons are to be placed?
Date: 2015-12-17; view: 933
| <== previous page | | | next page ==> |
| DOUBLE GATHERING OR GAUGING | | | BUTTON-HOLE STITCH FOR BEGINNERS |