This section gives basic information on how to begin operating your Dirt Bike. It includes how to start and stop your engine, how to use throttle and brakes, and what to do when you are through riding.
When you ride off-road, you need to operate the throttle, brakes and other controls without stopping to look at them. Read this section carefully before you ride. It describes the location, function and operation of all the basic controls on your motorcycle.
Operating Main Parts
Fuel Operation Fuel tank
Remove cap
The fuel tank will hold approximately3 liters.
Add fuel until the level reaches the bottom of the filler neck. Avoid overfilling the tank. After refusing, turn the fuel fill cap clockwise until it is secure. Check that the breather tube is properly seated on the fill cap.
Note!
93#OCTANE OR OVER HIGH QUALITY UNLEADED GASOLINE ONLY!
Fuel Value Operation
Fuel value: Located under fuel tank
Open fuel tank value
ON=open
Turning the fuel value ON before attempting to start the engine allows fuel to follow from the fuel tank to the carburetor.
OFF=closed
Turning the fuel tank value OFF after stopping the engine prevents the flow of fuel from the fuel tank to the carburetor.
Kick the starting lever with the foot and then bring it back to its home position.
Always close the fuel tank value when the engine is off.
Choke Lever Operation
A: Full on
B: Detent position
C: Full off
The choke lever is used for starting the engine. The choke increases the percentage of fuel in the fuel/air mixture delivered to the engine.
ON:
Used to start a cold engine with air temperature below 35C (95F).
DETENT:
Used to warm a cold engine immediately after starting with air temperature below 35C (95
OFF:
Used for normal operating, for restarting a warm engine, or starting a cold engine with air temperature above 35C (95F)
NOTEЈєWhen the engine is cold, push the lever to position A, wait a few seconds then push back to position C.
Key Switch On the left side of frame or in the middle of handlebar. Used to avoid the improper use of the motorcycle.
Before riding, insert the key and turn it to the Ў°onЎ± position.
Key switch
Key Position
Function
Key Removal
OFF
The engine cannot be operated.
can be removed
ON
With the engine stop switch at RUN and the transmission in neutral, the engine can be started.
cannot be removed
Engine Stop Switch
Turn to RUN to start the engine, turn to OFF to stop the engine in normal riding situations.
Front Brake Handle
On the right side of the handlebar, used to slow down or stop your motorcycle.
Rear Brake Pedal
On the right side of engine, depress the pedal with right foot to slow down or stop your motorcycle.
Clutch Handle
On the left side of the handlebar, used to shift gear of the engine. After shifting gear, pull back on the throttle grip towards you and released the clutch handle slowly.
Gear Lever
On the left side of engine, used to change the speed of the motorcycle.
D: Depress R: Raise N: idle
Throttle
Controls the engineЎЇs RPM (speed). To increase engine RPM, rotate the grip toward you .To reduce engine RPM, rotate the grip away from you. The throttle grip will automatically return the closed position (engine idle) when you remove your hand.
Kick-Starter /Kick- Electrical Starter
Swing the kick starter out from its stored position and depress it through its entire stroke to start the engine.
kick ЁC starter
As kick-electrical engine, the engine stop switch and Ignition Switch must be in the RUN and ON position before starting.
Chain guard
Used to protect the chain while is running. After riding ,used to against dust .
Covered on the muffler piped.
Used to keep off hot when the moto is running or after long time riding ! keep your security!
Side Stand
Used to support your motorcycle while is parking. Before riding, please raise the side stand.
Breaking in Run in the vehicle over about 500km.During this period, we recommend to:
Avoid travel at high speedsЎЈ
Change speed often so that the part will break in uniformly in a short time.
Avoid turning the throttle more than 3/4.
Warning!
Change the crankcase oil after 500km.
Always use a mixture of green grade oil and a qualitatively oil.
After the first off-road use, check all of the nuts and bolts.
High Air Temperature (95F or above)
1. Do not use the choke.
2. Start the engine under Normal Air Temperature.
3. Pull back on the throttle towards you and slow released the clutch lever.
4. When you attain a moderate speed, close the throttle, pull back on the clutch lever and pull up on the gear lever.
5. To continue shifting up to each higher gear, close the throttle, then repeat step 2.
6. When speed is slow, to shift down to a lower gear, close the throttle, pull back on the clutch lever and depress on the shift lever.
7. If stopping, shift gear is idle.
Warning!
Remember to close the throttle before shifting.
To prevent transmission damage, do not coast and toe the motorcycle for long distances with the engine off.
Stop Engine
Shift into neutral, push the engine stop switch to the OFF position and turn off the key.
Warning!
After parking the motorcycle, remove the key.
Maintenance Objects
Fuel
This engine is designed to use any petrol that has a pump octane number 92 0r higher.
Warning!
Never use stale or contaminated gasoline or an oil/gasoline mixture.
Avoid getting dirt, dust or water into the fuel tank.
Engine Oil
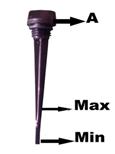
Inspecting Oil
1. Start the engine and run it for about three minutes.
2. Turn off the engine and wait for about a minutes.
3. Remove inspection cap A from the oil filter.
4. Using a clean tag, remove all traces of oil from the dipstick.
5. While keeping the motorcycle in an upright position, reinsert the dipstick and push it down to the filler thread without screwing the cap on.
6. Pull out the dipstick again or see window of green oil and check that the oil lever is between the MAX and MIN mark, pour in fresh oil through the filler hole until the level reaches the MAX mark.
NOTE!
Never drive if the oil level is below the MIN mark on the oil dipstick. When topping up with engine oil, be sure to never beyond the MAX level.
Oil Change
Always renew the oil while the engine is hot, taking care of the engine and the oil.
1. Put the motorcycle on its stand
2. Place a container under the engine, underneath oil drain hole B.
3. Unscrew filler plug A and drain plug C.
4. Empty the crankcase completely.
5. Refit drain plug
6. Pour in the right quantity of green oil through the filler hole.
NOTE!
Renew the engine oil after the first 500km
Spark Plug
The spark plug wrench and its handle are stored the tool bag delivered with your motorcycle.
You will need to provide your own tolls to perform any owner maintenance other than removing the spark plug.
When replacing the spark plug, screw it in by hand until it stops, then tighten with a wrench.
NOTE!
Improperly tighten spark plug can damage. Too loose, can burn the piston; Too tight, can damage the thread.
Spark Plug
To perform the check, simply slide of the electrical connection tube and unscrew the spark plug.
Examine the distance between the electrodes with a feeler.
Periodically, the spark may need to be either removed and cleaned or replaced due to build-up or an improper spark plug gap.
Remove the cap and plug from the engine block to see if there is any oil built-up or residue on the end.
Clean with a stiff brush and re-inspect.
A spark plug gap measuring tool is need for the proper gap. MGF. Suggests gap should be0.6-0.7mm. If the dirt bike still runs poorly, replace the plug with a new type spark plug.
Note!
Check it whether there has cracks in the insulation or corroded electrodes. If not, replace immediately.
Brake Pump Oil
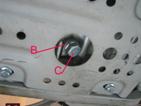
Front Brake
Front hydraulic brake
Undo the two screws A, remove cap B and check if fluid is present inside reservoir C. If necessary, top up with fresh fluid.
Rear Brake
The level of the fluid should never fall below sight half. To restore the level, undo the two screws, lift cap and top up with fresh fluid.
Brake Pads
To check the wear of front and rear brake pads , simply inspect the brake calipers.
The thickness of the lining on the ends of the four pads should never be less than 2mm.
If the lining be thinner, replace the brake pads immediately.
Operating Procedure
Always follow the proper staring procedure described below.
Preparation
Before starting, insert the key and turn the ignition switch to the Ў°ONЎ± position .Check if gear lever is on the idle position.
Make sure that the transmission is in the neutral position and the engine stop switch is in the RUN position. Turn the fuel valve ON.
Starting Procedure
To restart a warm engine, follow the procedure for High Air Temperature. Normal Air Temperature is 50-95F.
1. Push the choke lever up to fully on.
2. With the throttle slightly open, the transmission in the Neutral position.
3. After the engine starts, release the brake lever, push the choke lever down to the detent position .
4. About a half-minute later, push the choke lever down to fully OFF.
5. If idle is unstable, open the throttle slightly.
Braking procedure
Apply the front brake lever and rear brake pedal smoothly, while down shifting to match your speed. For maximum braking, close the throttle and firmly apply the brake lever and pedal controls.
Applying the brake too hard may cause the wheels to lock and slide, reducing control of your motorcycle. If this happens, release the brake controls, steer straight ahead until you regain control, then repeat the brakes more gently.
WarningЈЎ
When riding in wet or raining conditions, or on loose surfaces, the ability to maneuver and stop will be reduced. Avoid braking or closing the throttle quickly while riding.
Parking Procedure
Choose a lever place to park. Lower the side-stand to support your motorcycle. Turn the ignition switch OFF and remove the key.
Warning!
Keep away from wet place, high temperature and corrosive gas to avoid disorder and appearing the chemical corrosion on the surface of metal parts.
Maintenance And Adjustment
Maintenance Procedure
Read the instructions before you begin, and make sure you have the tools and skills required.
!WARNING(
Failure to property follow maintenance instructions and precautions can cause you to be seriously hurt of killed.
Always follow the procedures and precautions in this ownerЎЇs manual.
To help prevent motorcycle from falling over, park it on a firm, lever surface, using the side stand or a maintenance stand to provide support
Inspection Ј¦Maintenance Schedule
In order to avoid problems connected to the operation of the vehicle, it is advisable to perform number of checks and maintenance operations before and after use. Just a few minutes given to these procedures will save your time and money, and will make riding much safer. Proceed as follows:
On cold day, run the engine at idle speed for a few minutes before starting off.
Wash the motorcycle carefully after use.
Interval Part
Break-in-1 Month
Every 3 Months
Every 6 Month
Air Filter
C
Brakes and Houses
Inspect before every ride
Brake Fluid
Replace every 2 years
Chassis NutЈ¦Bolts
T
T
T
Drive Chain
I
I
I
Engine Oil
I
R
-
Exhaust System
T
T
T
Spark Plug
I
I
R
Suspension
I
I
I
Tires/Rims
Inspect before every ride
I- Inspect and clean/adjust if necessary C-Clean T-Tighten R-Replace
I- C T- R-
Maintenance Record
Correct maintenance will help you to ensure the dirt bike is natural. Please use the sheet to record anything you want to remind. If you find any problem while servicing you motorcycle, to check it as soon as possible before riding.
)
Miles(km)
Date
Performed By
Note
600(1,000)
1,200(2,000)
1,800(3,000)
2,400(4,000)
3,000(5,000)
3,600(6,000)
4,200(7,000)
4,800(8,000)
5,400(9,000)
6,000(10,000)
Important Safety Precautions
Make sure the engine is off before you begin any maintenance.
This will help eliminate several potential danger:
Do not touch the engine when is working, it may hurt you.
Avoid to touch the engine after working immediately.
Poison gas of Carbon monoxide comes from engineЎЇs exhaust. Be sure there is adequate ventilation whenever you operate the engine.
To reduce the possibility of a fire or explosion, be careful when working around gasoline. Keep cigarettes, sparks, and flames away from fuel-related parts.
Note!
If replacing pads, we suggest to contact with your dealer to replace the pads
Air Filter
Clean the air filter every time, after the vehicle is used cross-country .Air filter is under the saddle, consisting of plastics-case, filter element and cover. To clean it, undo the saddle and cover of plastic-case , the take out the sponge and wash it.
Note!
If filter element is very dirty, wash it in shampoo ,then make sure place dry sponge in the plastics-case.
Inspections after Cleaning
After cleaning the motorcycle, it is good practice to :
rear fork
Lubricate the articulated joints A on the rear suspension.
Clean carefully and dry the chain gear-pinion assembly and then apply grease thoroughly in to keep the parts in good condition as long as possible.
The rear shock absorber is equipped with adjusters which allow the vehicle geometry to be adapted to different conditions.
Adjuster B, located near the lower shock absorber mount,to adjust the hydraulic damping during the compression phase.
Turning knobs B clockwise increases the damping action; conversely, turning them anticlockwise decreases it
Note!
In the event of any malfunction, contact our authorized customer service network.
Adjustment Procedure
Adjusting parts is very important for the safety, and is very necessary for maintenance. Poor adjustment can cause premature wear or damage to dive some parts
Adjusting Throttle
1Ј®Throttle grip 2.throttle cable
Check free-play(1).
If necessary, adjust to the specified range.
Free-play:1/16ЎЄ3/1in (2.0ЎЄ4.0 mm)
Check:
1Ўў Check the throttle, assembly is positioned properly and the securing bolts are tight.
2Ўў Check for smooth rotation of the throttle (1) from fully open to fully closed in all steering positions. If there is problem, see your Dirt Bike dealerЎЈ
3Ўў Inspect the condition of the throttle cable (2) from the throttle grip down to the carburetor. If the cable is kinked or chafed, have it replaced .
4Ўў Check the cable for tension or stress in all steering positions.
5Ўў Lubricate the cable to prevent premature rust and corrosion.
Adjusting clutch
Clutch handle right side of engine
Adjustment:
1Ўў Loosen the adjuster lock nut(1)
2Ўў Turn the clutch adjuster (2) clockwise one turn; do not turn excessively.
3Ўў Slowly turn the adjuster counterclockwise until a slight resistance is felt 3
4Ўў From this position, turn the adjuster clockwise1/8to1/4turn, and tighten the lock nut.
5Ўў After adjustment, test ride the motorcycle to be certain the clutch operates properly.
6Ўў Generally, the only operation is performed on the clutch that is adjustment of the position of lever
To perform the adjustment, lift rubber dust cover D and turn adjuster C. The lever must have 5mm of side stroke.
Adjustment Front Fork
The forks are adjustable in both spring preload and rebound (return).
Adjuster 1 alters the spring preload.
Adjuster 2 alters the hydraulic rebound damping.
Adjusting Chain
rear Jack
Inspect the chain for:
1ЎўDamaged rollers
2ЎўLoose pins
3ЎўDry or rusted links
4ЎўKinked or bound links
5ЎўExcessive wear
Replace the drive chain if it has damaged rollers, loose pins, or kinks that cannot work. Always keep it lubricated and clean
Check the front and rear sprocket for excessive wear or damage .If necessary, have your dealer replace a worn sprocket.
If play s 20mm tighten the chain as follows;
1ЎўLoosen nut A on both sides.
2ЎўAct on screw B to retighten the chain.
3ЎўMove the same screw on the opposite side to the position of the previous one.
4ЎўCheck the wheel alignment
5ЎўRetighten nut A as the same way.
Adjusting Idling Speed
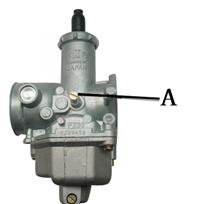
Carburetor
In order to perform this operation correctly, connecting an electric revolution counter to the spark plug wire when the engine is hot. Then used a screw driver on register screw A to calibrate the minimum.
Adjusting Brake
Front brake rear brak
Front Brake and Rear Brake
The front/rear brake is disk type with hydraulic control, and the front requires no adjustment, the rear may adjust pedal height by means of registers
What to Do In An Emergency
Trouble Shooting
Problem
Possible Cause
Solution
1 the Eng. Ignition Switch is in the Ў°OFFЎ± position
1. press the switch to the Ў°RUNЎ± position
2.Fuel valve is in the Ў°OFFЎ± position
2.Rotate the valve to the Ў°ONЎ± position
3.No gasoline/oil, deteriorated gasoline or fuel system is blocke
3.Fill tank with fresh 90# or high octane gasoline
Empty oil gasoline/refill or clean the system
4.Flooded plug/poor gap or Engine is flooded
4.Remove plug and clean. Replace if necessary .
With gas completely open, continue trying to start engine for a few moments. If engine still does not start, remove the spark plug and dry it off.
5.Loosen spark plug cap or no current arriving at spark plug 5.Loosen
5. Clean or replace spark plug, If the problem persists, consult one of our Authorized Dealers.
6.CDImodule is loose or faulty
6. Reseat module in connector or replace
7.Manual clutch lever is being engaged or is in gear
7.DO NOT engage manual clutch lever and ensure motorcycle is in neutral.ЎЈ
8.Air filter is very dirt
8. Proceed as indicated on air filter maintenance
Bike does not accelerate or runs poorly
1.Choke is in Ў°ONЎ± position
1.Place in Ў°OFFЎ± position before riding
2.Not in gear
2. Engage into 1st gear by pressing down on the gear lever
3.Throttle is not attached or in need repair
3.Inspect throttle cable and attach or replace throttle
The Warranty certificate and a copy of the original retail sales receipt MUST be returned to tradesman within ten days to active the warranty for your product .Warranty claims CANNOT be fulfilled until this information is on file .Please read below the terms:
(1).Reserving this certificate and original retail sales receipt, and repairing the motorcycle with them.
(2).If owner changed the parts to result in damaging them, we will not answer for everything.
(3).If being modified or not clear, this warranty certificate is inefficacious.
Warranty Certificate
Product Model:Date Of Purchase:
Frame No:
Engine NO:
Owners Name :
Address : State/Province:
Country Јє Zip Code:
Phone : Fax: Email:
DealerЎЇs Name:
Address : State/Province:
CountryЈє Zip Code
Phone : Fax: Email:
Signature or Seal of Service Mgr: Signature or Seal of Date:
Registration List of Changing Parts
Please service manager write down
Date
Type of service
Name of changing parts
Quantity &specification
Fee
Signature of the Officer
Owner Signature
NOTICESЈЎ
PLEASE FOLLOW ALL LOCAL LAWS TO RIDE VIHICLE.
PLEASE READ OWNERЎЇS MANUAL.
TO MAKE SURE YOU FULL UNDERSTAND HOW TO OPERATE THIS MOTORYCLE.
PLEASE KNOW ALL SATETYЈWARNING AND CAUTION MESSAGES ABOUT DIRT BIKE.
 the filler neck. Avoid overfilling the tank. After refusing, turn the fuel fill cap clockwise until it is secure. Check that the breather tube is properly seated on the fill cap.
 Key switch
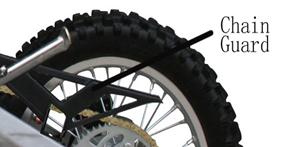
 Inspecting Oil
1. Start the engine and run it for about three minutes.
2. Turn off the engine and wait for about a minutes.
3. Remove inspection cap A from the oil filter.
4. Using a clean tag, remove all traces of oil from the dipstick.
5. While keeping the motorcycle in an upright position, reinsert the dipstick and push it down to the filler thread without screwing the cap on.
6. Pull out the dipstick again or see window of green oil and check that the oil lever is between the MAX and MIN mark, pour in fresh oil through the filler hole until the level reaches the MAX mark.
NOTE!
Never drive if the oil level is below the MIN mark on the oil dipstick. When topping up with engine oil, be sure to never beyond the MAX level.
Oil Change
Always renew the oil while the engine is hot, taking care of the engine and the oil.
1. Put the motorcycle on its stand
2. Place a container under the engine, underneath oil drain hole B.
3. Unscrew filler plug A and drain plug C.
4. Empty the crankcase completely.
5. Refit drain plug
6. Pour in the right quantity of green oil through the filler hole.
NOTE!
Renew the engine oil after the first 500km
Spark Plug
Inspecting Oil
1. Start the engine and run it for about three minutes.
2. Turn off the engine and wait for about a minutes.
3. Remove inspection cap A from the oil filter.
4. Using a clean tag, remove all traces of oil from the dipstick.
5. While keeping the motorcycle in an upright position, reinsert the dipstick and push it down to the filler thread without screwing the cap on.
6. Pull out the dipstick again or see window of green oil and check that the oil lever is between the MAX and MIN mark, pour in fresh oil through the filler hole until the level reaches the MAX mark.
NOTE!
Never drive if the oil level is below the MIN mark on the oil dipstick. When topping up with engine oil, be sure to never beyond the MAX level.
Oil Change
Always renew the oil while the engine is hot, taking care of the engine and the oil.
1. Put the motorcycle on its stand
2. Place a container under the engine, underneath oil drain hole B.
3. Unscrew filler plug A and drain plug C.
4. Empty the crankcase completely.
5. Refit drain plug
6. Pour in the right quantity of green oil through the filler hole.
NOTE!
Renew the engine oil after the first 500km
Spark Plug
 The spark plug wrench and its handle are stored the tool bag delivered with your motorcycle.
You will need to provide your own tolls to perform any owner maintenance other than removing the spark plug.
When replacing the spark plug, screw it in by hand until it stops, then tighten with a wrench.
NOTE!
Improperly tighten spark plug can damage. Too loose, can burn the piston; Too tight, can damage the thread.
Spark Plug
To perform the check, simply slide of the electrical connection tube and unscrew the spark plug.
Examine the distance between the electrodes with a feeler.
Periodically, the spark may need to be either removed and cleaned or replaced due to build-up or an improper spark plug gap.
Remove the cap and plug from the engine block to see if there is any oil built-up or residue on the end.
Clean with a stiff brush and re-inspect.
A spark plug gap measuring tool is need for the proper gap. MGF. Suggests gap should be0.6-0.7mm. If the dirt bike still runs poorly, replace the plug with a new type spark plug.
Note!
Check it whether there has cracks in the insulation or corroded electrodes. If not, replace immediately.
Brake Pump Oil
Front Brake
The spark plug wrench and its handle are stored the tool bag delivered with your motorcycle.
You will need to provide your own tolls to perform any owner maintenance other than removing the spark plug.
When replacing the spark plug, screw it in by hand until it stops, then tighten with a wrench.
NOTE!
Improperly tighten spark plug can damage. Too loose, can burn the piston; Too tight, can damage the thread.
Spark Plug
To perform the check, simply slide of the electrical connection tube and unscrew the spark plug.
Examine the distance between the electrodes with a feeler.
Periodically, the spark may need to be either removed and cleaned or replaced due to build-up or an improper spark plug gap.
Remove the cap and plug from the engine block to see if there is any oil built-up or residue on the end.
Clean with a stiff brush and re-inspect.
A spark plug gap measuring tool is need for the proper gap. MGF. Suggests gap should be0.6-0.7mm. If the dirt bike still runs poorly, replace the plug with a new type spark plug.
Note!
Check it whether there has cracks in the insulation or corroded electrodes. If not, replace immediately.
Brake Pump Oil
Front Brake
 Front hydraulic brake
Undo the two screws A, remove cap B and check if fluid is present inside reservoir C. If necessary, top up with fresh fluid.
Rear Brake
Front hydraulic brake
Undo the two screws A, remove cap B and check if fluid is present inside reservoir C. If necessary, top up with fresh fluid.
Rear Brake
 The level of the fluid should never fall below sight half. To restore the level, undo the two screws, lift cap and top up with fresh fluid.
Brake Pads
To check the wear of front and rear brake pads , simply inspect the brake calipers.
The thickness of the lining on the ends of the four pads should never be less than 2mm.
If the lining be thinner, replace the brake pads immediately.
The level of the fluid should never fall below sight half. To restore the level, undo the two screws, lift cap and top up with fresh fluid.
Brake Pads
To check the wear of front and rear brake pads , simply inspect the brake calipers.
The thickness of the lining on the ends of the four pads should never be less than 2mm.
If the lining be thinner, replace the brake pads immediately.


 rear fork
 2.throttle cable
 Clutch handle
 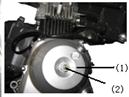 right side of engine
 rear Jack
 Carburetor
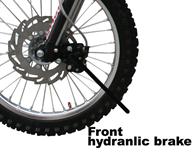 Front brake
  rear brak